In Memoriam: Tai'lahr
OpenUru.org, along with the rest of the Mystonline community, is mourning the loss of Tai'lahr on October 16th, 2019.
Rest in Peace, friend.
Basic Light and Avatar Shadows
When lighting up your Age in 3DS Max, it's important to remember that you'll be using 2 different kind of lights:
Max Standard and Plasma Run Time lights.
The "Max Standard" lights are used to light up the scene basically and all "static" objects. "Static" meaning they are not the avatars or things that move like kickable or animated objects.
The Plasma Run Time lights are basically used to light up the avatars and kickables. Here is some notes on that from Cyan:
http://assets.openuru.org/wiki/andy/MaxTutPics1/maxshad13.jpg
So what Cyan said in that last paragraph is important: use Standard lighting to light up most of your Age, and save the Plasma Run Time lights only where you need it.
In this tutorial, I'll be showing you how to put in a basic omni light, and a single Plasma Run Time light so our Avatar casts a shadow.
It's important that you already have your 3DS Max with the plugins set up, and have already started an Age. If you have not done this, please go back to my other tutorials and do so.
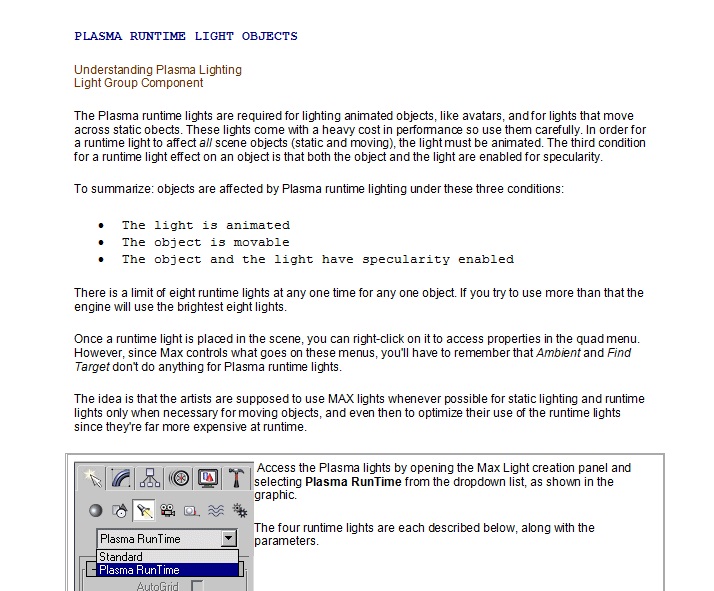
HEY! IT'S DARK IN HERE!
I've got my little test Age here, and we need to add some lights so we can see things when we export it. If you don't, it will be all dark (and when you use Drizzle to convert your Age for Uru:CC or stand alone, it will tell you that there are no lights!).
Go over to your tool panel. Click on the "Create" tab (green arrow). Then click on the "Lights" button (red arrow), and make sure the drop down box says "Standard" (purple arrow). "Standard" is the 3DS Max lighting.
You can also now select what type of light. In my case, I selected "Omni" by clicking on that button.
http://assets.openuru.org/wiki/andy/MaxTutPics1/maxshad1.jpg
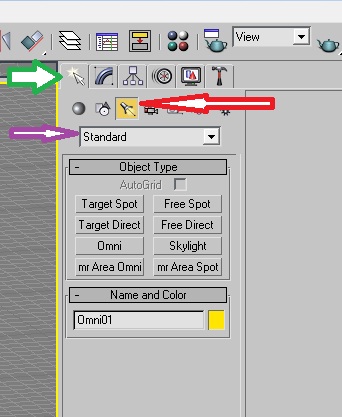
Click in your window where you want to create the light. It will appear as a 3D diamond.
http://assets.openuru.org/wiki/andy/MaxTutPics1/maxshad3.jpg
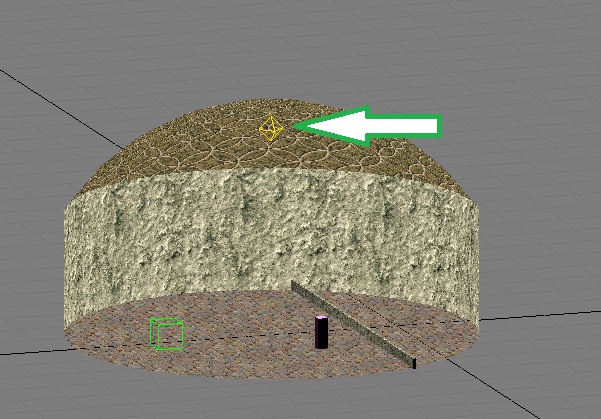
Move the light to where you want it. In this case, I've moved it up and high:
http://assets.openuru.org/wiki/andy/MaxTutPics1/maxshad4.jpg
Now go back and look at those last 2 pics again. Notice how bright my little room looks with the light inside it.....and how it darkens up as I move the light away.......nice to see the affect of the light, huh?
Rename the light to something easy and useful to you. I've left mine the default name, Omni01. Notice the yellow square in my pic next to the name? That color is NOT the color of the light that will be cast....it's the color that Max gives the light in your graphics screens so you can see it. The color of the light, is here:
http://assets.openuru.org/wiki/andy/MaxTutPics1/maxshad5.jpg
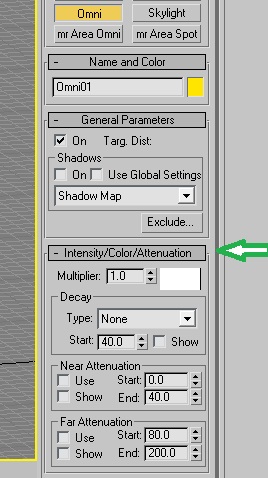
In the pic above, look at where my green arrow is. Here is where you control how bright the light is (Multiplier) and that little white box next to that is the color of the light. Mine is white. If you double click on it, you can change the color of your lighting. The other parameters below that will also affect the light. Play around with these until you get what you want.
For Max lights, you do NOT need to apply the PageInfo component to it. Max lights are NOT exported with your Age, only the effect that they have is.
That's it....that all you need to do to put Standard Max Lighting in your Age. You can export the Age and check out your lights.
Plasma Run Time Lights
Okay, so we want to put in some lighting that will make the avatar cast a shadow.
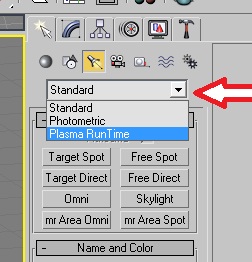
Go back to the "Create" tab, and the "Lights" button, only this time in the drop down box, select Plasma Run Time:
http://assets.openuru.org/wiki/andy/MaxTutPics1/maxshad7.jpg
Next, I selected what kind of light by clicking on "RT Directional" (as you can guess, RT stands for "Run Time"). The purple arrow shows where I did this, and the green arrow shows where you can adjust the color of the light and it's settings.
http://assets.openuru.org/wiki/andy/MaxTutPics1/maxshad8.jpg
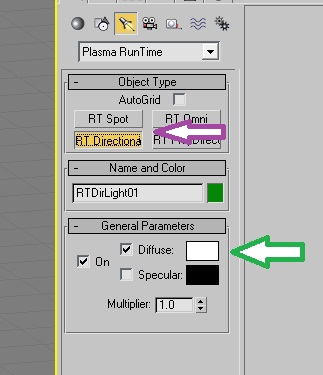
Click and drag in your graphics box to create the light. As you can see, it will create a large box with blue arrows pointing downward (the direction of the box). Use the scaling tool to make it smaller (scaling the light will have no affect on the light itself in game. It merely makings it easier to handle in Max, heh).
http://assets.openuru.org/wiki/andy/MaxTutPics1/maxshad9.jpg
Place the light where you want it.
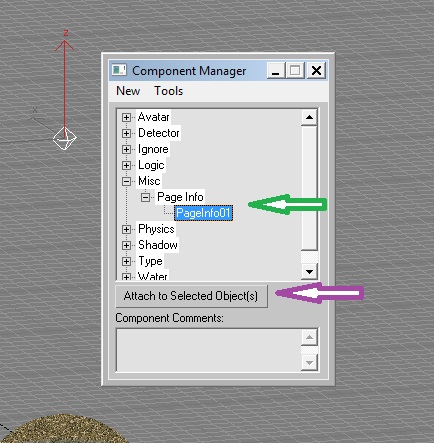
Once you have, you will need to assign the PageInfo it it, as Plasma Run Time lights ARE exported with your Age.
http://assets.openuru.org/wiki/andy/MaxTutPics1/maxshad6.jpg
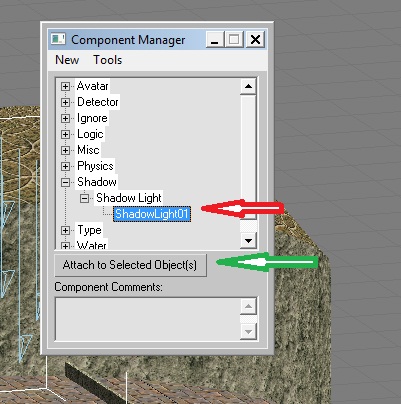
However, now we have to do something special here too. Since you have the Component Manager called up, click on "New" and then "Shadow" and then "Shadow Light"
http://assets.openuru.org/wiki/andy/MaxTutPics1/maxshad10.jpg
Then click on the ShadowLight01 ( you can name it something different you like) and then click on the "Attach Selected Object(s)" button.
http://assets.openuru.org/wiki/andy/MaxTutPics1/maxshad11.jpg
Now, with this light still selected, go over to your tool panel, and click on the little hammer tab (it's called "Utilities" where my red arrow is in the pic below), then click on the "Component Utils" button (green arrow) and then click on ShadowLight01 (or whatever you called it) where my purple arrow is.
http://assets.openuru.org/wiki/andy/MaxTutPics1/maxshad12.jpg
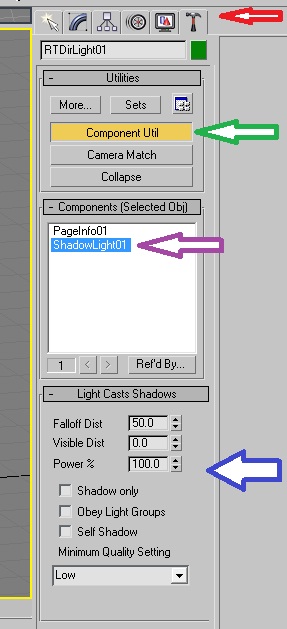
Where you see my blue arrow in the pic above, is where you can make adjustments that will affect the strength of the shadow. Falloff Dist will have a big impact on how strong the shadow is. (I have mine set to 50, that's 50 feet. My light is closer to the avatar than that, so his shadow shows up very strong. If I were to change that to say, 10 feet, his shadow will show up much weaker).
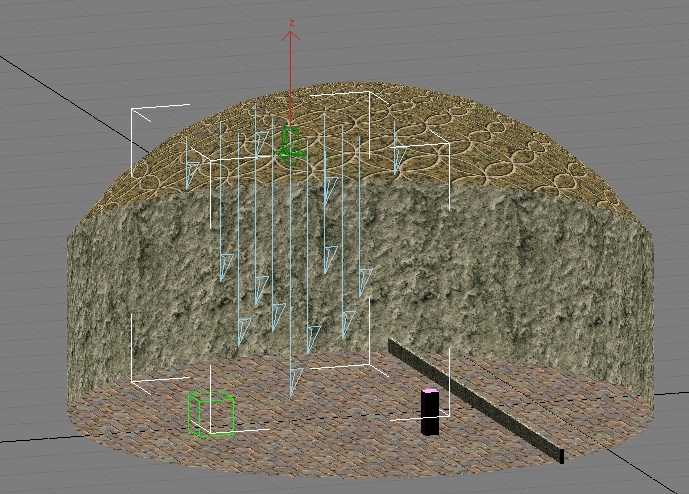
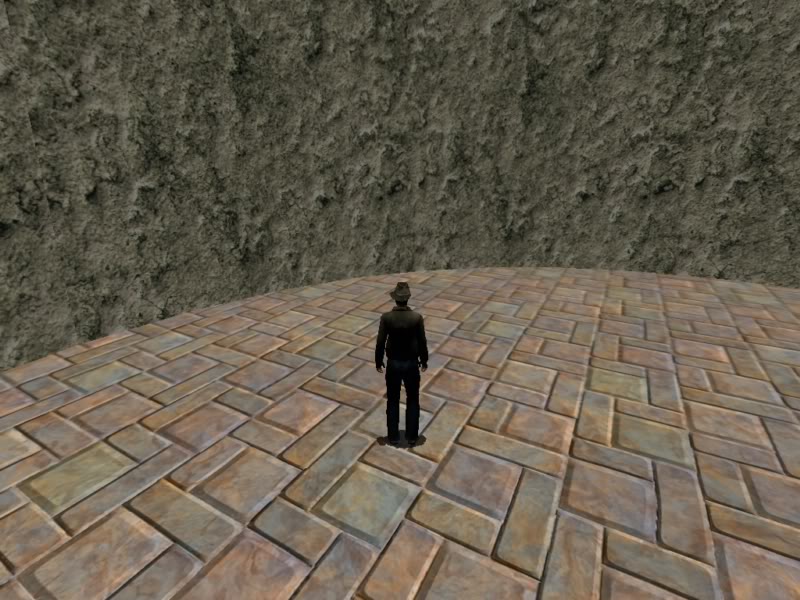
That's it! All you have to do now is export the Age, link in and take a look at your shadow:
http://assets.openuru.org/wiki/andy/MaxTutPics1/KIimage0067.jpg
Return To: 3DS Max Plugin Tutorials
A copy of the license is included in the section entitled "GNU Free Documentation License".