In Memoriam: Tai'lahr
OpenUru.org, along with the rest of the Mystonline community, is mourning the loss of Tai'lahr on October 16th, 2019.
Rest in Peace, friend.
Basic Material Animation
This tutorial will show you how to do a basic animation for a texture layer. You see this in MOUL:a as the water ripples next to the edges of objects in and around the water. This is also how the waterfall textures are animated.
However, please note, there are MANY, MANY different ways to animate your Materials. This is also used throughout MOUL:a, it's what helps give Eder Gira a night and day, the door light that flashes in Gahreesen, etc, etc. I'm not going to cover all those in this tutorial, as one could write a whole book on how to do all these things.
But this will get you started in animating your materials.
This tutorial assumes that you know how to set up the Cyan Plugin for use in Max, and that you've set up for Age Creation. It also assumes that you know you must attach the PageInfo component to your objects. And last, it assumes you know how to apply a Plasma Standard material and textures to your objects and UV Map them. If you don't know how to do these things, then you need to go read those tutorials first.
Getting Started......
Animation of a texture such as Water Ripples or Waterfalls, we are simply having the UV coordinates that we mapped our texture with offset themselves. The direction that the texture moves will depend on how we mapped the UV faces, and what offsets we use.
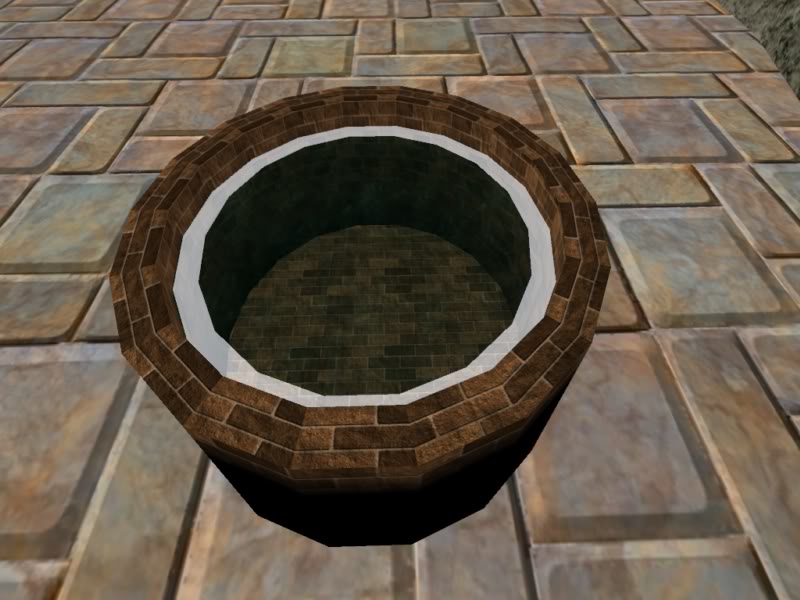
First we need something to work with. I made a simple looking well, added a mesh that has a "water" texture that's the surface of my water (NOTE: In this case, the water is NOT a waveset. Just like the small puddles in Er'cana, not all of your water will be a waveset. However you CAN have ripples for waveset water too, not just shore foam). I also then made a mesh that is located just above the water mesh:
http://assets.openuru.org/wiki/andy/MaxTutPics1/KIimage0080.jpg
Now, before we go any further, I'd like to point something out. If you look at the picture above, you'll see that it appears you can look through the "ripples" mesh straight to the bottom of the well. In other words, where ever my ripple mesh is, the water mesh's texture appears to be gone.
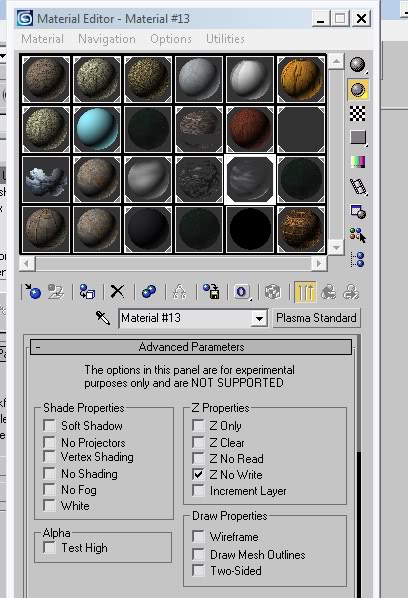
This is because the Plasma game engine is a bit confused as to how to handle the transparencies of both textures when one mesh is over another mesh. We need to tell it what to do. In Blender and the GoW Plugin, we used something called "Passindex". In Max with the Cyan plugin, you are going to use something called "No Z Write"
Open up your Material Editor and call up the Material you assigned to your Ripple mesh. Open up the roll out box called "Advanced Parameters"
http://assets.openuru.org/wiki/andy/MaxTutPics1/NoZWrite.jpg
In the box that says "Z Properties" place a check where it says "Z No Write" (yes, I know what it says at the top of the box, but Cyan does uses these settings with things).
That's all you have to do. Now Plasma will render the two textures (your water and your ripples) correctly.
Moving along now....
So here I have my ripples mesh with the material and texture applied, and UV Mapped correctly. For ripples like this, the way you want to UV map it, is by telling the unwrapping tool to "Flatten" your faces. Then select one of the faces and make it a full square on your texture. Then select "Copy" for that face, select the other faces and click on "Paste". All the other faces will line up with the first face.
Note: I'm using Cyan's ripple texture here for the tutorial. You'll need to make you're own ripple texture (a texture with a transparent background, and spray paint some wavy white lines on to it works pretty good).
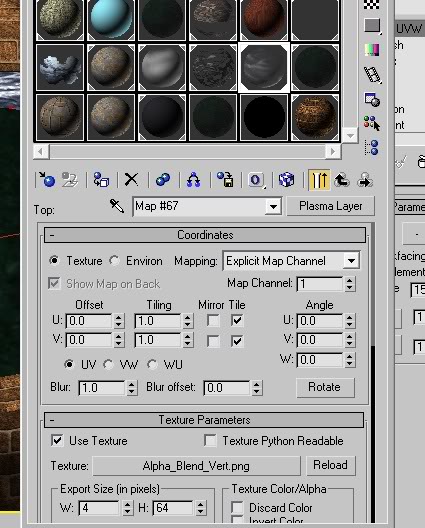
Make sure you have your Ripple mesh selected and call up it's Material. Then select the layer that is your ripple texture (in the pic below, I accidently have the Alpha Blend texture called up, oops):
http://assets.openuru.org/wiki/andy/MaxTutPics1/animtextmax2.jpg
We are going to be using the "Coordinates" roll out box for this.
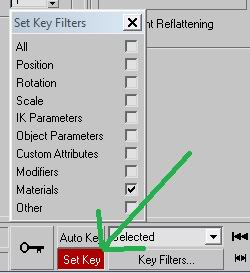
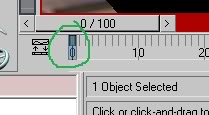
Next, go down in Max, where our Animation Controls are, and where we set Keys. Click on the Keys Filter box:
http://assets.openuru.org/wiki/andy/MaxTutPics1/animtextmax3.jpg
This will call up a little box, remove all the checks and make sure you have a checkmark where it says Materials.
Then click on the Set Keys box so we can start setting the Keys for our texture animation:
http://assets.openuru.org/wiki/andy/MaxTutPics1/animtextmax4.jpg
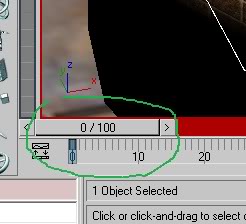
Go to the animation time line bar. Make sure you have it sitting at frame 0:
http://assets.openuru.org/wiki/andy/MaxTutPics1/animtextmax6.jpg
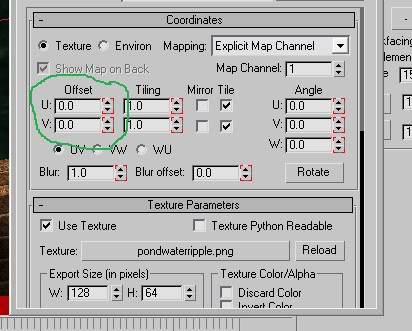
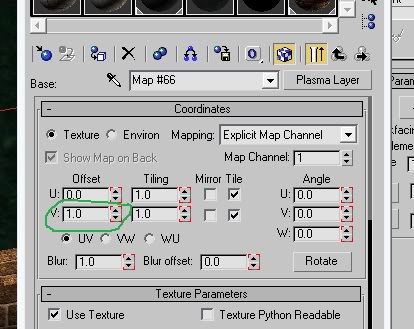
Now go back to the Material Editor and make sure your U and V coordinates for Offset are both set to 0.0
http://assets.openuru.org/wiki/andy/MaxTutPics1/animtextmax5.jpg
Note how you have those little red brackets around things. Each of these are things you can animate. For now, we're just going to mess with the UV Offsets.
Now go down and click on the button with the picture of a key on it. This will set our first Key at frame 0
http://assets.openuru.org/wiki/andy/MaxTutPics1/animtextmax7.jpg
You should see the Key marker in the time line, and it should be at frame 0
http://assets.openuru.org/wiki/andy/MaxTutPics1/animtextmax8.jpg
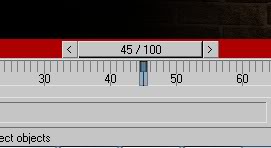
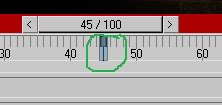
Now you need to move your time line bar to the next frame that you're going to set a key at. Where you move this to is going to be up to you. Default setting for Max is: 30 frames equals 1 second. I've found that moving it to frame 45 (1.5 seconds) works well with ripples. If you have a texture that you need to appear to move faster, you would set the key to a lower frame number. If you need the texture to appear to move slower, you'd use a higher frame number. One thing to remember here: in max, once you've set your keys, you can use the animation player at the bottom of Max to watch your animation. It will play it in real time, so you'll be able to see if you have your timing set right.
http://assets.openuru.org/wiki/andy/MaxTutPics1/animtextmax9.jpg
Now go back up to the Material Edit to the Coordinate roll out box. You need to change your offsets. Now, again, what you change them to, and which one you change will depend upon what you are doing, and how you mapped your texture. Changing either setting to 1.0 will be like scrolling the texture fully. This is what you will want to do. In Max, the U coordinate is the same as the X coordinate in Blender. The V coordinate is like the Y coordinate in Blender. Because of how I UV Mapped my ripple texture, I want to scroll it fully along the V coordinate. So I change the offset to 1.0 there.
http://assets.openuru.org/wiki/andy/MaxTutPics1/animtextmax10.jpg
Once you've set your offset, go back down and click on the Key button to set the key at this frame:
http://assets.openuru.org/wiki/andy/MaxTutPics1/animtextmax11.jpg
There you go! Now you can either move the time line bar back and forth to see your texture move in the 3D window, or you can press the "Play" button on your animation player and see how it looks!
You're not quite done yet. You'll need to let the Material know WHEN to play this animation.
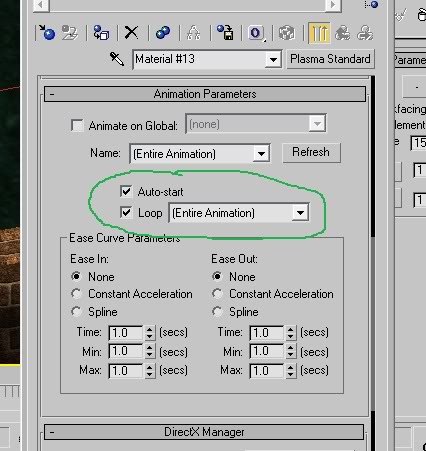
In your Material Editor, make sure you are now in the Material and not the Plasma Layer. Look for a roll out box that is called "Animation Parameters"
http://assets.openuru.org/wiki/andy/MaxTutPics1/animtextmax12.jpg
As I'm doing Ripples, I want the animation for them to start the moment a person links in. I also want the animation to play over and over. So I need to put check marks where it says "Autoplay" and "Loop"
Once you've done this. You are done! There are no extra Plasma Components to attach to this kind of animation. There will be other texture animations that you WILL have to have Plasma Components (like you want a symbol to flash at a player when they get close to it only.....you'd use a sensor region for that, and have the texture animation play only when triggered by the avatar entering the region sensor).
For now however, you have at least gotten started on how to animate a texture.
Here's a video of the result:
Return To: 3DS Max Plugin Tutorials
A copy of the license is included in the section entitled "GNU Free Documentation License".