In Memoriam: Tai'lahr
OpenUru.org, along with the rest of the Mystonline community, is mourning the loss of Tai'lahr on October 16th, 2019.
Rest in Peace, friend.
Distributor Tool
Using The Distributor Tool
The Distributor Tool allows us to do something quickly that otherwise would take quite a while to do. Such as having to place hundreds of bushes, grass, rocks, etc. Those of you that have been building Ages in Blender, will love this tool.
Let's take a look at a familiar scene:
http://assets.openuru.org/wiki/andy/MaxTutPics2/KIimage0091.jpg
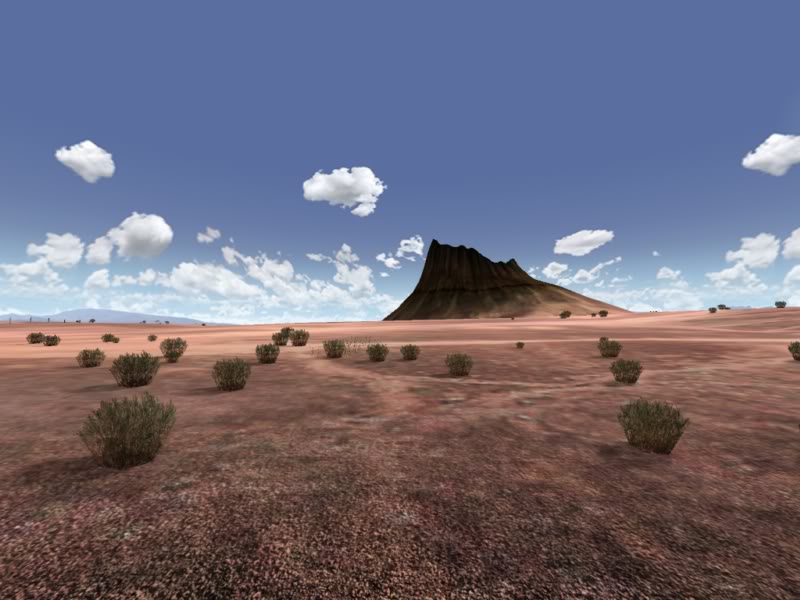
Ah yes, the Cleft in the New Mexico desert. Notice those scrubby little bushes. They're all over the place here.
When we built Ages in Blender, if you wanted something like this, you would have to build the bush, duplicate it, and place each one where you wanted it. Very time consuming.
With 3DS Max, and Cyan's Plugin, you'll only have to build one bush.....and then the Distributor will put clusters of it all over the place.
To use the Distributor, you'll need at least 2 things:
A surface that your Bush/Rock/Stick or whatever is going to go on, like the ground. A object to be distributed: that one Bush/Rock/Stick, etc.
After you've gotten each of these built, their materials assigned, and have attached them to your PageInfo, and any physics you might need, you're ready to use the Distributor Tool.
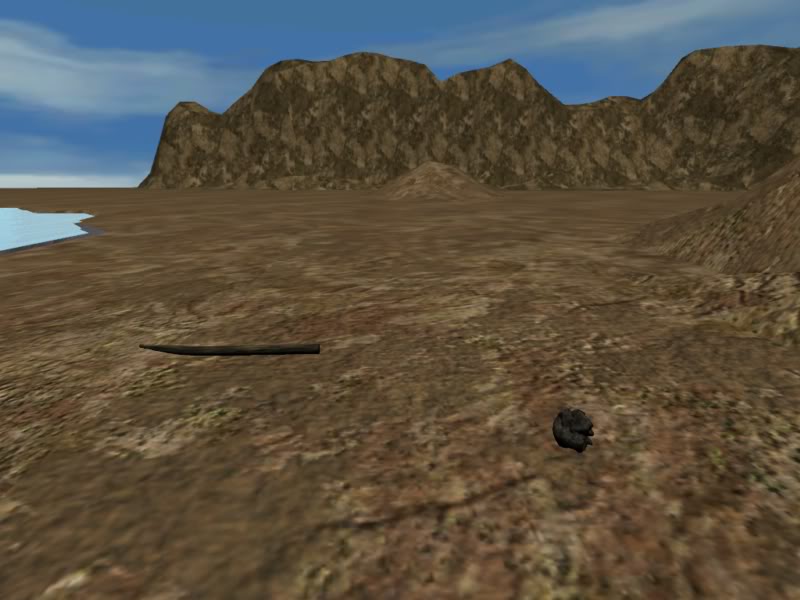
Now, normally you'll more than likely use this function for bushes like Cyan did. Well I decided to try it out with Rocks. Mainly because I'm having a transparency issue...heh......but I also wanted to show you how you can use it on more than one object. Here is my Outside Test Age. As you can see I have one rock, and a stick:
http://assets.openuru.org/wiki/andy/MaxTutPics2/KIimage0089.jpg
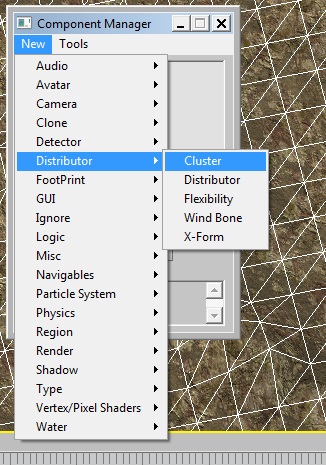
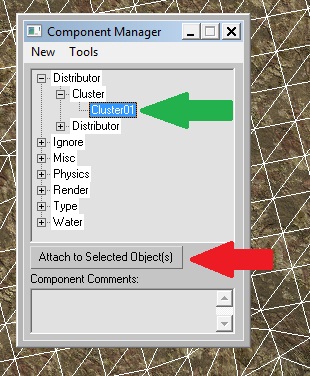
In Max, select the surface that you want to distribute your objects on. Then call up the Component Manager, and click on New > Distributor > Distributor
http://assets.openuru.org/wiki/andy/MaxTutPics1/DistMax1.jpg
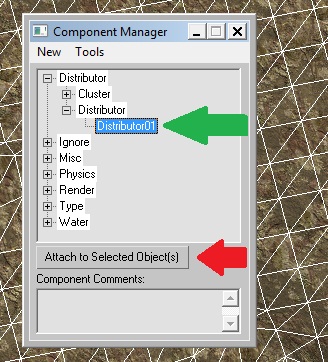
Then attach it to your surface:
http://assets.openuru.org/wiki/andy/MaxTutPics1/DistMax2.jpg
Now click on New > Distributor > Cluster
http://assets.openuru.org/wiki/andy/MaxTutPics1/DistMax3.jpg
And attach it also to your surface:
http://assets.openuru.org/wiki/andy/MaxTutPics1/DistMax4.jpg
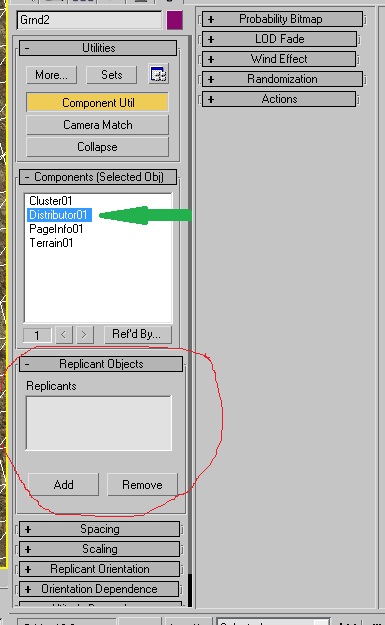
Now go over to your Utils Tab (the little hammer) and click on the Component Utils button. Select the Distributor we attached to our surface:
http://assets.openuru.org/wiki/andy/MaxTutPics1/DistMax5.jpg
Yes, I know...there are a LOT of roll outs here. Don't panic yet, we'll get into those later. They are all for making adjustments to your clusters. For now, look at where I have my red circle. We need to assign the object we built to here. Click on the "Add" button. It will turn yellow. Move your cursor over to your 3D Scene and click on the object that you made that is going to be distributed. In my case, I clicked on my rock:
http://assets.openuru.org/wiki/andy/MaxTutPics1/DistMax6.jpg
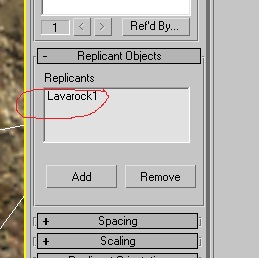
As you can see, your object will show up in the white box now. If you are going to distribute more than one object, just click on the "Add" button again, and then click on the next object you want to distribute.
Tip: You can add the same object more than once here. So say you want a lot of the same rock, and only a few bushes. You can add the same rock 3 times, and the bush just once. This has the same effect of giving the Rock a 3 out of 4 chance of showing up, and the bush only a 1 in 4 chance.
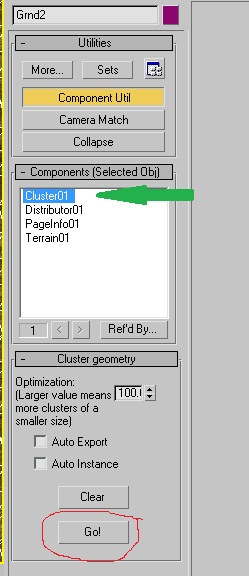
Now go up in your Component Utils and select the Cluster we assigned:
http://assets.openuru.org/wiki/andy/MaxTutPics1/DistMax7.jpg
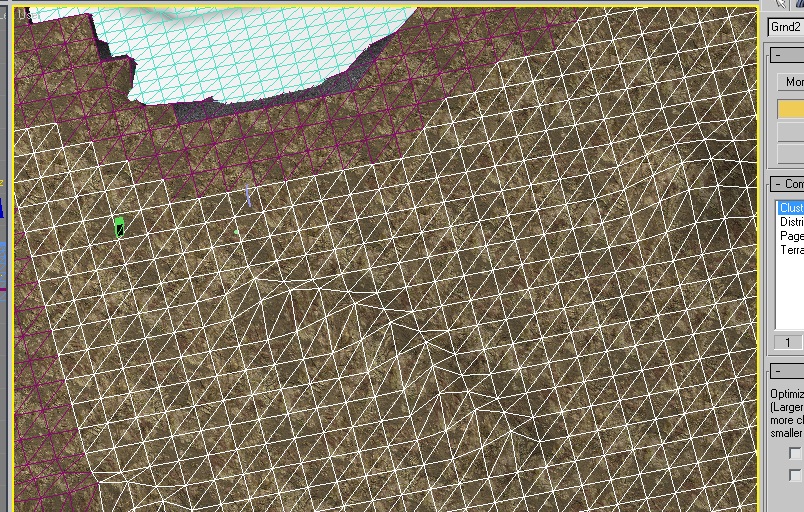
There are only 2 things you need concern yourself with for right now. The 2 buttons you see: "Clear" and "Go!" What we want to do is click on the "Go!" Button, but before we do, take a good look at your 3D Scene window:
http://assets.openuru.org/wiki/andy/MaxTutPics1/DistMax8.jpg
You can see my surface selected here, and you see my single green rock and purple branch. Now go and click on the "Go!" button, and look in the 3D window again.
NOTE: If you do have more than one object to be distributed, this can take a few minutes. Watch the progress bar at the bottom of Max. Save before you do this, as it is quite possible for you to get an "Out Of Memory" error and have Max shut down.
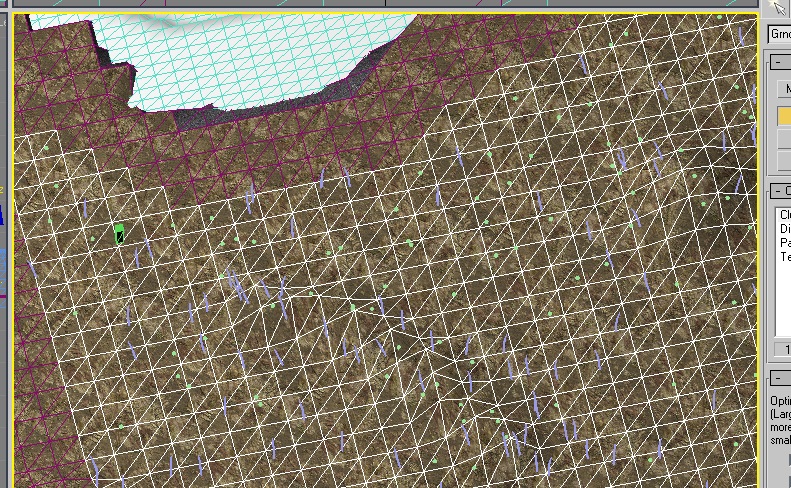
http://assets.openuru.org/wiki/andy/MaxTutPics1/DistMax9.jpg
Wow! Now there are a bunch of green rocks and purple branches all over my surface!
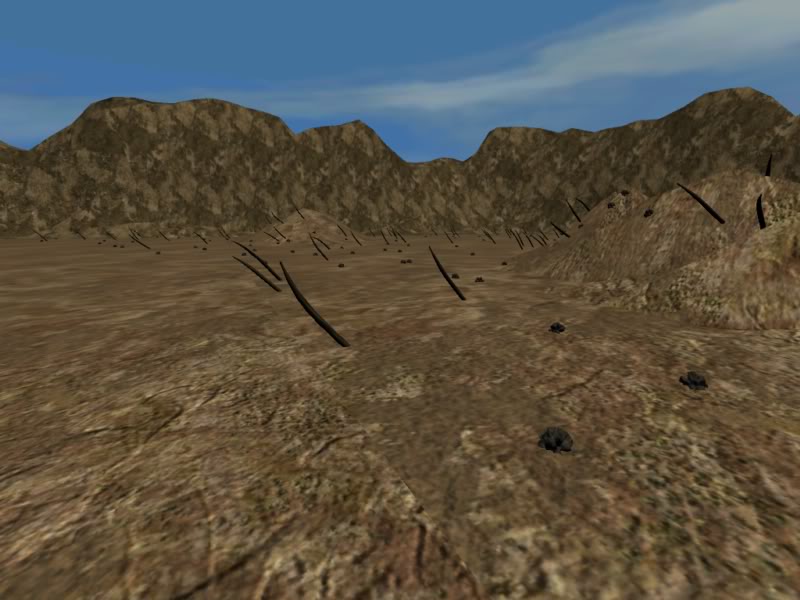
Okay, at this point, you can export and link in to take a look:
http://assets.openuru.org/wiki/andy/MaxTutPics2/KIimage0090.jpg
Woah! I've got junk laying around all over the ground now!
Now, you may notice that some of your objects are not lining up right, or there's too many (or not enough), and that's okay. Now it's time to go back to your Component Utils and select our Distributor again. Now we can make adjustments.
Spacing:
http://assets.openuru.org/wiki/andy/MaxTutPics1/DistMax10.jpg
Spacing: The distance between the objects. This value is in FEET.
Density: This amount is in PERCENT. It's the probability that a spot on the facing will get a replicant. The higher the number, the more chance the distributor will place a copy of your object there. 100 will fit as many as possible, depending on the amount of Spacing you specified. 0 will make nothing show up.
Randomness: This amount is in PERCENT. It's the probability of the randomness of position for the copies of your object on a imaginary grid. The lower this number, the more uniform your copies will look. So 100% will be completely random.
Seperation: This is used to help control how close together your objects will be. It's a drop down box and has the following settings:
None - Allows the copies to be placed right on top of one another.
Low - Will put a 1 foot zone around each copy.
Medium - Protected zone will be the size of the copy's Bounding Box.
High - Protected zone is a box of size Spacing cubed.
According to Cyan's documentation, they recommend tweaking the Spacing first, and then the Density.
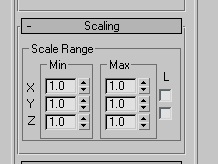
Scaling
http://assets.openuru.org/wiki/andy/MaxTutPics1/DistMax11.jpg
Scaling: This tool allows the scaling of your object. Say you don't want all your rocks or bushes to be the same size. You can use this tool to have the distributor randomly assign scaling to the object. You need to specify X, Y and Z. Having the same number in each will scale the object on all 3 dimensions. Having different numbers will give you squished and/or stretched looking objects (but then you may want that).
The value of 1.0 will keep the size of your object that you built it at. A value of 2.0 will double the object's size in that direction. Decimal values such as 0.5 will make the object half the size you built it at in that direction. Min, will be the minimum amount of scaling (set this to 1.0 if you don't want the object to be any smaller than you built it), and Max will be the maximum amount of scaling done to the object (set this to 1.0 if you don't want your object any bigger than you built it at).
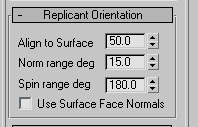
Replicant Orientation
http://assets.openuru.org/wiki/andy/MaxTutPics1/DistMax12.jpg
This will adjust how your objects are orientated on the surface.
Align To Surface: - The amount put here will be against the original alignment the Z axis or "Up" compared to your original object. To have all your objects point up the same as your original, place the value of 0% here.
Normal Range Deg: - If you are going to have the copies randomly point "Up" i different directions, you place the amount of degees to which the distributor with randomly change this direction. So a setting of 15 deg, the distributor will pitch the Z axis (Up), of the object from 0 up to 15 degrees away from straight up.
Spin Range Deg: - This is the amount of degrees to have the distributor randomly spin the object about on it's "Z" axis. 0 degrees setting will have the distributor try and keep the direction of the "Y" axis of each copy facing in the same direction as your original. 180 degrees setting will have the distributor randomly spin the object upon it's "Z" axis in all directions.
Use Surface Face Normals: - This is a check box. Placing a check here will have the distributor use the Flat Face normals instead of the Vertex Normals.
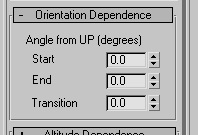
Orientation Dependence
http://assets.openuru.org/wiki/andy/MaxTutPics1/DistMax13.jpg
Basically this looks at the normals of your Surface. You can use this to tell the distributor whether or not to place a copy on your surface in places that you don't want them due to the orientation of the surface (IE, you don't have just a flat plane, but some hills, dips, craters, etc. Placing a bush that points out at a 45 degree angle from the side of a crater or hill would look strange).
Start: - This is the minimum value in degrees of your surface normal in which to allow your copy to be placed. So 0.0 would be a flat surface.
End: - This is the maximum value in degrees of your surface normal in which to allow your copy to be placed. So if you set this to 45 degrees, the distributor will not place a copy on that surface normal.
Transition: - This is the amount in degrees to allow for transition. Let's say you have your Start at 10 degrees and your End at 40 degrees. If you put 5 degrees in Transition, then the distributor will not put any copies within 5 degrees of either of those values. So they will be at 15 degrees to 35 degrees. The value of 0 or 180 in either Start or End, will have the Transition ignore those Angles.
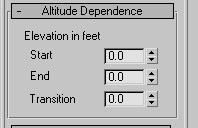
Altitude Dependence
http://assets.openuru.org/wiki/andy/MaxTutPics1/DistMax14.jpg
This is a really cool feature in my opinion.
Altitude Dependence will let you do something like the following: Let's say you have a beach and inland from the beach, the terrain rises up to like a road or something. Let's say you have some neat Dune Grass you want to use. The Dune Grass grows down by the beach, but not right on the water line. It also doesn't grow up higher by the road. You can use this feature to tell the distributor not to place copies above or below a certain altitude!
Start: - The minimum altitude you want your copies at.
End: - The maximum altitude you want your copies at.
Transition: - The amount in feet to transition from either min and max altitude.
Values are in Feet. Setting both Start and End to 0 will turn this feature off.
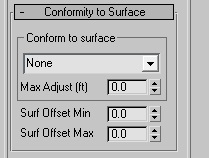
Conformity To Surface
http://assets.openuru.org/wiki/andy/MaxTutPics1/DistMax15.jpg
This option allows you to conform the base of your copies to the surface they sit on.
You have the following options in the drop down box:
None
Check
All Verts
Bottom
Base
None: - Makes sure just the pivot point of the copy is with the surface (you could still get things hanging over edges, etc)
Check: - Is like None, but will keep things from hanging over the edge of something.
All Verts: - Will distort all Vertices as needed to conform to the surface.
Bottome: - Will distort most of the verticies as need to conform to the surface, but will pretty much leave the top ones alone.
Base: - Only the Base verticies will be distorted to conform to the surface.
Other settings:
Max Adjust (ft): - This is the amount of feet you'll allow the surface to drop beneath your copy.
Surf Offset Min/Max: - Specifies a range to offset replicants over the surface onto which they are being distributed. For example, Offset Min and Max of 10.0 and 15.0 respectively would distribute the replicants in a layer five feet thick starting ten feet off the ground.
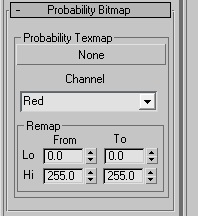
Probability Bitmap
http://assets.openuru.org/wiki/andy/MaxTutPics1/DistMax16.jpg
The Probability Bitmap allows distributions to be hand painted onto a surface. The bitmap won’t be exported, so it can be any size convenient. Unless you already happen to have a convenient UV mapping, you should apply the mapping to one of the upper channels which Plasma otherwise ignores.
When you click on None, you have to pick a Plasma Layer Map from your Material Editor to use.
Channel: - Which color or combination of colors from the bitmap to base the distribution on. This allows the same bitmap to convey different distributions
Remap: - Allows remapping of bitmap values into distribution probabilities. For example, to invert a bitmap distribution, leave From Lo and Hi at 0 and 255 respectively, but swap To Lo and Hi to 255 and 0 respectively.
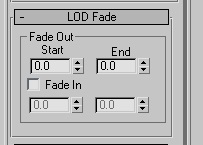
LOD Fade
As you get more and more of your Age built, there will be more and more things for the game engine, Plasma has to render to the player. Too many things can cause laggy performance, or worse. You replicants can add to this burden.
I'm sure when playing Uru, you've noticed how when running across the desert in towards the cleft, how you had those bushes gently fade into view. This is the tool for that.
http://assets.openuru.org/wiki/andy/MaxTutPics1/DistMax17.jpg
Fade Out: - The "Start" distance is the number of feet from the avatar that the object will be visable to that point. After which it will fade until the avatar gets to the "End" distance, at which point the object will no longer be rendered.
Set Start and End to 0 to turn this feature off
Fade In: - There is a check box here. If you check it, the copies will be invisible until the avatar reaches the Start distance after which, the copies will fade in until they are fully visible at the End distance.
Wind Effect, Randomization, and Actions
I'll cover "Wind Effect" at another time. This is used to give say like your Grass the movement that they are being gently moved by the wind.
http://assets.openuru.org/wiki/andy/MaxTutPics1/DistMax18.jpg
Randomization: - If you click on the check box, you will lock this, and the distributor will attempt to generate the same set of replicants each time.
Actions: - When setting up a specific Distributor, you can use the Preview function to get a quick rough idea of what your current settings will generate. The output of the Preview should be considered a rough draft and not exported. Keep in mind that interactions between different Distributors
That's it!
Return To: 3DS Max Plugin Tutorials
A copy of the license is included in the section entitled "GNU Free Documentation License".