In Memoriam: Tai'lahr
OpenUru.org, along with the rest of the Mystonline community, is mourning the loss of Tai'lahr on October 16th, 2019.
Rest in Peace, friend.
Help:Basic Editing
Important InformationYou will only be able to edit the content of this site if you have created an account and are logged in. There are a few things you ought to know before you start creating or editing articles in this wiki -
|
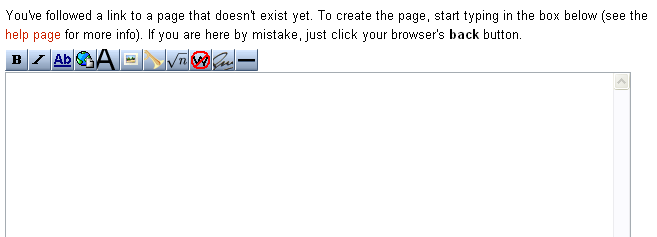
Basic EditingIf you follow a link for which no content has yet been created, you'll get a view like the one shown below - You'll get a similar view by selecting the "edit" tab on an existing page, except that current content will appear in the main edit window:
The simplest way to create content is to type in the text first, then apply formatting afterwards. You can hit the "Show preview" button to get a quick look at how your page looks. Sometimes if there's only a small amount of content it's difficult to see the preview as it appears above the editing pane and can seem to get lost in amongst the clutter. You'll probably find you need to hit enter twice to make text break onto a new line. Use the "Save page" button to commit your page to the server. |
Format ButtonsWorking from Left to right, the buttons are
|
Applying formattingIf you know HTML you can insert HTML tags in your text. For most things you can just use the buttons, e.g. to make text bold, highlight it in the edit window then click on the Bold ("B") button. You'll get some strange quote marks round the text but that's OK. The same sort of thing applies to Italic and Heading formats. In most cases you can hit the button first and then edit the text between the "tags" as required, but it's easier to make mistakes that way. |
LinksTo create a link to a new page (which you will create later) then simply type the title of the new page into your text. Make sure it is capitalised as you want it to appear on the page heading, then select the title and click on the Internal Link ("Ab") button. Once you save the current page you can follow the link and create the content for the new page. If you want to link to an existing page, then you need to type in the title of the target page highlight the title and click on the Internal Link button. For external links, simply type (or paste in) the URL of the target page, highlight and click on the external link button. Note: Some assets are stored on the wiki server, but are not uploaded directly into the wiki (Word documents, PDFs, etc.) and need to be linked using the "external" link method. This causes the external link icon to appear (like this) even though these are "local" assets. To suppress this icon, wrap your link with a "plainlinks" span as shown:
|
PicturesImages need to be uploaded before they can be used in a page. For security reasons, OpenURU.org does not use the wiki file upload tool: instead you should refer to Using Images. Once your images are uploaded, you can create the page text as normal. Type in the file name (with extension but no path) at the point you want the image to appear, highlight and click on the "Image" button. |
Further ReadingYou may find the following articles (from the English Wikipedia) to be helpful: |