In Memoriam: Tai'lahr
OpenUru.org, along with the rest of the Mystonline community, is mourning the loss of Tai'lahr on October 16th, 2019.
Rest in Peace, friend.
Difference between revisions of "How To Set Up And Use Exclusion Regions"
Andylegate (talk | contribs) (Created page with "I'm going to show you how to use an Exclusion Region for a door. Once you learn how to do this, you'll be able to see many different applications for Exclusion Regions. Just keep...") |
m (Remove HR) |
||
| Line 82: | Line 82: | ||
http://assets.openuru.org/wiki/andy/MaxTutPics2/Exclude5.jpg | http://assets.openuru.org/wiki/andy/MaxTutPics2/Exclude5.jpg | ||
| − | |||
| − | |||
{{ALTutorials}} | {{ALTutorials}} | ||
Latest revision as of 16:07, 29 July 2011
I'm going to show you how to use an Exclusion Region for a door. Once you learn how to do this, you'll be able to see many different applications for Exclusion Regions. Just keep in mind that Exclusion Regions are ideal for use in Multiplayer Environments.
Let's take a look at the picture below:
http://assets.openuru.org/wiki/andy/MaxTutPics2/Exclude7.jpg
This is a snap shot of a Hood imported into Blender. It's the door to the class room. You can see the sensor regions, the door, the Exclusion Region and the Safety Points, that are also used as One Shots to animate the avatar for when he or she touches the door to open it.
We'll set something like this up in Neolbah. It's not very hard to do, and once you get the hang of it, you'll find uses for it in other ways.
Getting Started
First, you need to already have set up your door, it's animation, the clickable or sensor region for the player, and the responder that is going to open / close the door. Once you have that all set up, it's time to make the Exclusion Region.
http://assets.openuru.org/wiki/andy/MaxTutPics2/Exclude2.jpg
In this Pic, you can see my exclusion region as the red box. You can make yours bigger or smaller if you so desire. There are 2 things to keep in mind when making your region:
1) Make sure it is the right shape, size and position to block the player where needed. 2) That it's positioned so that it detects the player when needed.
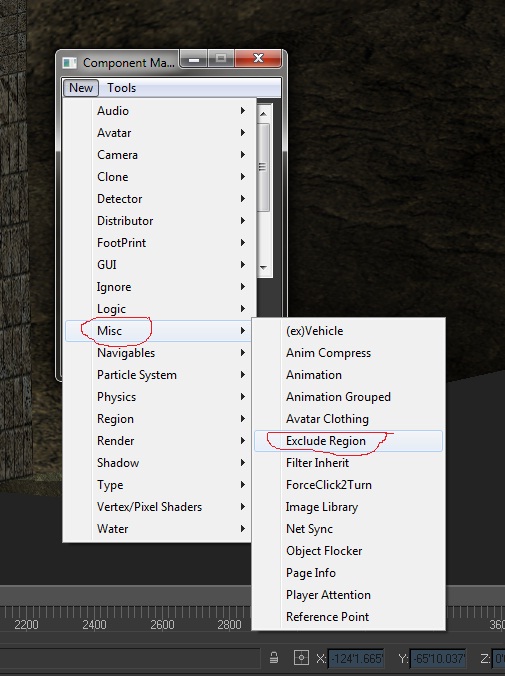
To make this an Exclusion Region, call up the component Manager, and click on New > Misc. > Exclusion Region and assign it to your region.
http://assets.openuru.org/wiki/andy/MaxTutPics2/Exclude6.jpg
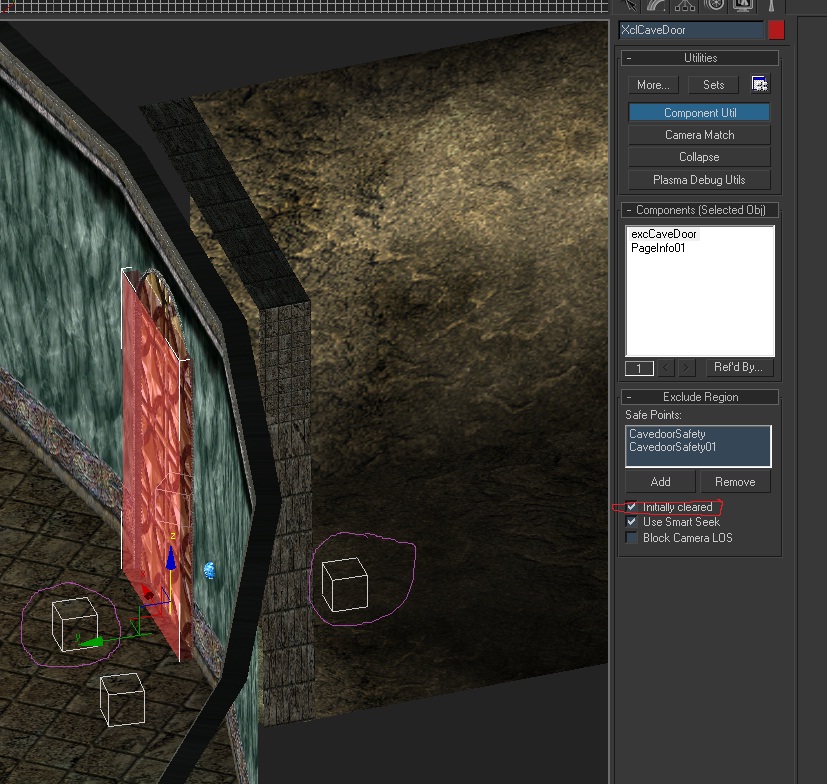
If you look at your Roll Out for it, you'll see the following:
http://assets.openuru.org/wiki/andy/MaxTutPics2/Exclude8.jpg
First, look at the check mark boxes. There are 3 of them:
Initially Cleared Use Smart Seek Block Camera LOS
Use Smart Seek and Block Camera LOS are up to you to use, each are self explainatory. However, Initially Cleared is very important.
Unfortunately the use of words can be confusing. Exclusion Regions have 2 states: Cleared or Released.
To me, both words pretty much mean the same thing, so this can be confusing. However, I'm going to show you how they are defined by Cyan's Plugin.
Cleared means: Clear the area of any player and keep it Cleared. This means that the region will act like a collider, and if a player is in the region, they will be moved to a safety point.
Released means: Release the area so that player may pass through. This means that the region will no longer block any players or move them.
So let's go back to that roll out. Initially Cleared, means that the region starts out as a blocker or collider. If your door is going to be closed when the player first links in, then you would want the exclusion region to block the player. So you would put a check mark where it says Initially Cleared.
If your door is going to be open when the player links in, they you do NOT want a check mark in that box!
Now, before we use the roll out any more, let's go back to our scene and add 2 things:
http://assets.openuru.org/wiki/andy/MaxTutPics2/Exclude2.jpg
Look at the picture again. You need to put 2 Dummies in place, on either side of where your Exclusion Region is. Place them OUTSIDE the exclusion region. These will be the points where the avatar will move to if they are in the exclusion region when the door goes to close. They local Y axis of the dummies points in the opposite direction of where the avatar will face.
Once you have them in position, the only component you need to assign them is the PageInfo component.
However, if you want, you can also assign a Multi Behavior Mod to either, and have the avatar animate when they get to that point. Such as using the DOH! animation (slapping of the forehead). The reason I mention this is: you may have a point that is a avatar one shot animation for touching the door, or door button. You can use that as one of your safety points if you so desire.
Let's go back to our exclusion region. Go to the roll out and now click on the "Add" button. When you do, you can click on one of your Safety Points. Make sure you add both of them.
That's it! You have made all that needs to be made.
NOW you need to wire it in. You can control your Exclusion Region in 2 ways: Responder or Python.
They Python way would be to use a global python file like xStandardDoor.py, or you may have some custom made python file (Teledahn's elevator is controlled by a special python file, and in it, it controls not only the movement of the elevator, but also the Exclusion regions).
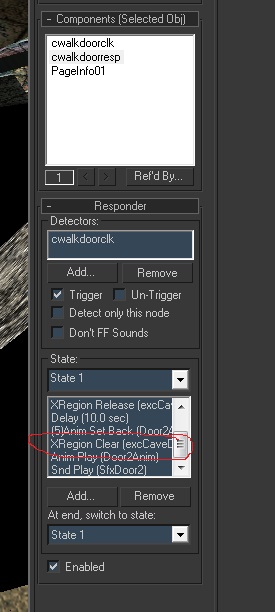
The responder way is easy. Call up your responder that controls your door. You will want to add a command that either Releases or Clears your exclusion region (if your door is shut and the exclusion region is initially cleared, then you'll want to release it in the responder). Just remember that you need the exclusion region to "Release" to allow players through, and have it "Clear" when you want players to be blocked.
http://assets.openuru.org/wiki/andy/MaxTutPics2/Exclude3.jpg
http://assets.openuru.org/wiki/andy/MaxTutPics2/Exclude4.jpg
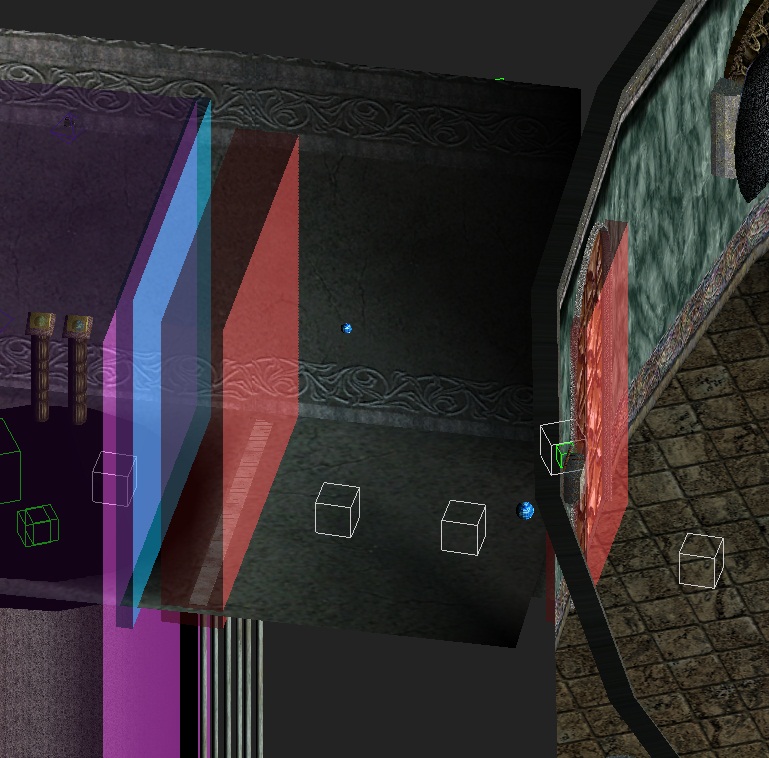
Here is another picture example of me using Exclusion Regions, this time for another door, AND for the entrance to an elevator. The one for the elevator is initially NOT cleared at first (as the bars are down):
http://assets.openuru.org/wiki/andy/MaxTutPics2/Exclude5.jpg
Return To: 3DS Max Plugin Tutorials
A copy of the license is included in the section entitled "GNU Free Documentation License".