In Memoriam: Tai'lahr
OpenUru.org, along with the rest of the Mystonline community, is mourning the loss of Tai'lahr on October 16th, 2019.
Rest in Peace, friend.
Difference between revisions of "How To Start An Age"
Andylegate (talk | contribs) |
m (Remove HR) |
||
| Line 124: | Line 124: | ||
Hope this helped folks. | Hope this helped folks. | ||
| − | |||
| − | |||
| − | |||
{{ALTutorials}} | {{ALTutorials}} | ||
Revision as of 15:21, 29 July 2011
For those of you that are used to using Blender, you are about to have your first rude awakening on how to get started in creating an Age. If you've never used Blender to create Ages, heh, you're already ahead of the game. But for us old salts that have been doing this in Blender for several years now, you'll remember to start a new Age all you had to do was go up to the menu and click on: Add>PyPRP>Create New Book, and you were on your way.
With Max, ahem, it's a bit different.......
Oh BOY, Oh BOY! I'm Going To Make An Age!!!!
Yep....so let's get you started.
For those of you that don't know (for those of you that do, you can skip down), each "Age" that is in Uru, is made up of many different files:
.age file, .prp files, .sdl files, and files located in the Python.pak file
The .age file has information on the Age that Uru's game engine, Plasma, needs:
StartDateTime=0000000000
DayLength=24
MaxCapacity=10
SequencePrefix=5102
ReleaseVersion=0
Page=mainroom,0
The most important part here for you to know is, "SequencePrefix" and "Page="
The SequencePrefix is like a serial number for the Age. Each age has a different SequencePrefix number. Any Age you create will have to have it's own unique number. Numbers 1 thru 100 are for Cyan to use. You'll find that the Ages in Uru use numbers between 1 and 20. Myst V Ages use the numbers that are much higher. If you use the same number as an Age located in your "dat" folder, you'll find your game will crash when you go to link into your new Age.....and also the Age that already had that number.
So it's a good idea to get your very own unique SequencePrefix number. Where do you get one? There is a list of what SequencePrefix numbers are used, it's located Here. Go there and look though the list of Ages and their numbers. Better yet, register at the site so you can log in. That way after you have picked a number, you can edit the list, and insert your Age you are making and the number you used, so that other people do not use YOUR number.
"Page=" is important as it's a list of the .prp file that is the "Main Room" where your meshes for your Age are located. If you end up making a big Age like the size of Teledahn or Gahreesen, you will more than likely end up having more that one "Room" where your stuff is located. Each "Room" will get listed here.
The other files, .sdl and Python have their uses too and will be talked about in other tutorials.
Okay, now that I've bored you to death with all that info, let's get started:
Oh Boy! Oh Boy! Now we can.....what? More junk to read????
Yes, more junk to read and do. Creating Ages is not as easy as say, building a house in The Sims 2. It's not all point and click, and while yes, the majority of your time will be spent building meshes and texturing them, there are many other things that need to be done too.
Like making a "Book" or your .age file. We need to do this first. Each object that you create in Max will need to know that it has to be exported to your .prp files.
First, we need to create our .age file, so go to the directory that you set up in the PlasmaMAX2.ini file. I left mine as "PlasmaTest". Now go to the "dat" folder that you already created there. Now open up a new text document in Notepad here. Copy and paste this information into the text file:
StartDateTime=0000000000
DayLength=24
MaxCapacity=10
SequencePrefix=<your unique number>
ReleaseVersion=0
Page=mainroom,0
Change "<your unique number>" to your Age's SequencePrefix number that you got (like Camp Bravo's is 5102).
Now save the text file as "YourAgeName.age" (making sure of course that you've named the Age, like Zephyr_Cove.age or Mojojojo.age, or whatever). Make sure that you click on "Save As" and when you go to save you click in the drop down box and change "*.txt" to "Any File" If you do not, your afe file will have the .txt file extension automatically applied to it and Max will not read it.
Okay, NOW you can open up 3DS Max........
Yay! We're in Max!
Yes we are, and now you can go build to your heart's content. BUT!
For EVERY object you create, you will need to do the following:
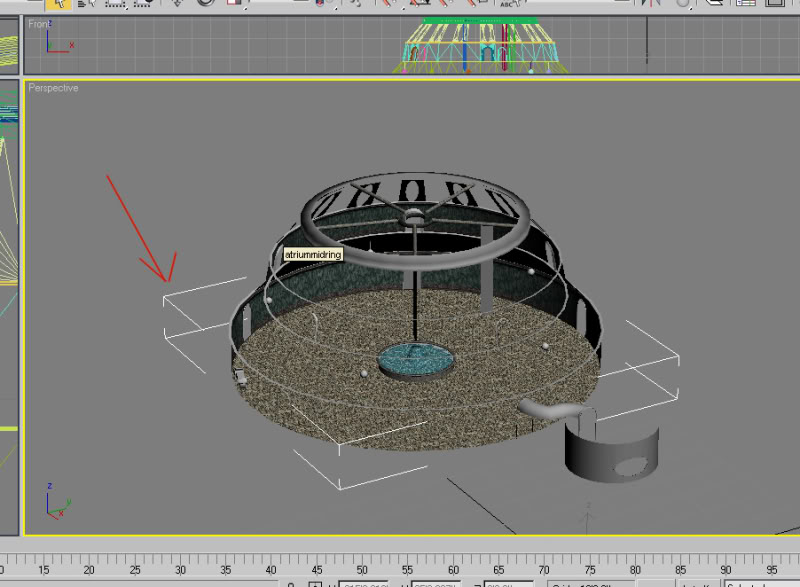
First select the object. I've selected the bottom wall of my Atrium here:
http://assets.openuru.org/wiki/andy/MaxTutPics1/getstart1.jpg
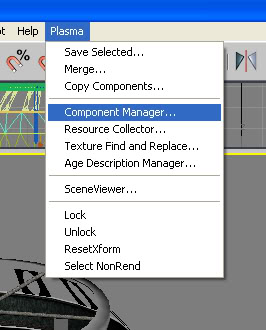
Then go up to the Plamsa Menu and select "Component Manager"
http://assets.openuru.org/wiki/andy/MaxTutPics1/getstart2.jpg
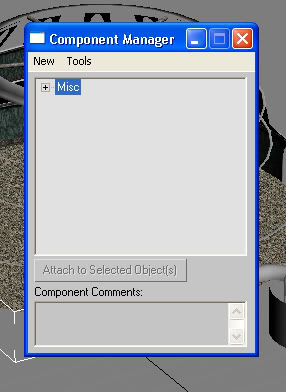
You'll have our friendly little box pop up (get friendly, 'cause you will use this box, a LOT!):
http://assets.openuru.org/wiki/andy/MaxTutPics1/getstart3.jpg
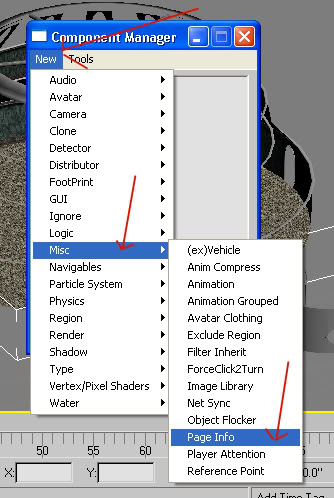
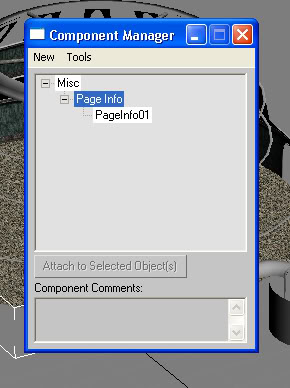
In the Component Manager box, click on "New" then "Misc." and then "Page Info"
http://assets.openuru.org/wiki/andy/MaxTutPics1/getstart4.jpg
This will create what looks like a directory tree in our little box here:
http://assets.openuru.org/wiki/andy/MaxTutPics1/getstart5.jpg
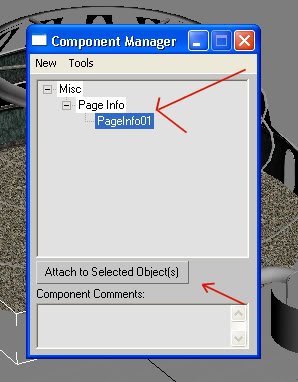
Now for each object, you need to click once on where it says "PageInfo01" (or whatever you named it, or a different page, if the object goes in a different prp file), to highlight it, and then click on the "Attach To Selected Object(s)" button shown by my arrows here:
http://assets.openuru.org/wiki/andy/MaxTutPics1/getstart6.jpg
As you may have guessed, you can select more than one object at a time to do this.
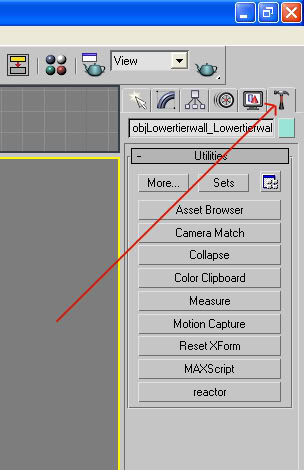
Now go to the Utilities Tab in the tool box on the right hand side of your screen (looks like a little hammer) and click on it:
http://assets.openuru.org/wiki/andy/MaxTutPics1/getstart7.jpg
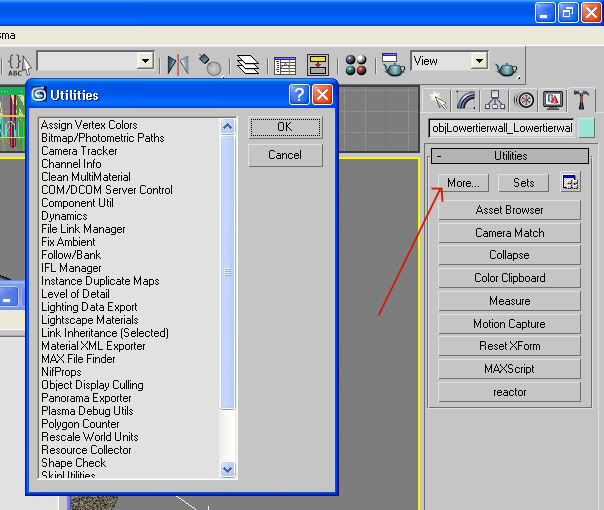
Click on the "More" button, show by my arrow in the pic below, and you'll have a neat box pop up:
http://assets.openuru.org/wiki/andy/MaxTutPics1/getstart8.jpg
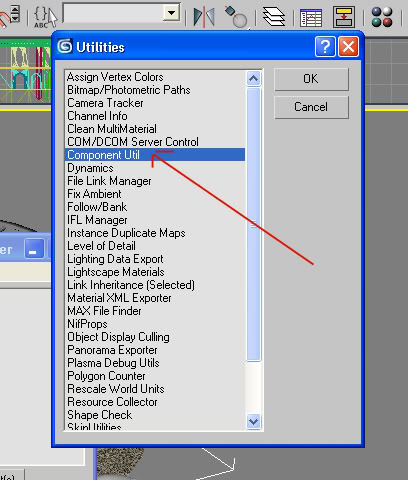
In that neat box that popped up, Double click on where it says "Component Util" (where my arrow is pointing in the pic below):
http://assets.openuru.org/wiki/andy/MaxTutPics1/getstart9.jpg
You should have an area in the the right hand tool box show up that looks like this:
http://assets.openuru.org/wiki/andy/MaxTutPics1/getstart10.jpg
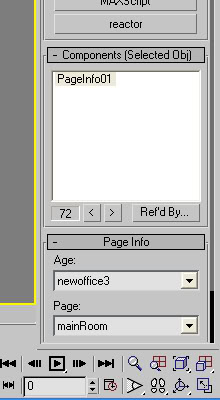
As you can see, you now have a dropdown menu box that shows your Age's name and the Mainroom. You can uses these to select what Age the object goes in, and also if it goes on a different Page for the Age.
Now, when you go to export your Age, this object (or Objects) will be exported into your prp file for that Age.
You MUST do this for each of your objects in your Age!
Hope this helped folks.
Return To: 3DS Max Plugin Tutorials
A copy of the license is included in the section entitled "GNU Free Documentation License".