In Memoriam: Tai'lahr
OpenUru.org, along with the rest of the Mystonline community, is mourning the loss of Tai'lahr on October 16th, 2019.
Rest in Peace, friend.
Rain Fall
Before going through this tutorial, you need to go through the Particle Tutorial on Snow Fall, as it explains the basics of setting up a Mesh Particle System. Once you understand how to do that, you can come back here and learn how to make rain.
Getting Started......
Okay, the first thing you need to do is think of how you want your rain. Do you want a light drizzle? Or do you want a torrential down pour?
The reason you need to think of this, is that it will affect how you make your mesh. For a down pour, you will need a plane with a lot of faces.....and more than one plane! For a light drizzle, you could most likely get away with using just one plane.
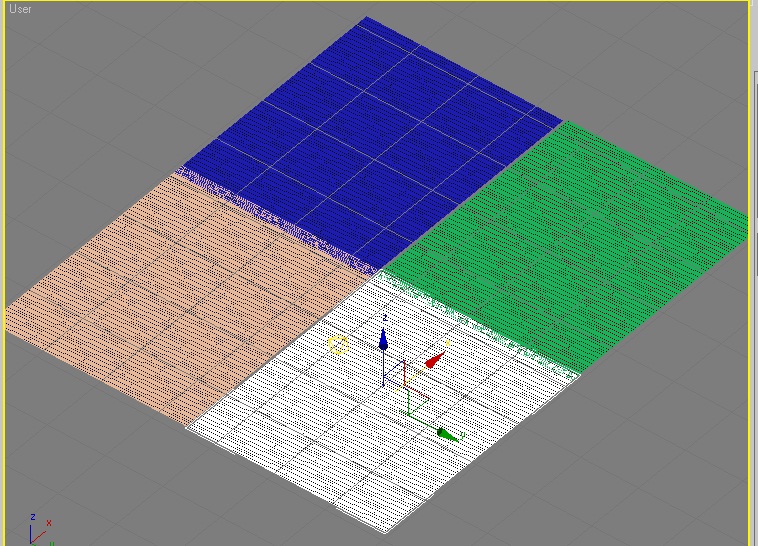
I decided to make it rain heavy inside of my little test Age, so I set up 4 planes like this:
http://assets.openuru.org/wiki/andy/MaxTutPics1/rainmax1.jpg
Another way would could arrange the meshes is to stack them. That will make for even denser rain.
Once you have your meshes made, you need to make your material for them. You'll need a raindrop texture. The raindrop texture that Cyan uses is very easy to make:
Create a pic with a transparent background that is 15 pixels wide, and 60 pixels long (high). Then take your paint brush and draw a straight line down the center. Make the line about 7 pixels wide, with feathered edges. That's it, you're done.
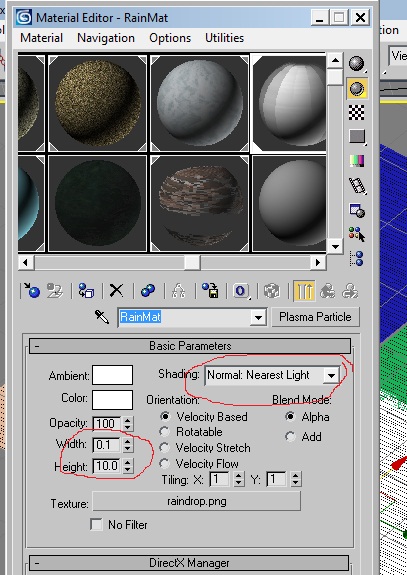
Call up the Material Editor by hitting your "M" key. Click on the Standard button and change it to Plasma Particle. Select your raindrop texture you made by clicking on the blank button next to "Texture", and make your settings like this:
http://assets.openuru.org/wiki/andy/MaxTutPics1/rainmax2.jpg
Take a look at where I've circled Width and Height. I've made the width scaling very small, 0.1. And I've made the Height scaling long: 10.0. This is because in Uru, when it rains, we don't see drops of water, but streaks. This will help produce that effect.
Click on the drop down box and select "Nearest Light" and make your Color and Ambient white.
Assign this material to all of your particle meshes you made. Then call up the component manager.
Attach "Particle System" to each mesh, but you don't have to make a new one for each mesh. You can attach the same one to all 4 meshes since all 4 will be producing the same particle types.
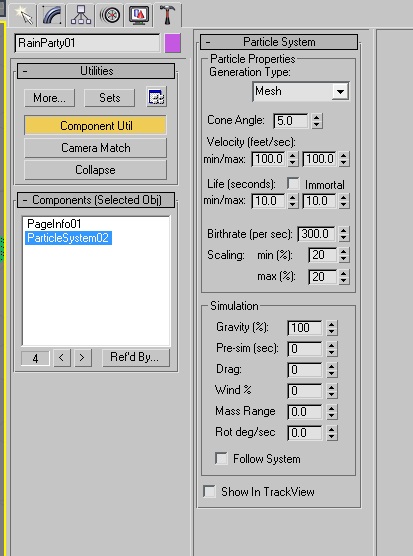
Once you've done that, open up the Utils Tab (the little hammer) and click on the Component Utils button, and select your particle.
Look at the values I assigned my rain:
http://assets.openuru.org/wiki/andy/MaxTutPics1/rainmax3.jpg
These numbers worked really good for me. You can play around with them if you want, but keep in mind 2 things: Velocity and Birthrate.
You'll want to keep your Velocity high, as the rain falls fast, not drifting down like Snow or Leaves.
Birthrate: I've got the number set pretty high, but don't take it too high. I did, and the plugin yelled at me when I tried to export (I'd set it at 1,000).
That's basically it! Export, Drizzle it, and link in.
Return To: 3DS Max Plugin Tutorials
A copy of the license is included in the section entitled "GNU Free Documentation License".