In Memoriam: Tai'lahr
OpenUru.org, along with the rest of the Mystonline community, is mourning the loss of Tai'lahr on October 16th, 2019.
Rest in Peace, friend.
Difference between revisions of "Reward or Takeable Clothing"
m (Removed extra HR in footer) |
Andylegate (talk | contribs) |
||
| Line 22: | Line 22: | ||
This is the animated bone structure of the Male Avatar for MOUL. | This is the animated bone structure of the Male Avatar for MOUL. | ||
| − | + | http://assets.openuru.org/wiki/andy/MaxTutPics2/AvieCloth1.jpg | |
[http://www.guildofmaintainers.org/ftp/basic_avatar_female.max basic_avatar_female.max] | [http://www.guildofmaintainers.org/ftp/basic_avatar_female.max basic_avatar_female.max] | ||
This is the animated bone structure of the Female Avatar for MOUL. | This is the animated bone structure of the Female Avatar for MOUL. | ||
| − | + | http://assets.openuru.org/wiki/andy/MaxTutPics2/avieCloth2.jpg | |
If you already have clothing mesh you have made and want to use, that is great! If you do not have any, then you can use this file here, which is just some basic pants: | If you already have clothing mesh you have made and want to use, that is great! If you do not have any, then you can use this file here, which is just some basic pants: | ||
| Line 58: | Line 58: | ||
Okay, before we dive right in, I want you to take a look at the pants mesh that is in the file I provided in the above link, even if you are going to try and use your own clothing mesh, there is something important that you will need to understand. When you open up the pants.max file, you will see this in the 3D Scene: | Okay, before we dive right in, I want you to take a look at the pants mesh that is in the file I provided in the above link, even if you are going to try and use your own clothing mesh, there is something important that you will need to understand. When you open up the pants.max file, you will see this in the 3D Scene: | ||
| − | + | http://assets.openuru.org/wiki/andy/MaxTutPics2/AvieCloth3.jpg | |
As you can see there are what looks like 3 sets of pants. In reality there are 5, as 3 of them are all sitting in the same place. | As you can see there are what looks like 3 sets of pants. In reality there are 5, as 3 of them are all sitting in the same place. | ||
| Line 65: | Line 65: | ||
The Red mesh, is considered High Ploy or High Faces. This will be your highest resolution of your clothing Mesh. | The Red mesh, is considered High Ploy or High Faces. This will be your highest resolution of your clothing Mesh. | ||
| − | + | http://assets.openuru.org/wiki/andy/MaxTutPics2/AvieCloth4.jpg | |
The Green Mesh is considered the Medium Poly or Medium Faces mesh. | The Green Mesh is considered the Medium Poly or Medium Faces mesh. | ||
| − | + | http://assets.openuru.org/wiki/andy/MaxTutPics2/AvieCloth5.jpg | |
The Dark Blue Mesh is considered the Low Poly or Low Faces mesh, and will the the lowest resolution of your clothing Mesh. | The Dark Blue Mesh is considered the Low Poly or Low Faces mesh, and will the the lowest resolution of your clothing Mesh. | ||
| − | + | http://assets.openuru.org/wiki/andy/MaxTutPics2/AvieCloth6.jpg | |
These 3 meshes will sit on top of one another, and must fit over top the Avatar Bone system. The remaining two meshes that are light blue and what I call Tan are Morphing Meshes. The sit just off to the side. Light Blue is the skiniest avatar, and the Tan is the fattest avatar (don't get offended.....Tan would be MY clothing color!!! heheheh). | These 3 meshes will sit on top of one another, and must fit over top the Avatar Bone system. The remaining two meshes that are light blue and what I call Tan are Morphing Meshes. The sit just off to the side. Light Blue is the skiniest avatar, and the Tan is the fattest avatar (don't get offended.....Tan would be MY clothing color!!! heheheh). | ||
| Line 108: | Line 108: | ||
Open up the BasicBoneAvatar_Male.max file in 3DS Max: | Open up the BasicBoneAvatar_Male.max file in 3DS Max: | ||
| − | + | http://assets.openuru.org/wiki/andy/MaxTutPics2/AvieCloth1.jpg | |
In this file, I have done many things for you already and you will not have to do them. The bone structure system is animated, and the Parent to Child hiarchy is already in place (except for your clothing Meshes, more on that later). The 5 nice looking avatars you see below the bone structure are what is called the Smoothing Bases, and used to be in a separate file. Cyan used XRef to reference them. However, for our purposes, it was easier to just merge them with this file so they are always there. | In this file, I have done many things for you already and you will not have to do them. The bone structure system is animated, and the Parent to Child hiarchy is already in place (except for your clothing Meshes, more on that later). The 5 nice looking avatars you see below the bone structure are what is called the Smoothing Bases, and used to be in a separate file. Cyan used XRef to reference them. However, for our purposes, it was easier to just merge them with this file so they are always there. | ||
| Line 119: | Line 119: | ||
Okay, let us get the clothing mesh into this scene. Go up to your menu bar and click on Plasma, and then click on Merge. Find and select the Pants.max file you downloaded. Now your scene should look like this: | Okay, let us get the clothing mesh into this scene. Go up to your menu bar and click on Plasma, and then click on Merge. Find and select the Pants.max file you downloaded. Now your scene should look like this: | ||
| − | + | http://assets.openuru.org/wiki/andy/MaxTutPics2/AvieCloth7.jpg | |
As you can see, the Red, Green and Dark Blue pants are all right on the Bone system. If you used your own clothing mesh and they are not, you will need to move them so that they are! This is for later when we "Skin" the meshes to the Bone structure. | As you can see, the Red, Green and Dark Blue pants are all right on the Bone system. If you used your own clothing mesh and they are not, you will need to move them so that they are! This is for later when we "Skin" the meshes to the Bone structure. | ||
| Line 125: | Line 125: | ||
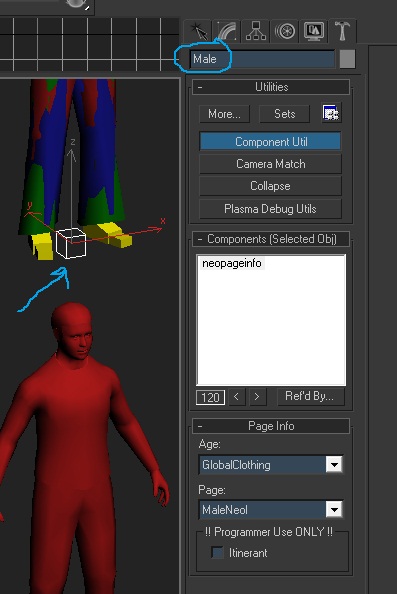
Once you get the files merged, you need to select everything in the scene and attach a PageInfo component on everything that does not have it. Change the Age name to GlobalClothing, and the Page that you made. | Once you get the files merged, you need to select everything in the scene and attach a PageInfo component on everything that does not have it. Change the Age name to GlobalClothing, and the Page that you made. | ||
| − | + | http://assets.openuru.org/wiki/andy/MaxTutPics2/AvieCloth8.jpg | |
| Line 133: | Line 133: | ||
Okay, we are going to do some work with the Smoothing Bases here. I could have done it all for you, but then where is the fun in that? Go down and select all the meshes for the Red (High) Smoothing Avatar: | Okay, we are going to do some work with the Smoothing Bases here. I could have done it all for you, but then where is the fun in that? Go down and select all the meshes for the Red (High) Smoothing Avatar: | ||
| − | + | http://assets.openuru.org/wiki/andy/MaxTutPics2/AvieCloth9.jpg | |
Now open up the Component Manager and click on New > Render > Smoothing Base and attach it to these meshes. | Now open up the Component Manager and click on New > Render > Smoothing Base and attach it to these meshes. | ||
| − | + | http://assets.openuru.org/wiki/andy/MaxTutPics2/AvieCloth10.jpg | |
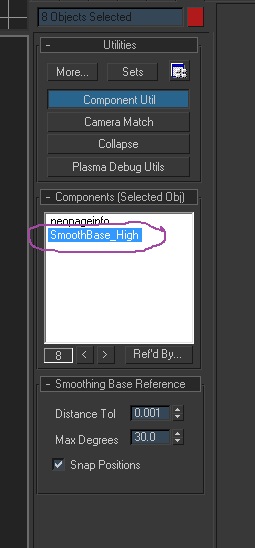
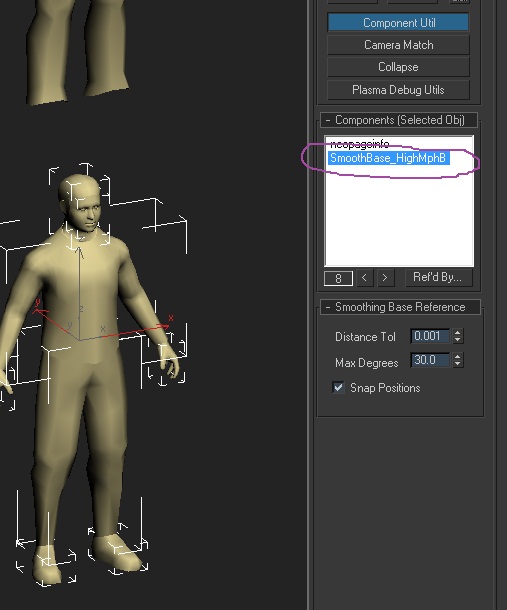
Rename the component to what you see in my picture below. Renaming the components is also a MUST to help keep track of things! | Rename the component to what you see in my picture below. Renaming the components is also a MUST to help keep track of things! | ||
| − | + | http://assets.openuru.org/wiki/andy/MaxTutPics2/AvieCloth11.jpg | |
You can leave the Roll Out for it alone as the default settings are fine. | You can leave the Roll Out for it alone as the default settings are fine. | ||
| Line 147: | Line 147: | ||
Now go and select all the meshes of the Green Smooth Avatar (Med), and attach a NEW Smoothing Base component to it too (DO NOT use the same one you just attached to the High mesh!). Rename it also so that you know it is for the Medium Smoothing Mesh: | Now go and select all the meshes of the Green Smooth Avatar (Med), and attach a NEW Smoothing Base component to it too (DO NOT use the same one you just attached to the High mesh!). Rename it also so that you know it is for the Medium Smoothing Mesh: | ||
| − | + | http://assets.openuru.org/wiki/andy/MaxTutPics2/AvieCloth12.jpg | |
Repeat these same steps for the Dark Blue Smooth Avatar (Low), and again, rename the component. | Repeat these same steps for the Dark Blue Smooth Avatar (Low), and again, rename the component. | ||
| Line 153: | Line 153: | ||
Now go down and select all the meshes for the Light Blue (Cyan? heheheh) Smooth looking Avatar. This is the Morphing Mesh Smooth Base for our High Mesh. Repeat the steps above and attach the Smoothing Base component to it too, and rename it: | Now go down and select all the meshes for the Light Blue (Cyan? heheheh) Smooth looking Avatar. This is the Morphing Mesh Smooth Base for our High Mesh. Repeat the steps above and attach the Smoothing Base component to it too, and rename it: | ||
| − | + | http://assets.openuru.org/wiki/andy/MaxTutPics2/AvieCloth13.jpg | |
Then go over and select all the Tan Smooth Avatar, and again, repeat assigning the Smoothing Base component to it too, also renaming it: | Then go over and select all the Tan Smooth Avatar, and again, repeat assigning the Smoothing Base component to it too, also renaming it: | ||
| − | + | http://assets.openuru.org/wiki/andy/MaxTutPics2/AvieCloth14.jpg | |
This means you should have FIVE Smoothing Base components in the Component Manager now! | This means you should have FIVE Smoothing Base components in the Component Manager now! | ||
| Line 166: | Line 166: | ||
Go to between the Avatar's feet and select the Male Dummy box that is there. | Go to between the Avatar's feet and select the Male Dummy box that is there. | ||
| − | + | http://assets.openuru.org/wiki/andy/MaxTutPics2/AvieCloth15.jpg | |
If you then hit the "H" Key, you will see the selection box, and can see that just about everything is parented to the Male dummy box. The exceptions to this are the Smoothing Base Avatars. | If you then hit the "H" Key, you will see the selection box, and can see that just about everything is parented to the Male dummy box. The exceptions to this are the Smoothing Base Avatars. | ||
| Line 172: | Line 172: | ||
You may notice that our Pants meshes are not either (or whatever Mesh you used). You need to select each one at a time, and parent it to the High, Med, and Low Dummy boxes: | You may notice that our Pants meshes are not either (or whatever Mesh you used). You need to select each one at a time, and parent it to the High, Med, and Low Dummy boxes: | ||
| − | + | http://assets.openuru.org/wiki/andy/MaxTutPics2/AvieCloth16.jpg | |
So select the Red Pants, and parent it to the High dummy box. Select your Green pants and parent it to the Med dummy box, and then select the Dark Blue pants and parent them to the Low Dummy box | So select the Red Pants, and parent it to the High dummy box. Select your Green pants and parent it to the Med dummy box, and then select the Dark Blue pants and parent them to the Low Dummy box | ||
| Line 179: | Line 179: | ||
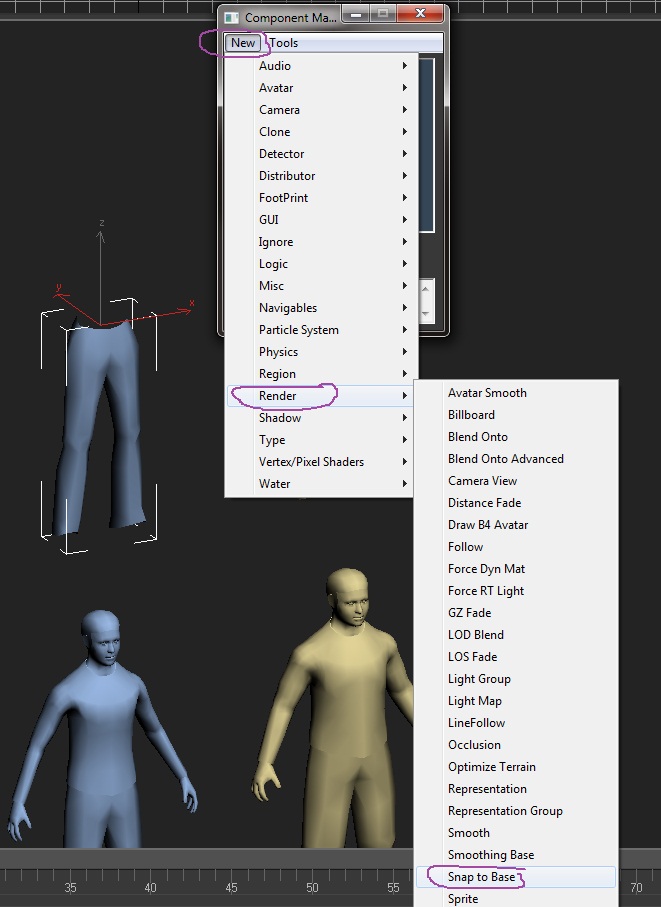
However, now it is time to work with them. Select the Light Blue pants. Open up the Component Manager and click on New > Render > Snap To Base and assign it to them. | However, now it is time to work with them. Select the Light Blue pants. Open up the Component Manager and click on New > Render > Snap To Base and assign it to them. | ||
| − | + | http://assets.openuru.org/wiki/andy/MaxTutPics2/AvieCloth17.jpg | |
Rename the component, and then in the roll out for it, click on the button below "Smoothing Comp Of Base Set" and then click on the Light Blue Smooth Avatar: | Rename the component, and then in the roll out for it, click on the button below "Smoothing Comp Of Base Set" and then click on the Light Blue Smooth Avatar: | ||
| − | + | http://assets.openuru.org/wiki/andy/MaxTutPics2/AvieCloth18.jpg | |
Now click on the Tan pants and do the exact thing for them too (only make sure it's a NEW Snap To Base component, and this time click on the Tan Smooth Avatar): | Now click on the Tan pants and do the exact thing for them too (only make sure it's a NEW Snap To Base component, and this time click on the Tan Smooth Avatar): | ||
| − | + | http://assets.openuru.org/wiki/andy/MaxTutPics2/AvieCloth19.jpg | |
---- | ---- | ||
| Line 194: | Line 194: | ||
Okay, time to mess with our High, Med, and Low Dummy boxes. Select the High one: | Okay, time to mess with our High, Med, and Low Dummy boxes. Select the High one: | ||
| − | + | http://assets.openuru.org/wiki/andy/MaxTutPics2/AvieCloth20.jpg | |
Open up the Component Manager and click on New > Avatar > Morph Layer and assign it as a component to the High Dummy box: | Open up the Component Manager and click on New > Avatar > Morph Layer and assign it as a component to the High Dummy box: | ||
| − | + | http://assets.openuru.org/wiki/andy/MaxTutPics2/AvieCloth21.jpg | |
In the Roll Out for it, you'll see a box called "Delta Meshes" and an Add Button: | In the Roll Out for it, you'll see a box called "Delta Meshes" and an Add Button: | ||
| − | + | http://assets.openuru.org/wiki/andy/MaxTutPics2/AvieCloth22.jpg | |
Click on the Add button and then click on the Light Blue pants | Click on the Add button and then click on the Light Blue pants | ||
| Line 210: | Line 210: | ||
Now assign a 2nd Morph Layer to the High Dummy, changing it's name, and in it's roll out, click on the Add button, only this time click on the Tan pants | Now assign a 2nd Morph Layer to the High Dummy, changing it's name, and in it's roll out, click on the Add button, only this time click on the Tan pants | ||
| − | + | http://assets.openuru.org/wiki/andy/MaxTutPics2/AvieCloth23.jpg | |
What we just did is told the game that your pants can Morph down to as small as the Light Blue mesh, but get no smaller, and it can also get as big as the Tan mesh, but no bigger. | What we just did is told the game that your pants can Morph down to as small as the Light Blue mesh, but get no smaller, and it can also get as big as the Tan mesh, but no bigger. | ||
| Line 216: | Line 216: | ||
Open up the Component Manager and click on New > Avatar > Morph Sequence, and assign this to the High Dummy box, and rename it too: | Open up the Component Manager and click on New > Avatar > Morph Sequence, and assign this to the High Dummy box, and rename it too: | ||
| − | + | http://assets.openuru.org/wiki/andy/MaxTutPics2/AvieCloth23a.jpg | |
In the roll out for this mesh, click on the Neutral Mesh button and then click on the Red pants Mesh. In the Box that says Morph Layers, click on Add and in the box that pops up, select the 2 Morph Layers that are assigned to the High Dummy | In the roll out for this mesh, click on the Neutral Mesh button and then click on the Red pants Mesh. In the Box that says Morph Layers, click on Add and in the box that pops up, select the 2 Morph Layers that are assigned to the High Dummy | ||
| − | + | http://assets.openuru.org/wiki/andy/MaxTutPics2/AvieCloth23b.jpg | |
| Line 228: | Line 228: | ||
Now it's time to "Skin" our Pants Mesh to the Bone structure. This is important because if you have messed with the Animation Bar, you've seen that the bones move, but not the pants: | Now it's time to "Skin" our Pants Mesh to the Bone structure. This is important because if you have messed with the Animation Bar, you've seen that the bones move, but not the pants: | ||
| − | + | http://assets.openuru.org/wiki/andy/MaxTutPics2/AvieCloth30.jpg | |
Let us start with the Red or High Mesh pants. Select them and then click on the Modifier Tab. We need to add UVW Mapping to this mesh. So do that: | Let us start with the Red or High Mesh pants. Select them and then click on the Modifier Tab. We need to add UVW Mapping to this mesh. So do that: | ||
| − | + | http://assets.openuru.org/wiki/andy/MaxTutPics2/AvieCloth24.jpg | |
You do NOT need to edit the UV Mapping. Adding the Unwrap UVW modifier simply gives the mesh mapping coordinates and that is all we need. | You do NOT need to edit the UV Mapping. Adding the Unwrap UVW modifier simply gives the mesh mapping coordinates and that is all we need. | ||
| Line 238: | Line 238: | ||
Next, go up to the menu bar and click on Modifiers > Animation > Skin and give it that modifier: | Next, go up to the menu bar and click on Modifiers > Animation > Skin and give it that modifier: | ||
| − | + | http://assets.openuru.org/wiki/andy/MaxTutPics2/AvieCloth25.jpg | |
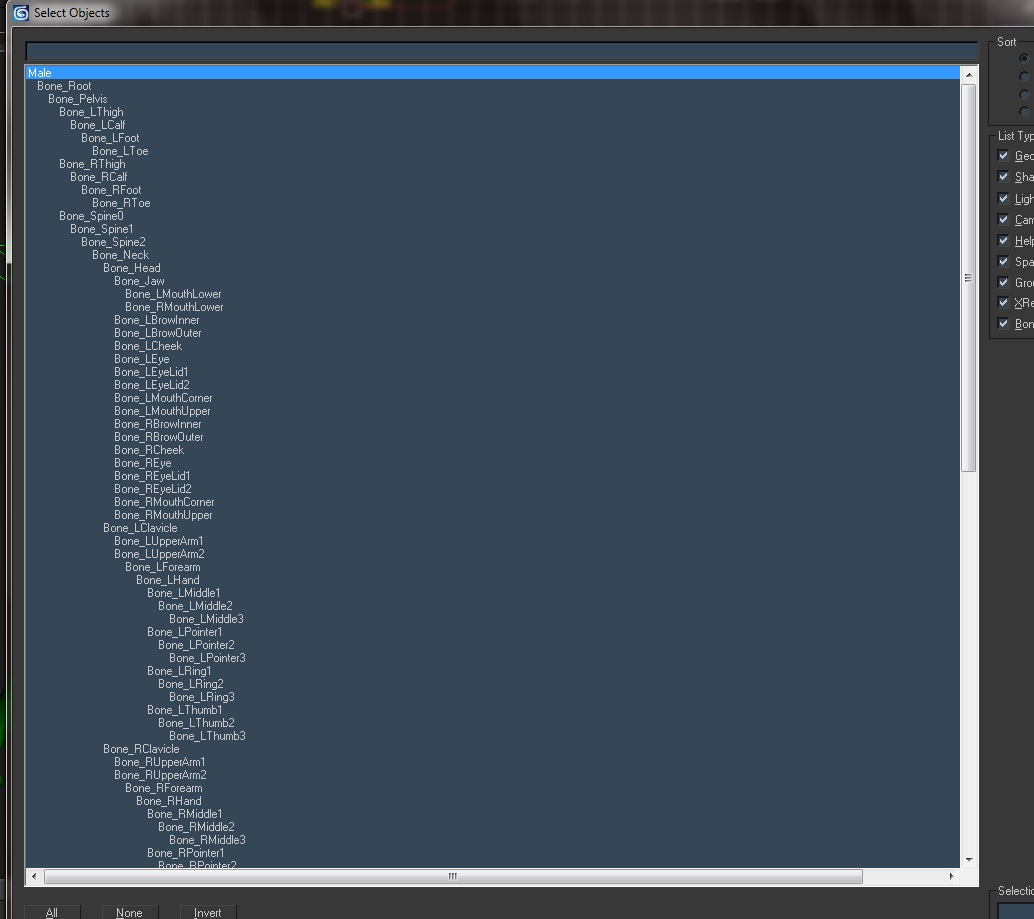
Open up the Skin Modifier. You see that you have a empty box and we need to put bones in there. We do this by clicking on the Add button I have circled in my picture below: | Open up the Skin Modifier. You see that you have a empty box and we need to put bones in there. We do this by clicking on the Add button I have circled in my picture below: | ||
| − | + | http://assets.openuru.org/wiki/andy/MaxTutPics2/AvieCloth26.jpg | |
So how do you know what bones to add to what clothing mesh? I mean, to me, Pants should just need the Pelvis, Thighs, Calfs and that should be it, right? | So how do you know what bones to add to what clothing mesh? I mean, to me, Pants should just need the Pelvis, Thighs, Calfs and that should be it, right? | ||
| Line 264: | Line 264: | ||
The envelopes for the Bones are what Cyan has set for the pants all ready, however, if you are using your own mesh that you have made, or modified an existing clothing mesh, you will need to move the animation bar and make sure the clothing moves with the bones, line the next 3 pictures show: | The envelopes for the Bones are what Cyan has set for the pants all ready, however, if you are using your own mesh that you have made, or modified an existing clothing mesh, you will need to move the animation bar and make sure the clothing moves with the bones, line the next 3 pictures show: | ||
| − | + | http://assets.openuru.org/wiki/andy/MaxTutPics2/AvieCloth27.jpg | |
| − | + | http://assets.openuru.org/wiki/andy/MaxTutPics2/AvieCloth28.jpg | |
| − | + | http://assets.openuru.org/wiki/andy/MaxTutPics2/AvieCloth29.jpg | |
Now, if you moved the animation bar, and instead you got this: | Now, if you moved the animation bar, and instead you got this: | ||
| − | + | http://assets.openuru.org/wiki/andy/MaxTutPics2/AvieCloth30.jpg | |
It means you did not add the UVW mapping modifier (or you collapsed the tree. I have found that collapsing the tree can cause this problem), or you did not pick the correct bones! | It means you did not add the UVW mapping modifier (or you collapsed the tree. I have found that collapsing the tree can cause this problem), or you did not pick the correct bones! | ||
| Line 278: | Line 278: | ||
Or you may have seen something like this: | Or you may have seen something like this: | ||
| − | + | http://assets.openuru.org/wiki/andy/MaxTutPics2/AvieCloth31.jpg | |
This means you did not do all the clothing meshes yet. | This means you did not do all the clothing meshes yet. | ||
| Line 286: | Line 286: | ||
You more than likely will see this, especially if you are using your own meshes you made: | You more than likely will see this, especially if you are using your own meshes you made: | ||
| − | + | http://assets.openuru.org/wiki/andy/MaxTutPics2/AvieCloth32.jpg | |
If you see your clothing being stretched or distorted like this, it means you will need to adjust the Envelopes on the Bones. Don't worry, I'm going to show you how to do that. | If you see your clothing being stretched or distorted like this, it means you will need to adjust the Envelopes on the Bones. Don't worry, I'm going to show you how to do that. | ||
| Line 295: | Line 295: | ||
In the modifier tab, open up the Skin Modifier and select where it says Envelope, select the check marks for Verticies, Envelopes, and Cross sections, and then the bone in the box you want to adjust: | In the modifier tab, open up the Skin Modifier and select where it says Envelope, select the check marks for Verticies, Envelopes, and Cross sections, and then the bone in the box you want to adjust: | ||
| − | + | http://assets.openuru.org/wiki/andy/MaxTutPics2/AvieCloth33.jpg | |
'''HEY! MY RED PANTS JUST TURNED BLUE!!!'' | '''HEY! MY RED PANTS JUST TURNED BLUE!!!'' | ||
| Line 303: | Line 303: | ||
As you can see from the above picture, our envelope is way too small to interact with the skin. We need to make it bigger. I like using the Cross Sections to adjust this, so in my picture below click and drag on one of the boxes I have circled: | As you can see from the above picture, our envelope is way too small to interact with the skin. We need to make it bigger. I like using the Cross Sections to adjust this, so in my picture below click and drag on one of the boxes I have circled: | ||
| − | + | http://assets.openuru.org/wiki/andy/MaxTutPics2/AvieCloth34.jpg | |
Now drag your mouse to make the circle bigger: | Now drag your mouse to make the circle bigger: | ||
| − | + | http://assets.openuru.org/wiki/andy/MaxTutPics2/AvieCloth35.jpg | |
As you can see, the pants mesh is changing colors to show us where it is being affected by the envelope. Make it big enough to include the area you need, but not too big! If you make it too big, it will start to affect the other pant leg and we do not want that! | As you can see, the pants mesh is changing colors to show us where it is being affected by the envelope. Make it big enough to include the area you need, but not too big! If you make it too big, it will start to affect the other pant leg and we do not want that! | ||
| Line 313: | Line 313: | ||
Now go down and adjust the other cross section of the envelope to again what you need: | Now go down and adjust the other cross section of the envelope to again what you need: | ||
| − | + | http://assets.openuru.org/wiki/andy/MaxTutPics2/AvieCloth36.jpg | |
Now check your other envelopes of the other bones and make sure they are affecting the skin like we need: | Now check your other envelopes of the other bones and make sure they are affecting the skin like we need: | ||
| Line 319: | Line 319: | ||
Foot: | Foot: | ||
| − | + | http://assets.openuru.org/wiki/andy/MaxTutPics2/AvieCloth37.jpg | |
Thigh: | Thigh: | ||
| − | + | http://assets.openuru.org/wiki/andy/MaxTutPics2/AvieCloth38.jpg | |
Pelvis: | Pelvis: | ||
| − | + | http://assets.openuru.org/wiki/andy/MaxTutPics2/AvieCloth39.jpg | |
After you have done this, you can move the animation bar and see how your skin is moving with the bones. In my pic below you can see we got the right pant leg to work correctly, but the left one still needs to be done: | After you have done this, you can move the animation bar and see how your skin is moving with the bones. In my pic below you can see we got the right pant leg to work correctly, but the left one still needs to be done: | ||
| − | + | http://assets.openuru.org/wiki/andy/MaxTutPics2/AvieCloth40.jpg | |
Okay, NOW do that for the other 2 meshes (you MUST set the envelopes for all 3 clothing meshes, Red, Green and Dark Blue)! | Okay, NOW do that for the other 2 meshes (you MUST set the envelopes for all 3 clothing meshes, Red, Green and Dark Blue)! | ||
| Line 345: | Line 345: | ||
Call up your Material Editor, and select a blank or new spot. Click on Get Material, and select New and then double click where it says Plasma Clothing: | Call up your Material Editor, and select a blank or new spot. Click on Get Material, and select New and then double click where it says Plasma Clothing: | ||
| − | + | http://assets.openuru.org/wiki/andy/MaxTutPics2/AvieCloth42.jpg | |
This is what the default material will look like: | This is what the default material will look like: | ||
| − | + | http://assets.openuru.org/wiki/andy/MaxTutPics2/AvieCloth43.jpg | |
Go to where the Material Name is and change it to something. If you have looked through Cyan's Avatar Documentaion, you will see that they use a pretty good system for naming things. This is very important so you do not get confused as to what clothing you are dealing with, and if it's for Male or Female. Later, in your Age, you will be having to use this name, so WRITE IT DOWN!!!!!! | Go to where the Material Name is and change it to something. If you have looked through Cyan's Avatar Documentaion, you will see that they use a pretty good system for naming things. This is very important so you do not get confused as to what clothing you are dealing with, and if it's for Male or Female. Later, in your Age, you will be having to use this name, so WRITE IT DOWN!!!!!! | ||
| − | + | http://assets.openuru.org/wiki/andy/MaxTutPics2/AvieCloth44.jpg | |
I named mine MNeoPants, with the "M" meaning Male. | I named mine MNeoPants, with the "M" meaning Male. | ||
| Line 359: | Line 359: | ||
Next, in the Item Description box, you can put in a description of your clothing item here. It's not necessary to put anything here, but it will help you keep track of things: | Next, in the Item Description box, you can put in a description of your clothing item here. It's not necessary to put anything here, but it will help you keep track of things: | ||
| − | + | http://assets.openuru.org/wiki/andy/MaxTutPics2/AvieCloth45.jpg | |
Next, in the Tileset dropdown box, you need to select what this Material is for. In my case it is for Pants, so I will select "Legs" | Next, in the Tileset dropdown box, you need to select what this Material is for. In my case it is for Pants, so I will select "Legs" | ||
| − | + | http://assets.openuru.org/wiki/andy/MaxTutPics2/AvieCloth47.jpg | |
Next, click on the Layer dropdown box, and select "Base". You have other things you can choose, but right now we need to set the Base Texture (default texture of the clothes): | Next, click on the Layer dropdown box, and select "Base". You have other things you can choose, but right now we need to set the Base Texture (default texture of the clothes): | ||
| − | + | http://assets.openuru.org/wiki/andy/MaxTutPics2/AvieCloth48.jpg | |
Now you can click on the button that says (None) and select your texture for you clothes. Notice how it says "Legs (512, 512)". That is because this texture MUST be 512 x 512 pixels! Do not try and use a different size, or else you will get a nasty message from the pluging telling you "No. Try again". | Now you can click on the button that says (None) and select your texture for you clothes. Notice how it says "Legs (512, 512)". That is because this texture MUST be 512 x 512 pixels! Do not try and use a different size, or else you will get a nasty message from the pluging telling you "No. Try again". | ||
| − | + | http://assets.openuru.org/wiki/andy/MaxTutPics2/AvieCloth49.jpg | |
Let us talk about the clothing textures for just a minute. If you look at the documentation, it shows you how the textures are suppose to be arranged and the sizes. If you change the Tileset to other body parts, you will see different buttons pop up for them, AND you will see different textures sizes: | Let us talk about the clothing textures for just a minute. If you look at the documentation, it shows you how the textures are suppose to be arranged and the sizes. If you change the Tileset to other body parts, you will see different buttons pop up for them, AND you will see different textures sizes: | ||
| Line 377: | Line 377: | ||
The Torso has 2 textures: Torso and Arms | The Torso has 2 textures: Torso and Arms | ||
| − | + | http://assets.openuru.org/wiki/andy/MaxTutPics2/AvieCloth50.jpg | |
The Head has several different textures: Eyes, Face, Extra Hair, and Hat | The Head has several different textures: Eyes, Face, Extra Hair, and Hat | ||
| − | + | http://assets.openuru.org/wiki/andy/MaxTutPics2/AvieCloth51.jpg | |
Now, the Pants (and other clothing), you can add Layers with the dropdown box. Remember how in the Relto Closet the player can change the pants color? And how they can change the Belt color? This is because you can add 2 more layers, Tint1 and Tint2, and assign different textures to them. Here is what Cyan has for the Kakki Pants: | Now, the Pants (and other clothing), you can add Layers with the dropdown box. Remember how in the Relto Closet the player can change the pants color? And how they can change the Belt color? This is because you can add 2 more layers, Tint1 and Tint2, and assign different textures to them. Here is what Cyan has for the Kakki Pants: | ||
| Line 389: | Line 389: | ||
Base Texture: | Base Texture: | ||
| − | + | http://assets.openuru.org/wiki/andy/MaxTutPics2/Basepants.png | |
Tint1 texture for changing the pants color: | Tint1 texture for changing the pants color: | ||
| − | + | http://assets.openuru.org/wiki/andy/MaxTutPics2/Tint1pants.png | |
Tint2 texture for changing the Belt's color: | Tint2 texture for changing the Belt's color: | ||
| − | + | http://assets.openuru.org/wiki/andy/MaxTutPics2/Tint2pants.png | |
Okay, the next section is for Python. You can just put what I have for now. For GroupName you can make up your own if you like: | Okay, the next section is for Python. You can just put what I have for now. For GroupName you can make up your own if you like: | ||
| − | + | http://assets.openuru.org/wiki/andy/MaxTutPics2/AvieCloth52.jpg | |
And that is it. You do not UV Map the texture, as that is built in (and why the textures for clothing HAVE to be laid out in certain ways that the documentation shows you). | And that is it. You do not UV Map the texture, as that is built in (and why the textures for clothing HAVE to be laid out in certain ways that the documentation shows you). | ||
| Line 411: | Line 411: | ||
Now close the Material Editor (I sure hope you wrote down the name or names of your Materials), and select the dummy box between the Avatar's feet. Open up the Component Manager and click on New > Avatar > Avatar Clothing, and assign it to the dummy: | Now close the Material Editor (I sure hope you wrote down the name or names of your Materials), and select the dummy box between the Avatar's feet. Open up the Component Manager and click on New > Avatar > Avatar Clothing, and assign it to the dummy: | ||
| − | + | http://assets.openuru.org/wiki/andy/MaxTutPics2/AvieCloth53.jpg | |
Rename the component so it makes sense, and then look at the roll out for it: | Rename the component so it makes sense, and then look at the roll out for it: | ||
| − | + | http://assets.openuru.org/wiki/andy/MaxTutPics2/AvieCloth54.jpg | |
For the box that says Clothing Materials, click on the Add button, and add the Material you made for the pants. | For the box that says Clothing Materials, click on the Add button, and add the Material you made for the pants. | ||
| Line 423: | Line 423: | ||
Now go down to the LOD box, and click on the button, selecting the proper mesh for that component (Red for High, Green for Med, etc): | Now go down to the LOD box, and click on the button, selecting the proper mesh for that component (Red for High, Green for Med, etc): | ||
| − | + | http://assets.openuru.org/wiki/andy/MaxTutPics2/AvieCloth55.jpg | |
CONGRADULATIONS! YOU JUST COMPLETED THE GLOBALCLOTHING PART!!!!!! yay! Drinks all around! Take a break! You deserve it! Because NOW you have to export this. Once you have, you can send the modified .age file and new prp file for GlobalClothing to your MOUL type server admin person. | CONGRADULATIONS! YOU JUST COMPLETED THE GLOBALCLOTHING PART!!!!!! yay! Drinks all around! Take a break! You deserve it! Because NOW you have to export this. Once you have, you can send the modified .age file and new prp file for GlobalClothing to your MOUL type server admin person. | ||
| Line 438: | Line 438: | ||
For this tutorial, I just made a box to be my clickable. Then I assigned a Python component to it, and used xTakableClothing.py as the python. In the roll outs, it is pretty easy to figure out. However, I do need to cover a couple of things: | For this tutorial, I just made a box to be my clickable. Then I assigned a Python component to it, and used xTakableClothing.py as the python. In the roll outs, it is pretty easy to figure out. However, I do need to cover a couple of things: | ||
| − | + | http://assets.openuru.org/wiki/andy/MaxTutPics2/AvieCloth56.jpg | |
Where it says "Show / Hide age SDL var name", you need to put in a SDL BOOL variable. This means you need to add a SDL line to your SDL file, that looks like this: | Where it says "Show / Hide age SDL var name", you need to put in a SDL BOOL variable. This means you need to add a SDL line to your SDL file, that looks like this: | ||
| Line 463: | Line 463: | ||
Short Sleeve Shirts: | Short Sleeve Shirts: | ||
| − | + | http://assets.openuru.org/wiki/andy/MaxTutPics2/AvieCloth57.jpg | |
As you can see from the above picture, if you decide to make your own short sleeve shirt, you MUST provide the fore arms too! If you do not, when the player puts the shirt on, it will look like they have no fore arms! | As you can see from the above picture, if you decide to make your own short sleeve shirt, you MUST provide the fore arms too! If you do not, when the player puts the shirt on, it will look like they have no fore arms! | ||
| Line 470: | Line 470: | ||
Hats and Helmets: | Hats and Helmets: | ||
| − | + | http://assets.openuru.org/wiki/andy/MaxTutPics2/AvieCloth58.jpg | |
For Hats and Helmets you must provide part of the head as you can see in the picture above. Accessories like Glasses, earrings, etc, do not require this. But hats do. | For Hats and Helmets you must provide part of the head as you can see in the picture above. Accessories like Glasses, earrings, etc, do not require this. But hats do. | ||
Revision as of 17:07, 29 July 2011
Credit where credit is due! This tutorial would not have been possible without the help of GPNMilano, who did a LOT of indepth work on this and provided me with much information when I started learning how to do this. Credit also goes to Austin and Mark DeForest (aka Chogon) from Cyan for the information and help given by them.
Before you get started with this tutorial, PLEASE read the following!
This tutorial is not for a beginner in Age creation. If you have just started and are still learning how to even just model and texture your Age, you may want to get more practice in before you attempt this. The process is complex. You will not be able to use this with any of the stand alone Uru games (POTS, Uru:CC), nor will this work correctly with ALCUGS or UU type servers. You must have access to a MOUL based server in order to test what you are making due to changes in the Avatar's bone structure that were made. This is mostly due to the files I'm providing as the Avatar bone structure is based upon the MOUL avatar. If someone were to change the structure to what is used in the stand alone and ALCUGS, then you would be able to use the information here. But if you try to use it, you will find that the avatar will not look right when you put the clothing on. Instead you'll look like some deformed, mutant Bahro!
This tutorial is not meant to show you how to make clothing meshes that will fit the avatar, but instead assumes that you already have those. In the files I provide, will be a set of meshes for some pants so that you can follow along and give it a try. The documentation provided comes from Cyan, and has a wealth of information in it, including how to make the clothing meshes. Textures for clothing are special too, and must be a certain size and layout depending on what type of clothing / accessory you are making.
There are a couple of things that I have discovered while doing this: I have not been successful in making certain types of clothing, such as Jump Suits. The way the bone structure is made, it does not like once piece clothing. Combining the legs with the torso or the torso with the head (like a diving bell suit) causes problems with the avatar when it animates in game. This does not mean that it is impossible (I have learned not to use that word when it comes to Plasma and the Uru Community), however someone will have to figure out a way to makes those.
Finally, this method that I am going to show you involves adding prp files to the GlobalClothing Age. Trying to place the clothing in your Age will not work, as the Plasma Clothing material type will not export into the Age. I realize that this could cause problems, especially on a server where more than one Fan Age will have clothing. However, until someone figures out a way to work around this, it is the only way I know for it to work.
Enough talking from me. Let's get to work. There is a LOT of information to get through.
Files You Will Need
You will need to download at least the next 2 files:
This is the animated bone structure of the Male Avatar for MOUL. http://assets.openuru.org/wiki/andy/MaxTutPics2/AvieCloth1.jpg
This is the animated bone structure of the Female Avatar for MOUL. http://assets.openuru.org/wiki/andy/MaxTutPics2/avieCloth2.jpg
If you already have clothing mesh you have made and want to use, that is great! If you do not have any, then you can use this file here, which is just some basic pants: pants.max
You do not need this file, however this is what you should end up with at the end of the tutorial: PantsNeolbah.max
avatar-documentation.pdf This is Cyan's documentation on the Avatar for making clothing.
The following are python files made by Mark DeForest (aka Chogon) and can be extremely useful:
This file will allow you to let the avatar link to the Relto closet without having to go to Relto, and when they are done, will link back into your Age.
This file will save what the player is wearing to the client's hard drive before they put on whatever reward clothing your Age offeres.
This file will return the clothing that was saved to the client's computer in case they want to change back to the clothes they were wearing just before they put on the Reward clothing your Age offered.
Getting Started
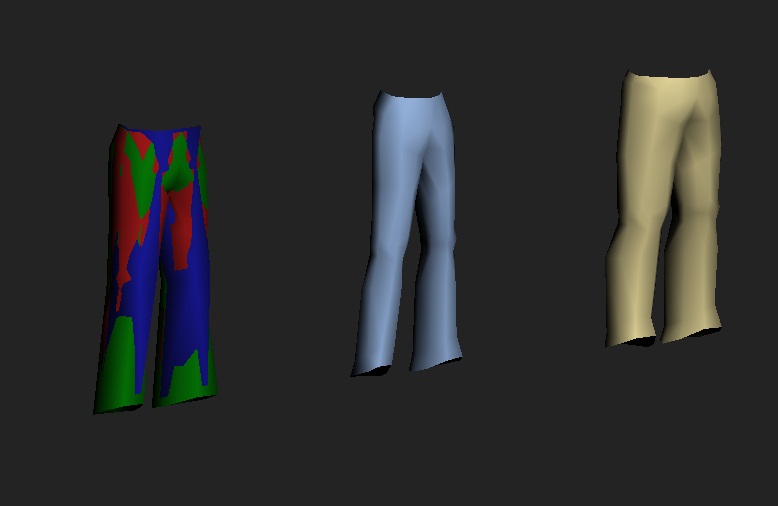
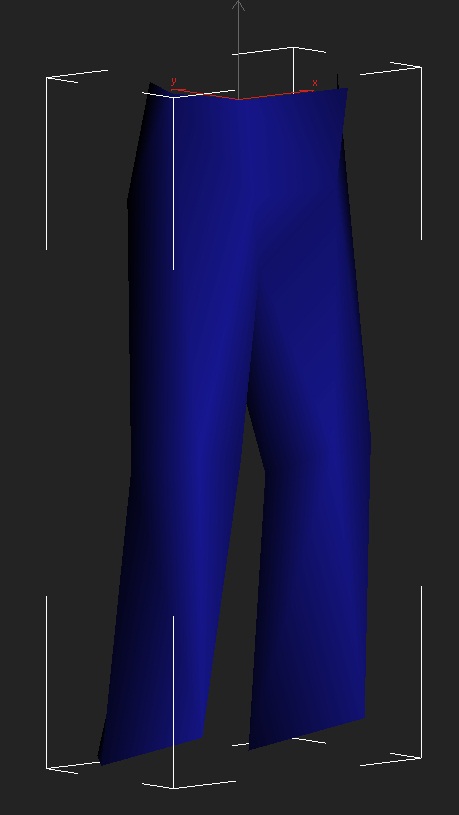
Okay, before we dive right in, I want you to take a look at the pants mesh that is in the file I provided in the above link, even if you are going to try and use your own clothing mesh, there is something important that you will need to understand. When you open up the pants.max file, you will see this in the 3D Scene:
http://assets.openuru.org/wiki/andy/MaxTutPics2/AvieCloth3.jpg
As you can see there are what looks like 3 sets of pants. In reality there are 5, as 3 of them are all sitting in the same place. The coloring of the meshes is very important, as it helps you keep track of what mesh is what:
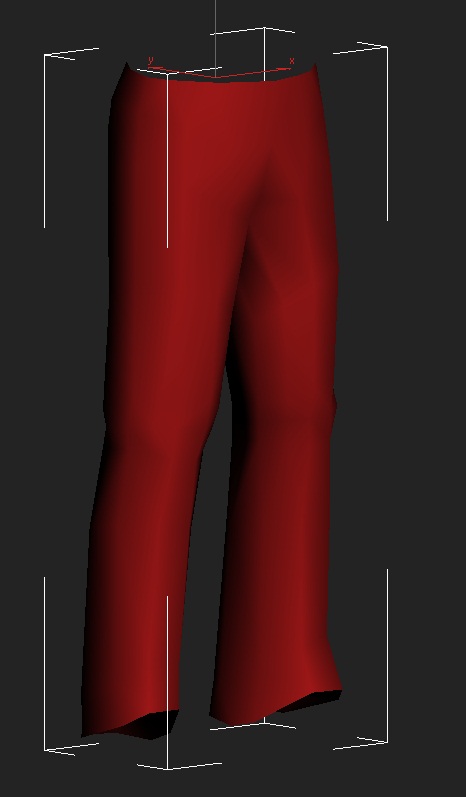
The Red mesh, is considered High Ploy or High Faces. This will be your highest resolution of your clothing Mesh.
http://assets.openuru.org/wiki/andy/MaxTutPics2/AvieCloth4.jpg
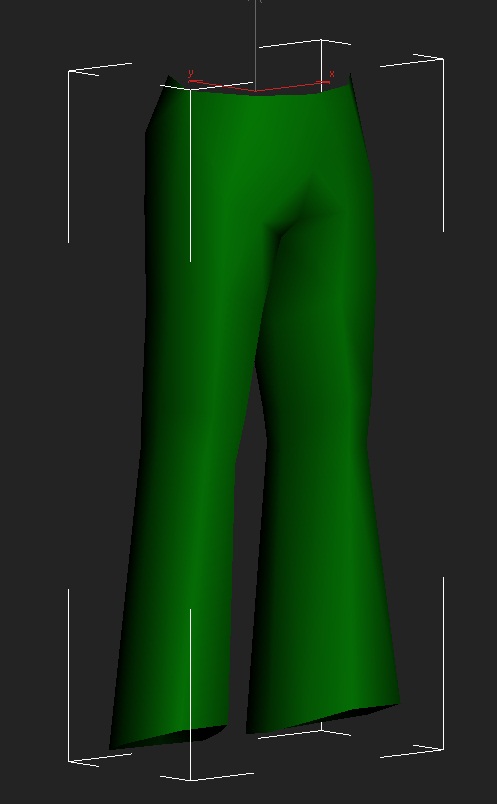
The Green Mesh is considered the Medium Poly or Medium Faces mesh.
http://assets.openuru.org/wiki/andy/MaxTutPics2/AvieCloth5.jpg
The Dark Blue Mesh is considered the Low Poly or Low Faces mesh, and will the the lowest resolution of your clothing Mesh.
http://assets.openuru.org/wiki/andy/MaxTutPics2/AvieCloth6.jpg
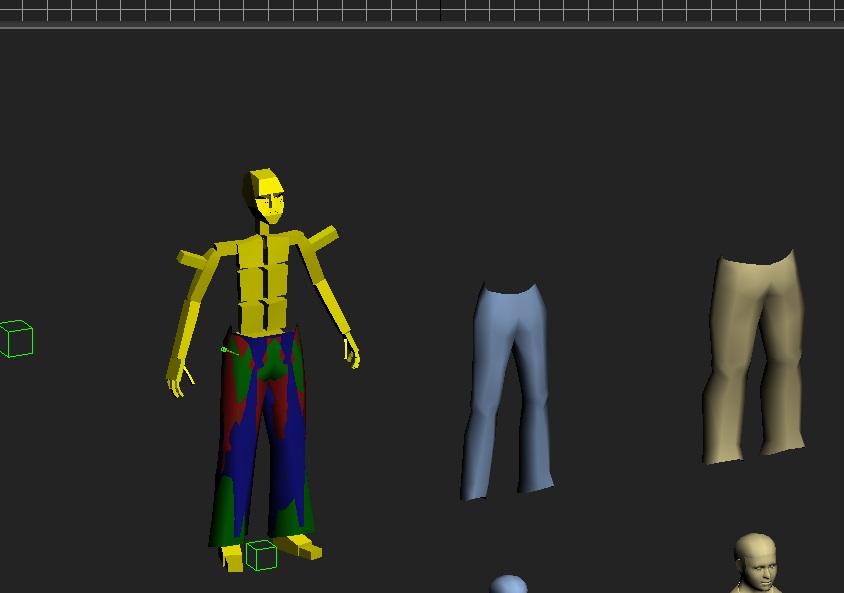
These 3 meshes will sit on top of one another, and must fit over top the Avatar Bone system. The remaining two meshes that are light blue and what I call Tan are Morphing Meshes. The sit just off to the side. Light Blue is the skiniest avatar, and the Tan is the fattest avatar (don't get offended.....Tan would be MY clothing color!!! heheheh).
We also need to do something before we get started. We need to make a GlobalClothing.age file and put it in our PlasmaTest export dat folder.
Open up Notepad and use this:
StartDateTime=0000000000
DayLength=24.000000
MaxCapacity=10
LingerTime=180
SequencePrefix=-5
ReleaseVersion=0
Page=Female,2
Page=Female01,4
Page=Female02,5
Page=FemaleXP2,8
Page=Male,1
Page=Male01,3
Page=Male02,6
Page=MaleXP2,7
Page=MaleNeol,11
As you can see, I have added a Page to the GlobalClothing Age, and it is called MaleNeol, you can change this to fit whatever your Age is called. Make sure you save it and put it in your dat folder of your PlasmaTest.
Merging The Files
I need you to keep this in mind: We will be using the Male avatar for this tutorial. BUT! You MUST do what you are about to do all over again for the Female avatar! You MUST have 2 versions of your clothing for the players. If you do not, and only make it say for Male, any Female Avatars will not be able to put on the clothing and vice-versa.
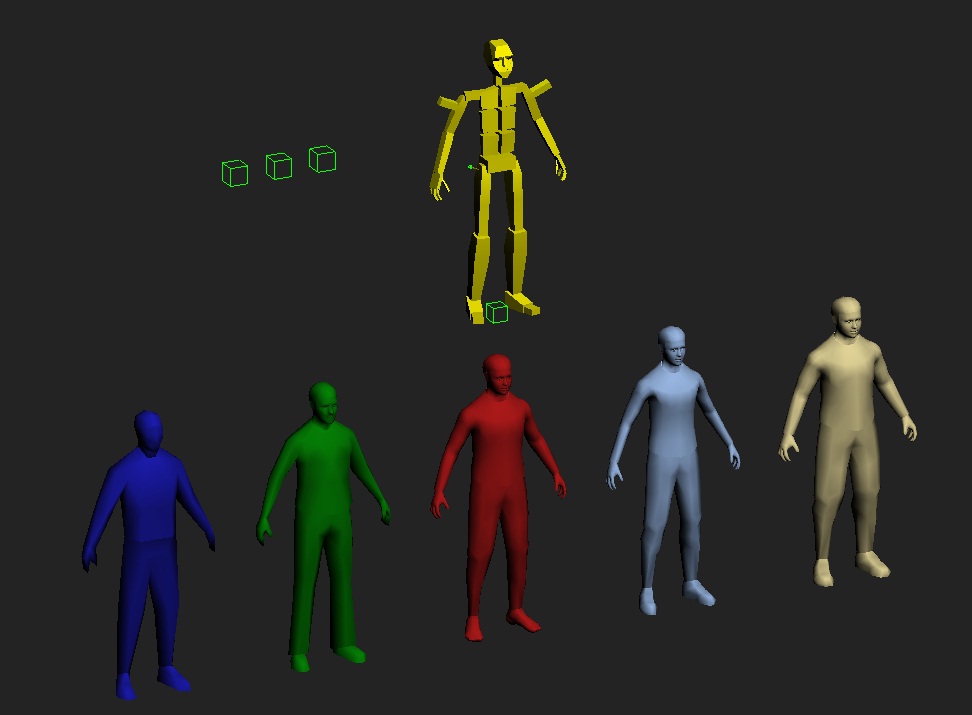
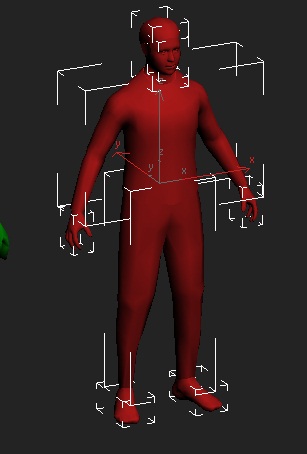
Open up the BasicBoneAvatar_Male.max file in 3DS Max:
http://assets.openuru.org/wiki/andy/MaxTutPics2/AvieCloth1.jpg
In this file, I have done many things for you already and you will not have to do them. The bone structure system is animated, and the Parent to Child hiarchy is already in place (except for your clothing Meshes, more on that later). The 5 nice looking avatars you see below the bone structure are what is called the Smoothing Bases, and used to be in a separate file. Cyan used XRef to reference them. However, for our purposes, it was easier to just merge them with this file so they are always there.
The bone structure of the Avatar is not just for their body, but both this file and the female file have the bone structure for the Relto Book in place. DO NOT REMOVE THE RELTO BOOK BONE STRUCTURE!!! This can cause problems with the appearance of the player if you do!
There are 4 Dummy Boxes: one between the bone structure's feet, called "Male" (the one in the Female file is called "Female"). The 3 boxes to the left are called "High", "Med", and "Low"
Okay, let us get the clothing mesh into this scene. Go up to your menu bar and click on Plasma, and then click on Merge. Find and select the Pants.max file you downloaded. Now your scene should look like this:
http://assets.openuru.org/wiki/andy/MaxTutPics2/AvieCloth7.jpg
As you can see, the Red, Green and Dark Blue pants are all right on the Bone system. If you used your own clothing mesh and they are not, you will need to move them so that they are! This is for later when we "Skin" the meshes to the Bone structure.
Once you get the files merged, you need to select everything in the scene and attach a PageInfo component on everything that does not have it. Change the Age name to GlobalClothing, and the Page that you made.
http://assets.openuru.org/wiki/andy/MaxTutPics2/AvieCloth8.jpg
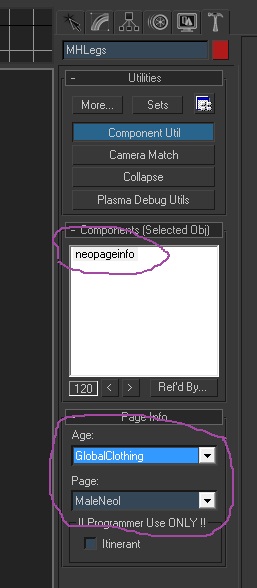
The Smooth Bases
Okay, we are going to do some work with the Smoothing Bases here. I could have done it all for you, but then where is the fun in that? Go down and select all the meshes for the Red (High) Smoothing Avatar:
http://assets.openuru.org/wiki/andy/MaxTutPics2/AvieCloth9.jpg
Now open up the Component Manager and click on New > Render > Smoothing Base and attach it to these meshes.
http://assets.openuru.org/wiki/andy/MaxTutPics2/AvieCloth10.jpg
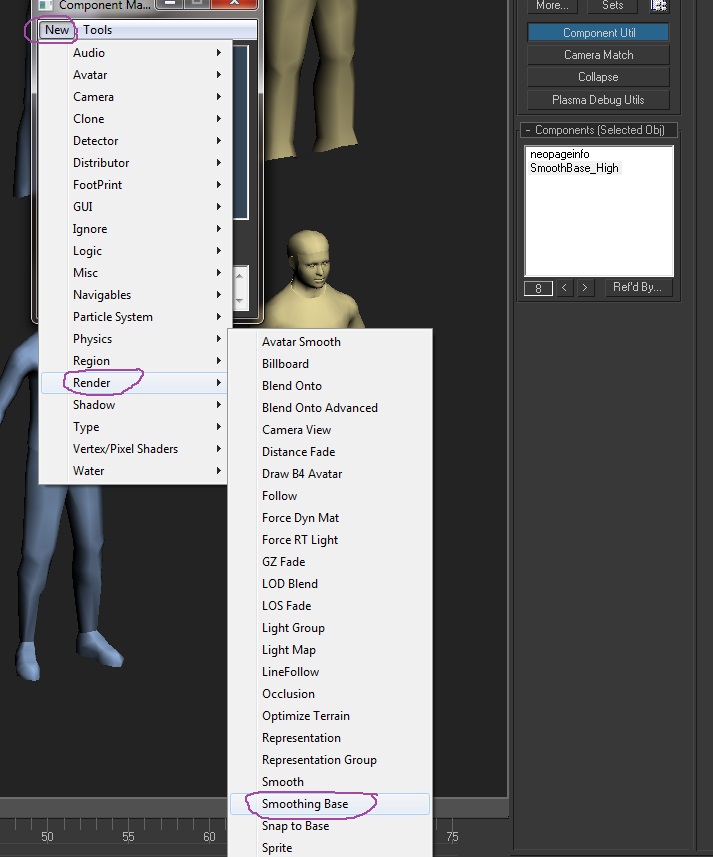
Rename the component to what you see in my picture below. Renaming the components is also a MUST to help keep track of things!
http://assets.openuru.org/wiki/andy/MaxTutPics2/AvieCloth11.jpg
You can leave the Roll Out for it alone as the default settings are fine.
Now go and select all the meshes of the Green Smooth Avatar (Med), and attach a NEW Smoothing Base component to it too (DO NOT use the same one you just attached to the High mesh!). Rename it also so that you know it is for the Medium Smoothing Mesh:
http://assets.openuru.org/wiki/andy/MaxTutPics2/AvieCloth12.jpg
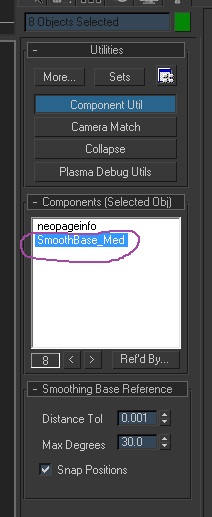
Repeat these same steps for the Dark Blue Smooth Avatar (Low), and again, rename the component.
Now go down and select all the meshes for the Light Blue (Cyan? heheheh) Smooth looking Avatar. This is the Morphing Mesh Smooth Base for our High Mesh. Repeat the steps above and attach the Smoothing Base component to it too, and rename it:
http://assets.openuru.org/wiki/andy/MaxTutPics2/AvieCloth13.jpg
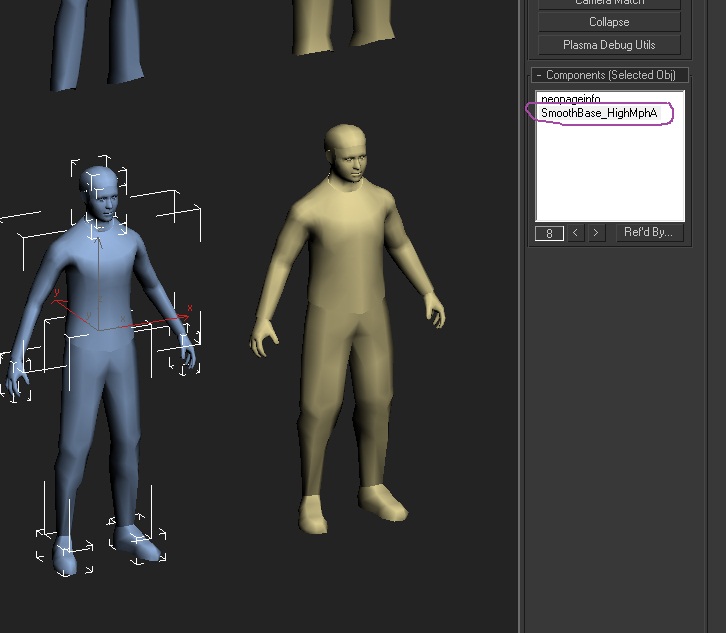
Then go over and select all the Tan Smooth Avatar, and again, repeat assigning the Smoothing Base component to it too, also renaming it:
http://assets.openuru.org/wiki/andy/MaxTutPics2/AvieCloth14.jpg
This means you should have FIVE Smoothing Base components in the Component Manager now!
The Parent
Go to between the Avatar's feet and select the Male Dummy box that is there.
http://assets.openuru.org/wiki/andy/MaxTutPics2/AvieCloth15.jpg
If you then hit the "H" Key, you will see the selection box, and can see that just about everything is parented to the Male dummy box. The exceptions to this are the Smoothing Base Avatars.
You may notice that our Pants meshes are not either (or whatever Mesh you used). You need to select each one at a time, and parent it to the High, Med, and Low Dummy boxes:
http://assets.openuru.org/wiki/andy/MaxTutPics2/AvieCloth16.jpg
So select the Red Pants, and parent it to the High dummy box. Select your Green pants and parent it to the Med dummy box, and then select the Dark Blue pants and parent them to the Low Dummy box The remaining 2 meshes (the light blue and Tan color pants) do NOT get parented to anything.
However, now it is time to work with them. Select the Light Blue pants. Open up the Component Manager and click on New > Render > Snap To Base and assign it to them.
http://assets.openuru.org/wiki/andy/MaxTutPics2/AvieCloth17.jpg
Rename the component, and then in the roll out for it, click on the button below "Smoothing Comp Of Base Set" and then click on the Light Blue Smooth Avatar:
http://assets.openuru.org/wiki/andy/MaxTutPics2/AvieCloth18.jpg
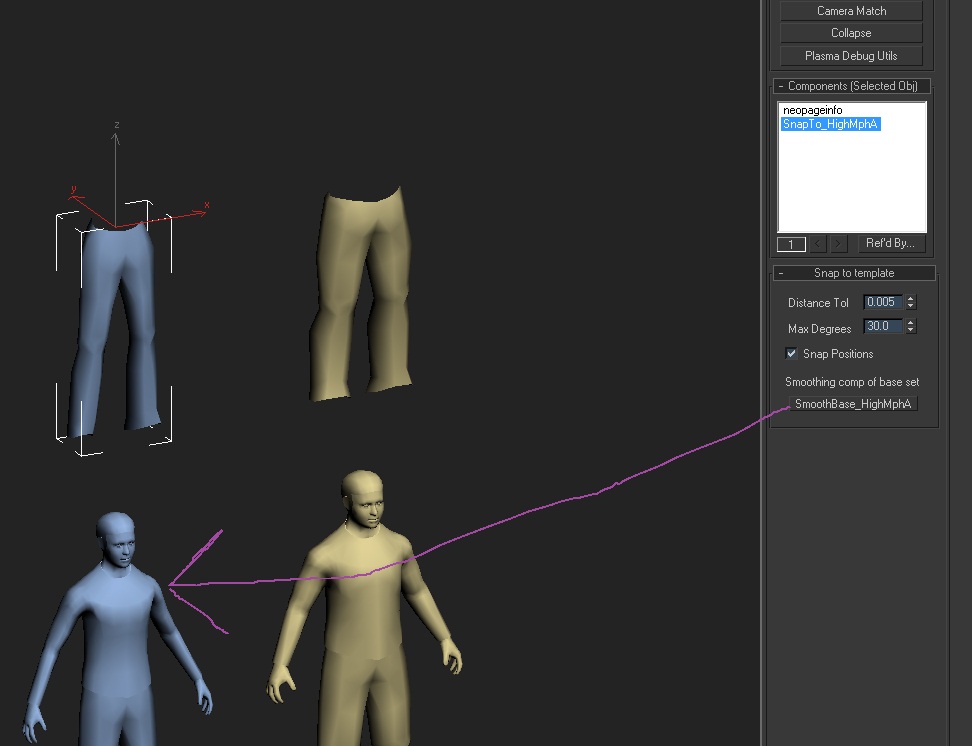
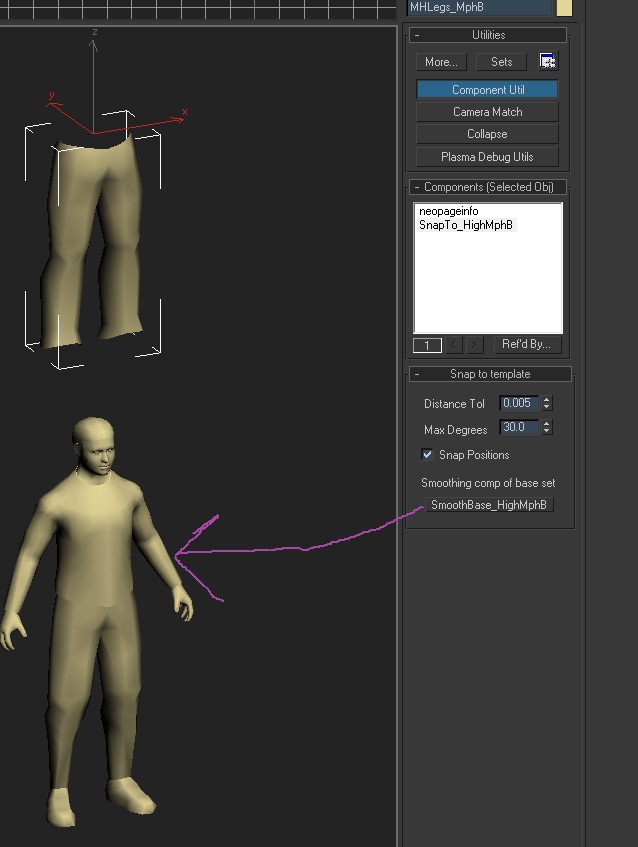
Now click on the Tan pants and do the exact thing for them too (only make sure it's a NEW Snap To Base component, and this time click on the Tan Smooth Avatar):
http://assets.openuru.org/wiki/andy/MaxTutPics2/AvieCloth19.jpg
High, Med, and Low Dummy Boxes
Okay, time to mess with our High, Med, and Low Dummy boxes. Select the High one:
http://assets.openuru.org/wiki/andy/MaxTutPics2/AvieCloth20.jpg
Open up the Component Manager and click on New > Avatar > Morph Layer and assign it as a component to the High Dummy box:
http://assets.openuru.org/wiki/andy/MaxTutPics2/AvieCloth21.jpg
In the Roll Out for it, you'll see a box called "Delta Meshes" and an Add Button:
http://assets.openuru.org/wiki/andy/MaxTutPics2/AvieCloth22.jpg
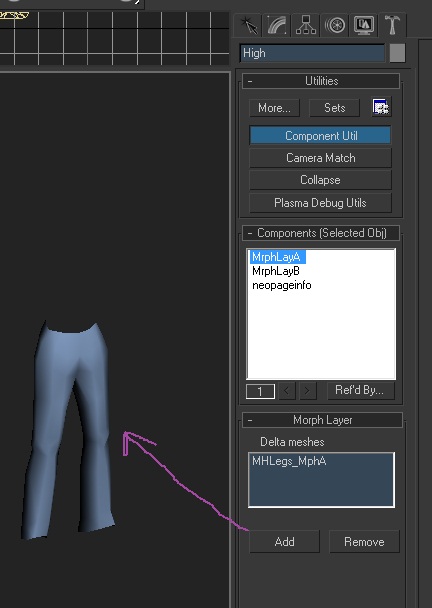
Click on the Add button and then click on the Light Blue pants
Wait. What the heck is "Delta Meshes"???? "Delta Meshes are the meshes that we can morph or change to. "Delta" is the symbol used for "Change", and is used in math, physics and many other things.
Now assign a 2nd Morph Layer to the High Dummy, changing it's name, and in it's roll out, click on the Add button, only this time click on the Tan pants
http://assets.openuru.org/wiki/andy/MaxTutPics2/AvieCloth23.jpg
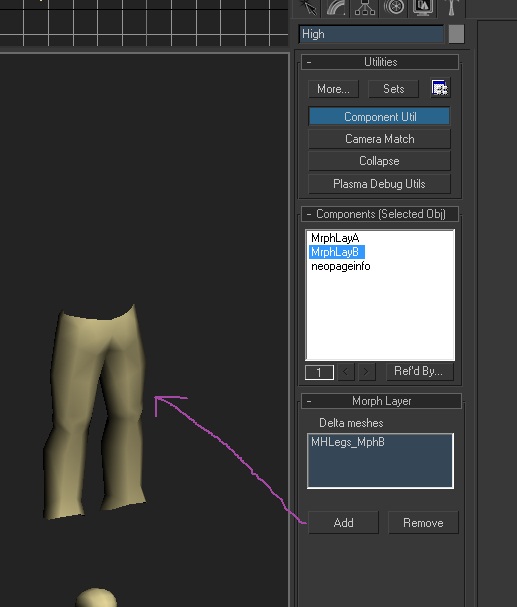
What we just did is told the game that your pants can Morph down to as small as the Light Blue mesh, but get no smaller, and it can also get as big as the Tan mesh, but no bigger.
Open up the Component Manager and click on New > Avatar > Morph Sequence, and assign this to the High Dummy box, and rename it too:
http://assets.openuru.org/wiki/andy/MaxTutPics2/AvieCloth23a.jpg
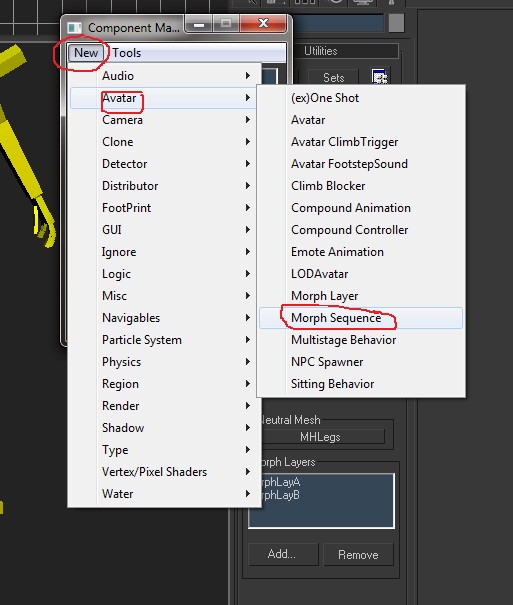
In the roll out for this mesh, click on the Neutral Mesh button and then click on the Red pants Mesh. In the Box that says Morph Layers, click on Add and in the box that pops up, select the 2 Morph Layers that are assigned to the High Dummy
http://assets.openuru.org/wiki/andy/MaxTutPics2/AvieCloth23b.jpg
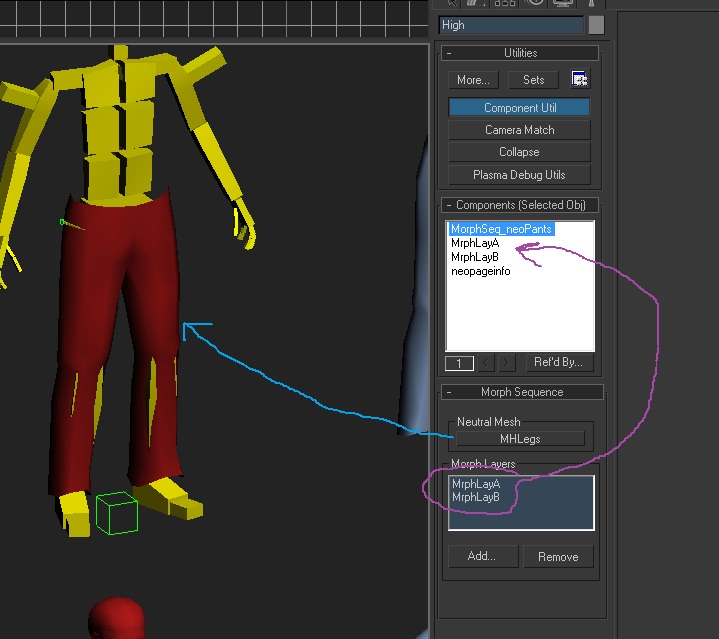
Skinning The Bones
Now it's time to "Skin" our Pants Mesh to the Bone structure. This is important because if you have messed with the Animation Bar, you've seen that the bones move, but not the pants:
http://assets.openuru.org/wiki/andy/MaxTutPics2/AvieCloth30.jpg
Let us start with the Red or High Mesh pants. Select them and then click on the Modifier Tab. We need to add UVW Mapping to this mesh. So do that:
http://assets.openuru.org/wiki/andy/MaxTutPics2/AvieCloth24.jpg
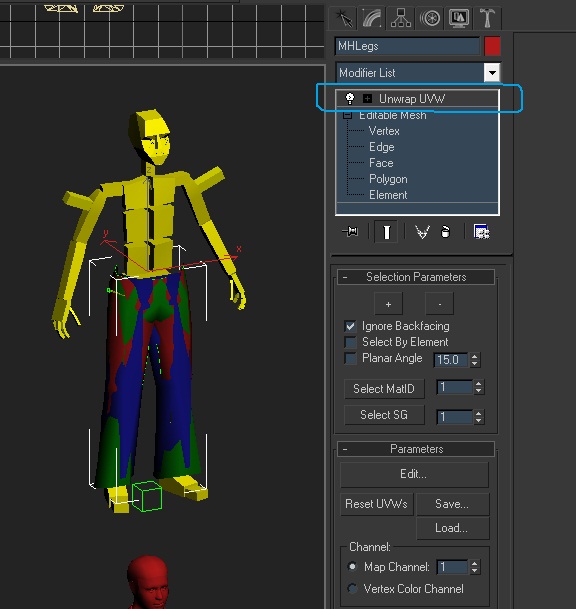
You do NOT need to edit the UV Mapping. Adding the Unwrap UVW modifier simply gives the mesh mapping coordinates and that is all we need.
Next, go up to the menu bar and click on Modifiers > Animation > Skin and give it that modifier:
http://assets.openuru.org/wiki/andy/MaxTutPics2/AvieCloth25.jpg
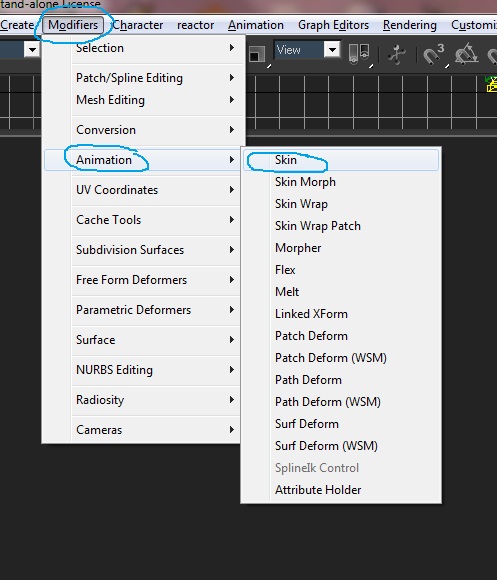
Open up the Skin Modifier. You see that you have a empty box and we need to put bones in there. We do this by clicking on the Add button I have circled in my picture below:
http://assets.openuru.org/wiki/andy/MaxTutPics2/AvieCloth26.jpg
So how do you know what bones to add to what clothing mesh? I mean, to me, Pants should just need the Pelvis, Thighs, Calfs and that should be it, right? Wrong. Pants also need the Spine0 bone and the Feet. Here is what bones you should use for most clothing:
Hat or Helmet - Head, Neck, Spine2.
Torso (shirts, vests, jackets, etc) - Neck, Spine0, Spine1, Spine2, All Clavicles, Upper Arms, Fore Arms, Hands, Pelvis.
Pants - Spine0, Pelvis, Thighs, Calves, Feet.
Gloves - Fore Arms, Hands, Fingers.
Shoes - Calves, Feet, Toes.
That should help you out some.
Now, you will need to do this to the Red (High), Green (Med), and Dark Blue (Low) clothing meshes: Add UVW mapping coordinates, and then the Skin modifier, and add the bones to the modifier.
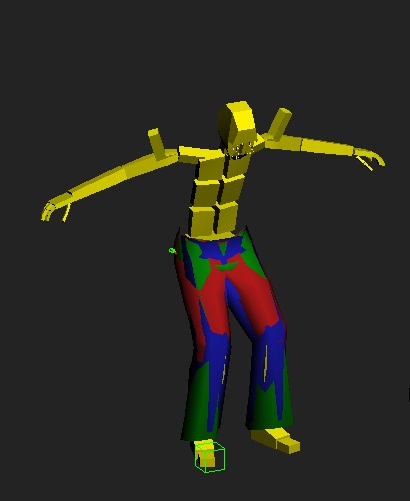
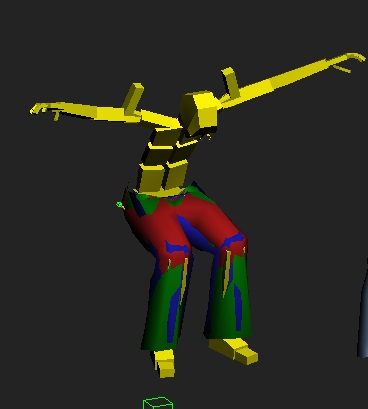
The envelopes for the Bones are what Cyan has set for the pants all ready, however, if you are using your own mesh that you have made, or modified an existing clothing mesh, you will need to move the animation bar and make sure the clothing moves with the bones, line the next 3 pictures show:
http://assets.openuru.org/wiki/andy/MaxTutPics2/AvieCloth27.jpg
http://assets.openuru.org/wiki/andy/MaxTutPics2/AvieCloth28.jpg
http://assets.openuru.org/wiki/andy/MaxTutPics2/AvieCloth29.jpg
Now, if you moved the animation bar, and instead you got this:
http://assets.openuru.org/wiki/andy/MaxTutPics2/AvieCloth30.jpg
It means you did not add the UVW mapping modifier (or you collapsed the tree. I have found that collapsing the tree can cause this problem), or you did not pick the correct bones!
Or you may have seen something like this:
http://assets.openuru.org/wiki/andy/MaxTutPics2/AvieCloth31.jpg
This means you did not do all the clothing meshes yet.
OR......
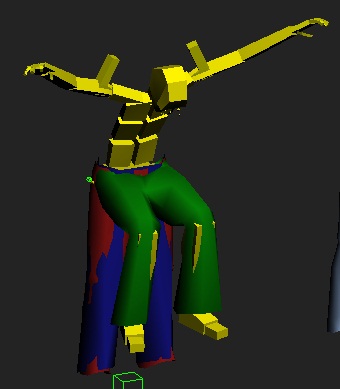
You more than likely will see this, especially if you are using your own meshes you made:
http://assets.openuru.org/wiki/andy/MaxTutPics2/AvieCloth32.jpg
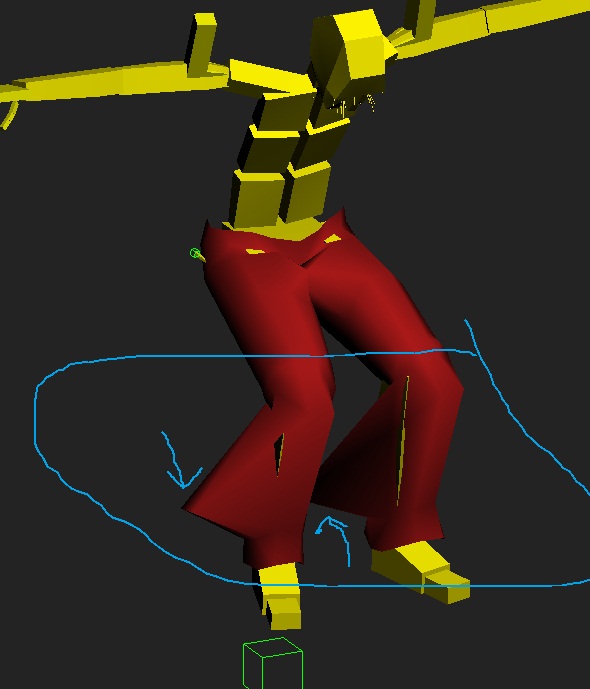
If you see your clothing being stretched or distorted like this, it means you will need to adjust the Envelopes on the Bones. Don't worry, I'm going to show you how to do that.
Adjusting The Envelopes
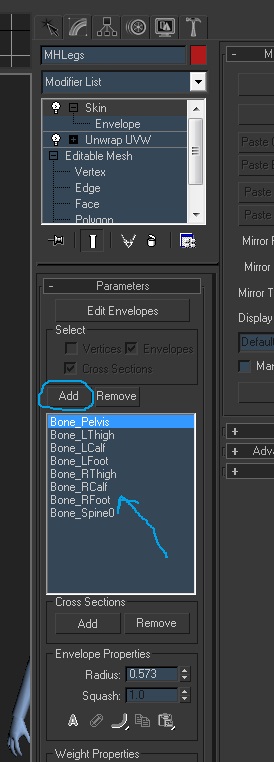
In the modifier tab, open up the Skin Modifier and select where it says Envelope, select the check marks for Verticies, Envelopes, and Cross sections, and then the bone in the box you want to adjust:
http://assets.openuru.org/wiki/andy/MaxTutPics2/AvieCloth33.jpg
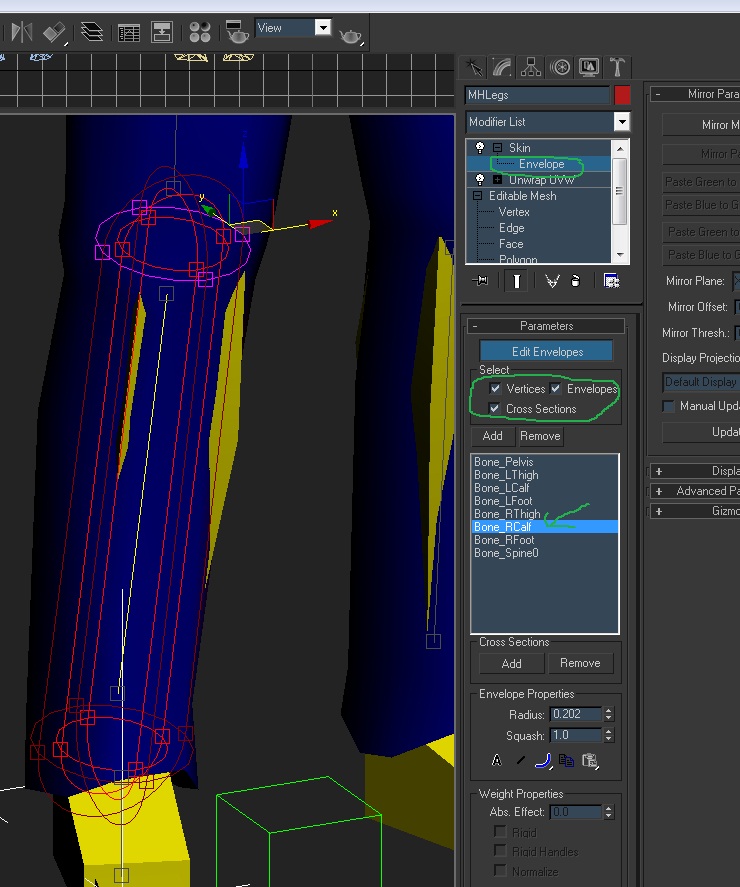
'HEY! MY RED PANTS JUST TURNED BLUE!!!
Relax, it's okay. The mesh has turned into a color field to show you where the envelope is reacting to the skin. Blue means that the bone will not move that area of mesh. As you increase your envelope, you will see a rainbow of colors where bright yellow means maximum movement from the bone.
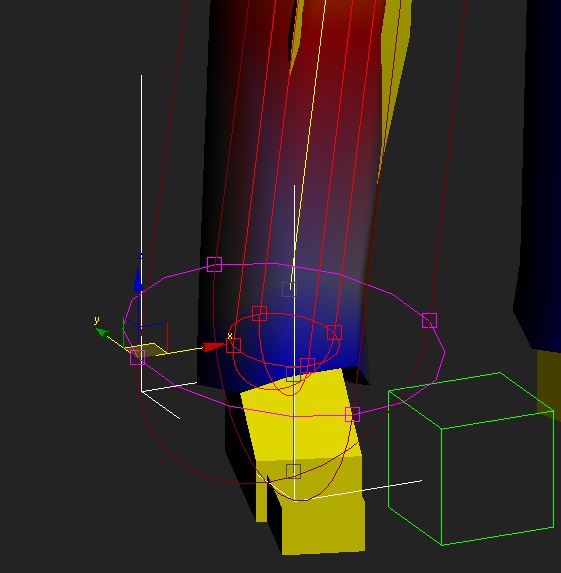
As you can see from the above picture, our envelope is way too small to interact with the skin. We need to make it bigger. I like using the Cross Sections to adjust this, so in my picture below click and drag on one of the boxes I have circled:
http://assets.openuru.org/wiki/andy/MaxTutPics2/AvieCloth34.jpg
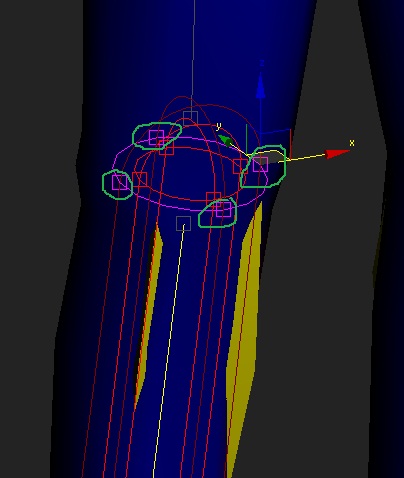
Now drag your mouse to make the circle bigger:
http://assets.openuru.org/wiki/andy/MaxTutPics2/AvieCloth35.jpg
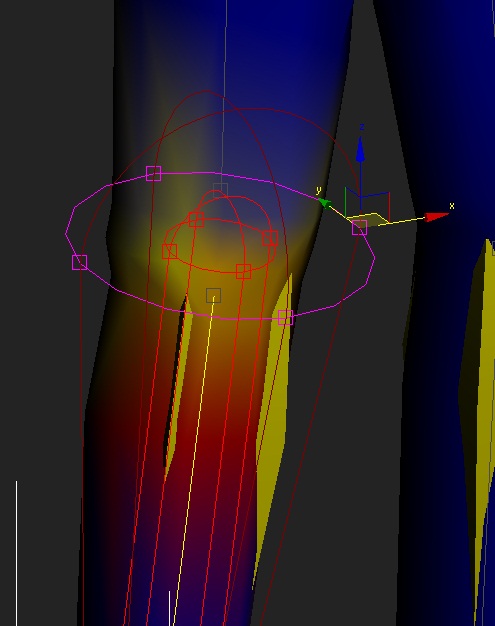
As you can see, the pants mesh is changing colors to show us where it is being affected by the envelope. Make it big enough to include the area you need, but not too big! If you make it too big, it will start to affect the other pant leg and we do not want that!
Now go down and adjust the other cross section of the envelope to again what you need:
http://assets.openuru.org/wiki/andy/MaxTutPics2/AvieCloth36.jpg
Now check your other envelopes of the other bones and make sure they are affecting the skin like we need:
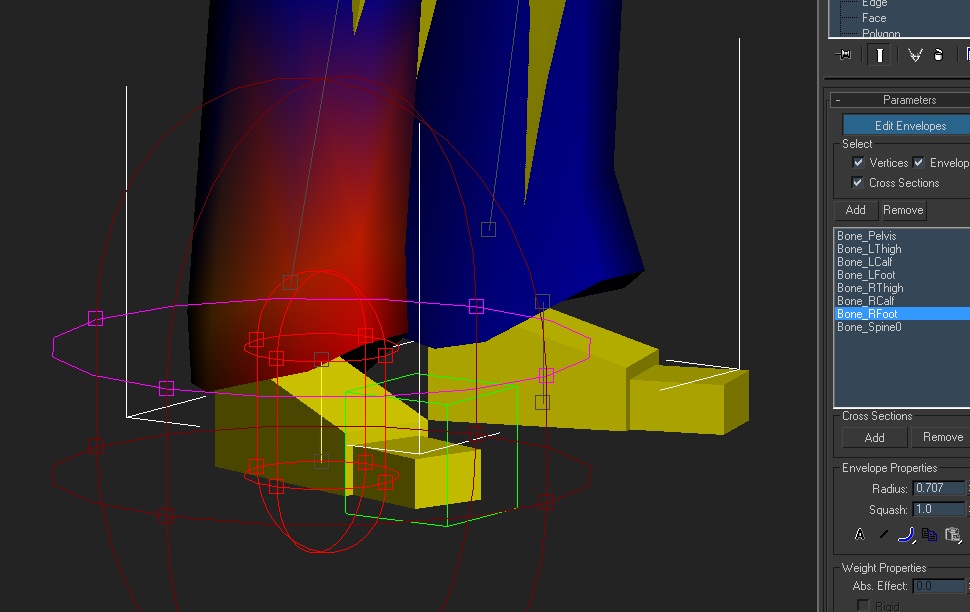
Foot:
http://assets.openuru.org/wiki/andy/MaxTutPics2/AvieCloth37.jpg
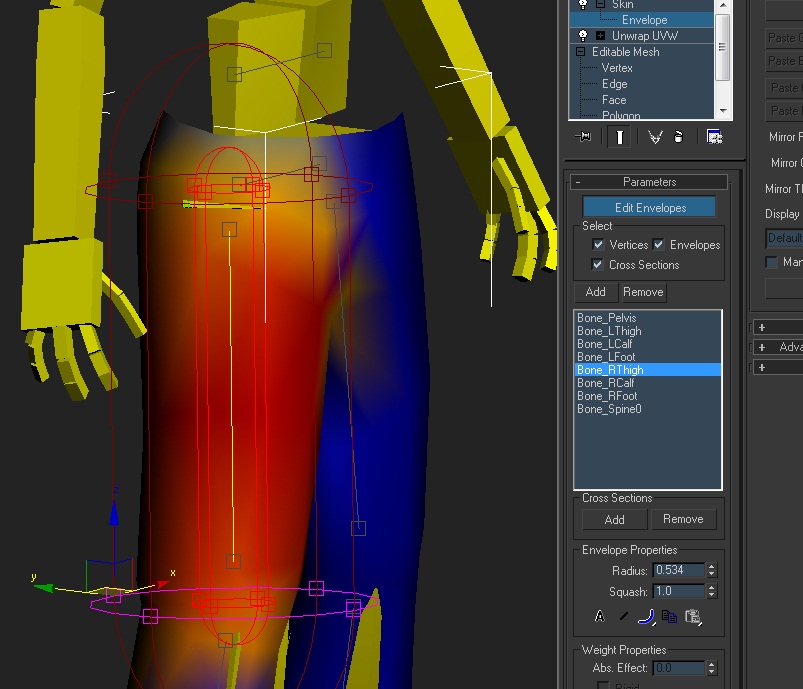
Thigh:
http://assets.openuru.org/wiki/andy/MaxTutPics2/AvieCloth38.jpg
Pelvis:
http://assets.openuru.org/wiki/andy/MaxTutPics2/AvieCloth39.jpg
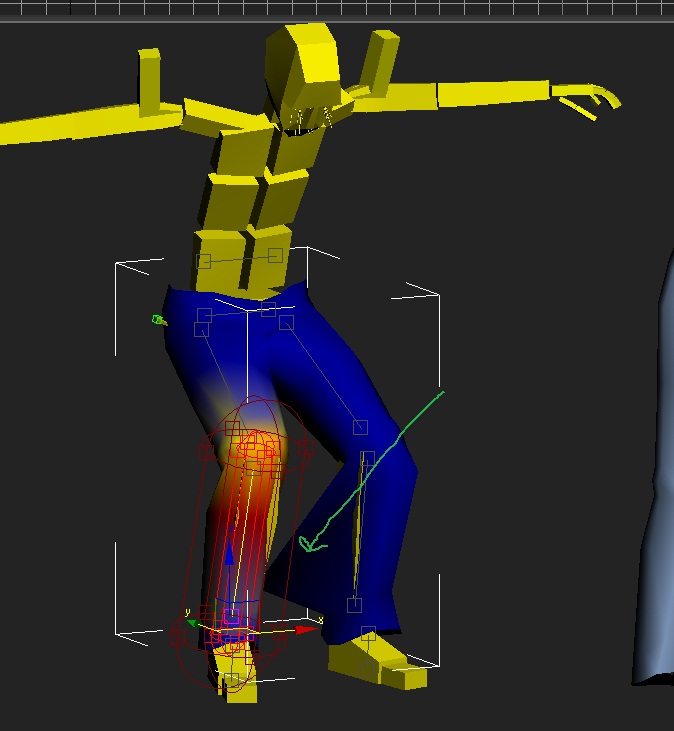
After you have done this, you can move the animation bar and see how your skin is moving with the bones. In my pic below you can see we got the right pant leg to work correctly, but the left one still needs to be done:
http://assets.openuru.org/wiki/andy/MaxTutPics2/AvieCloth40.jpg
Okay, NOW do that for the other 2 meshes (you MUST set the envelopes for all 3 clothing meshes, Red, Green and Dark Blue)!
Making The Clothing Material
Okay now it is time to make the Clothing Material before we can go any further (as we will need some components that will need the materials).
Unlike what you are used to, Plasma Clothing does NOT get assigned to any objects in your scene like you are used to. There is one Material that needs to be applied, and that is either the Male or Female Pallette, but I have already done that for you.
Call up your Material Editor, and select a blank or new spot. Click on Get Material, and select New and then double click where it says Plasma Clothing:
http://assets.openuru.org/wiki/andy/MaxTutPics2/AvieCloth42.jpg
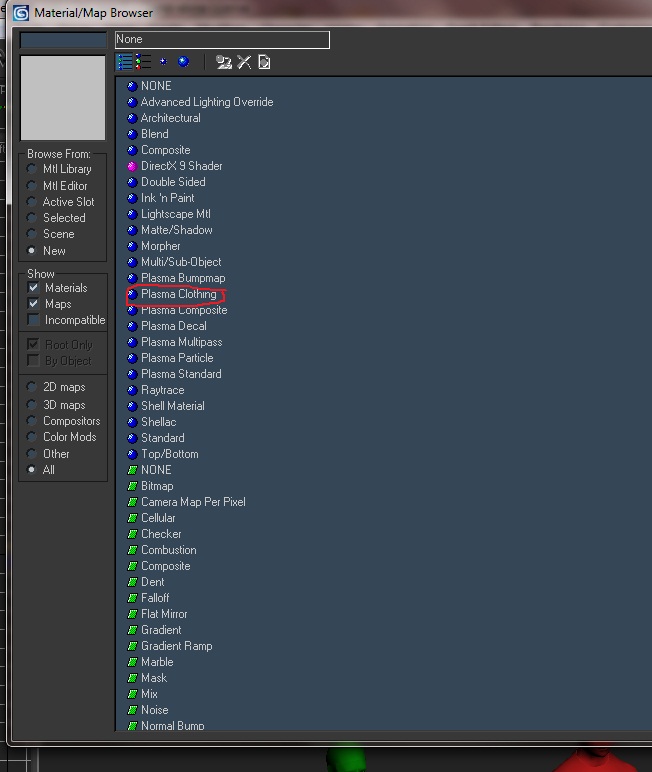
This is what the default material will look like:
http://assets.openuru.org/wiki/andy/MaxTutPics2/AvieCloth43.jpg
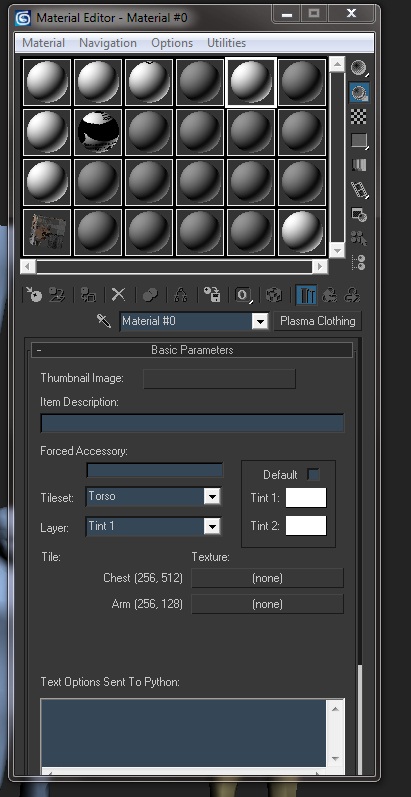
Go to where the Material Name is and change it to something. If you have looked through Cyan's Avatar Documentaion, you will see that they use a pretty good system for naming things. This is very important so you do not get confused as to what clothing you are dealing with, and if it's for Male or Female. Later, in your Age, you will be having to use this name, so WRITE IT DOWN!!!!!!
http://assets.openuru.org/wiki/andy/MaxTutPics2/AvieCloth44.jpg
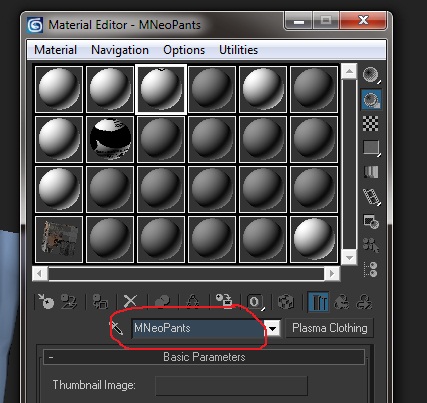
I named mine MNeoPants, with the "M" meaning Male.
Next, in the Item Description box, you can put in a description of your clothing item here. It's not necessary to put anything here, but it will help you keep track of things:
http://assets.openuru.org/wiki/andy/MaxTutPics2/AvieCloth45.jpg
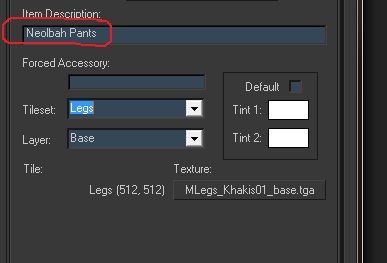
Next, in the Tileset dropdown box, you need to select what this Material is for. In my case it is for Pants, so I will select "Legs"
http://assets.openuru.org/wiki/andy/MaxTutPics2/AvieCloth47.jpg
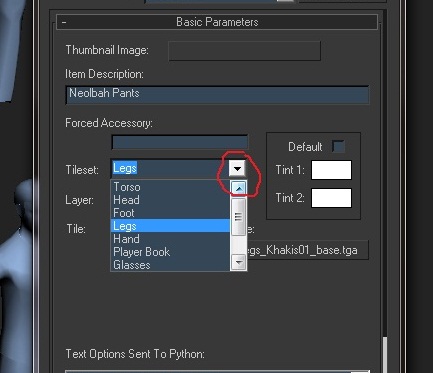
Next, click on the Layer dropdown box, and select "Base". You have other things you can choose, but right now we need to set the Base Texture (default texture of the clothes):
http://assets.openuru.org/wiki/andy/MaxTutPics2/AvieCloth48.jpg
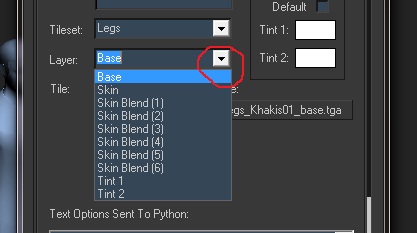
Now you can click on the button that says (None) and select your texture for you clothes. Notice how it says "Legs (512, 512)". That is because this texture MUST be 512 x 512 pixels! Do not try and use a different size, or else you will get a nasty message from the pluging telling you "No. Try again".
http://assets.openuru.org/wiki/andy/MaxTutPics2/AvieCloth49.jpg
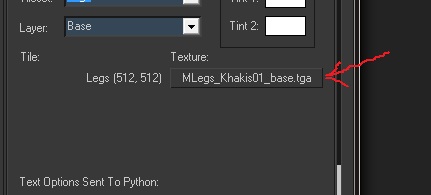
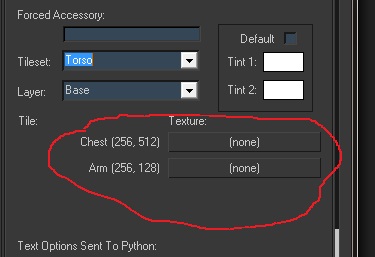
Let us talk about the clothing textures for just a minute. If you look at the documentation, it shows you how the textures are suppose to be arranged and the sizes. If you change the Tileset to other body parts, you will see different buttons pop up for them, AND you will see different textures sizes:
The Torso has 2 textures: Torso and Arms
http://assets.openuru.org/wiki/andy/MaxTutPics2/AvieCloth50.jpg
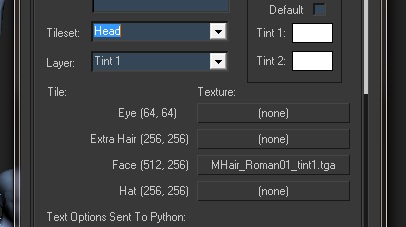
The Head has several different textures: Eyes, Face, Extra Hair, and Hat
http://assets.openuru.org/wiki/andy/MaxTutPics2/AvieCloth51.jpg
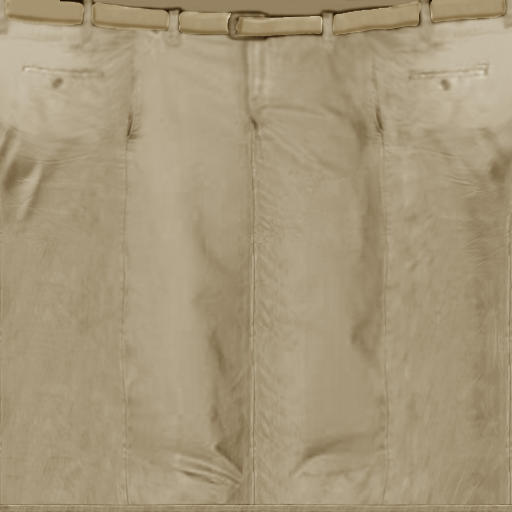
Now, the Pants (and other clothing), you can add Layers with the dropdown box. Remember how in the Relto Closet the player can change the pants color? And how they can change the Belt color? This is because you can add 2 more layers, Tint1 and Tint2, and assign different textures to them. Here is what Cyan has for the Kakki Pants:
*Note: the following 3 textures are from Cyan and are being used for this tutorial and educational purposes.
Base Texture:
http://assets.openuru.org/wiki/andy/MaxTutPics2/Basepants.png
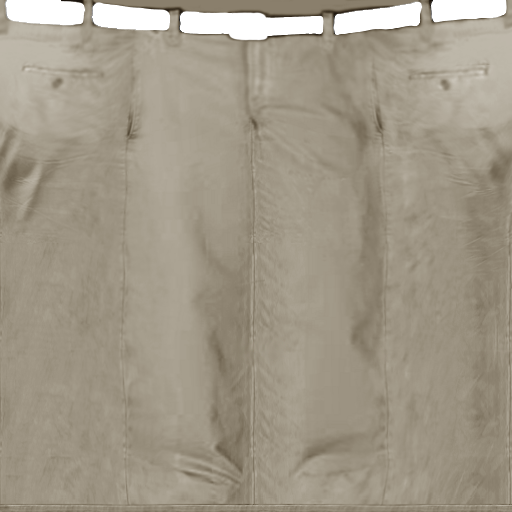
Tint1 texture for changing the pants color:
http://assets.openuru.org/wiki/andy/MaxTutPics2/Tint1pants.png
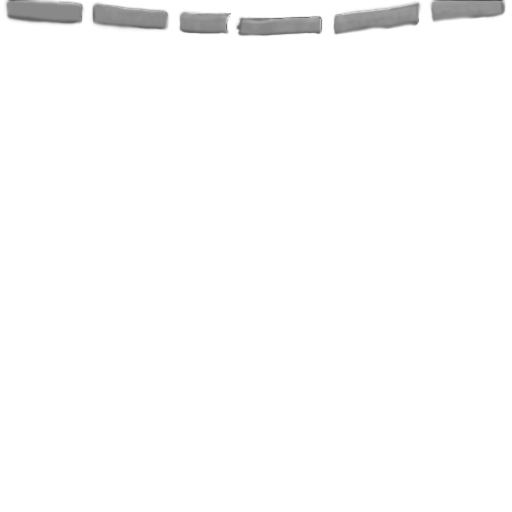
Tint2 texture for changing the Belt's color:
http://assets.openuru.org/wiki/andy/MaxTutPics2/Tint2pants.png
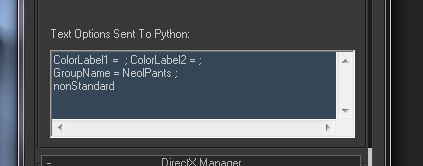
Okay, the next section is for Python. You can just put what I have for now. For GroupName you can make up your own if you like:
http://assets.openuru.org/wiki/andy/MaxTutPics2/AvieCloth52.jpg
And that is it. You do not UV Map the texture, as that is built in (and why the textures for clothing HAVE to be laid out in certain ways that the documentation shows you).
Assigning The Clothes
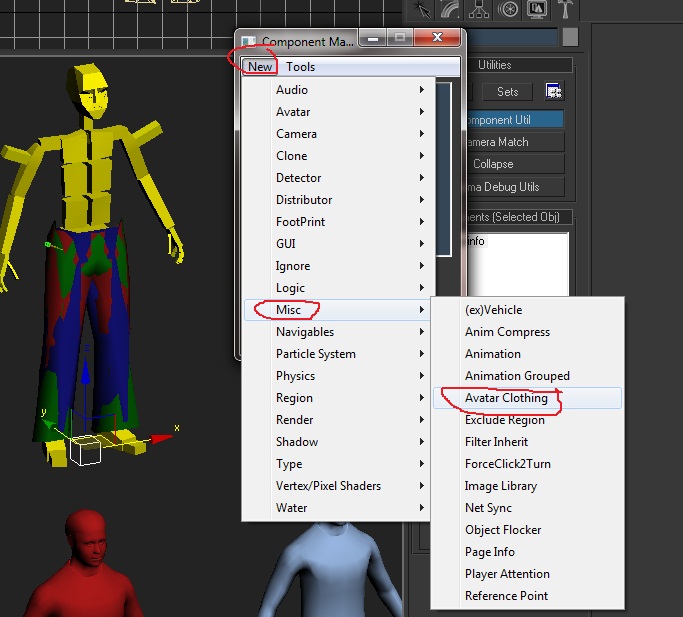
Now close the Material Editor (I sure hope you wrote down the name or names of your Materials), and select the dummy box between the Avatar's feet. Open up the Component Manager and click on New > Avatar > Avatar Clothing, and assign it to the dummy:
http://assets.openuru.org/wiki/andy/MaxTutPics2/AvieCloth53.jpg
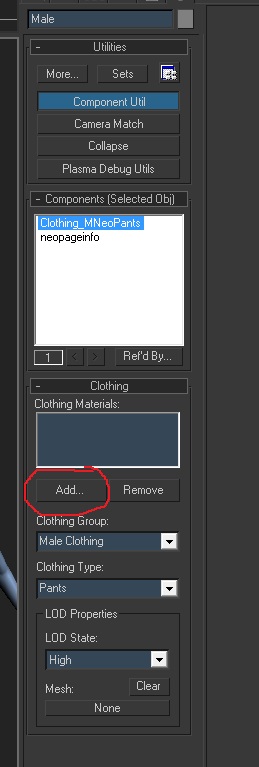
Rename the component so it makes sense, and then look at the roll out for it:
http://assets.openuru.org/wiki/andy/MaxTutPics2/AvieCloth54.jpg
For the box that says Clothing Materials, click on the Add button, and add the Material you made for the pants.
You will need to add 2 more Avatar Clothing components to the dummy (one for each mesh you have, Red, Green, Dark Blue), but they all use the SAME material!).
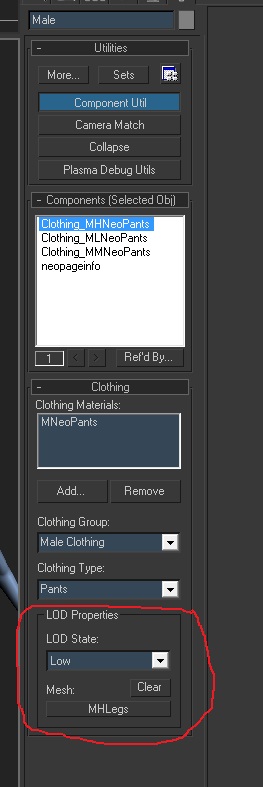
Now go down to the LOD box, and click on the button, selecting the proper mesh for that component (Red for High, Green for Med, etc):
http://assets.openuru.org/wiki/andy/MaxTutPics2/AvieCloth55.jpg
CONGRADULATIONS! YOU JUST COMPLETED THE GLOBALCLOTHING PART!!!!!! yay! Drinks all around! Take a break! You deserve it! Because NOW you have to export this. Once you have, you can send the modified .age file and new prp file for GlobalClothing to your MOUL type server admin person.
BUT! Before you do that, you will need to go into your Age and do some stuff. It will be easy and short, I promise!
However, before you do......you will need to go back and do ALL of this over again, for the Female avatar...........
In Your Age
Okay, now it is time to get your Age ready for this. You need to make a Clickable of some sort. It could be a mesh that is textured to look like the close are all folded up, or hanging there. Or you could make it look like the clothes are in a dresser drawer or locker. How you do that is up to you.
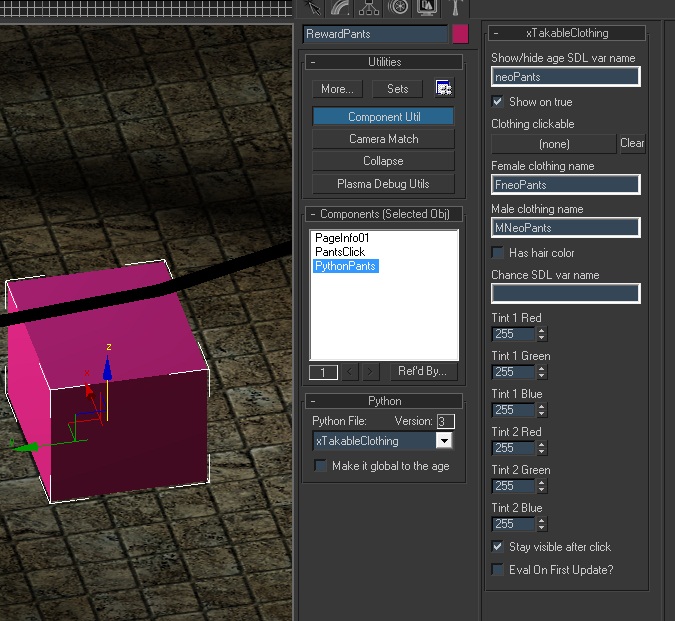
For this tutorial, I just made a box to be my clickable. Then I assigned a Python component to it, and used xTakableClothing.py as the python. In the roll outs, it is pretty easy to figure out. However, I do need to cover a couple of things:
http://assets.openuru.org/wiki/andy/MaxTutPics2/AvieCloth56.jpg
Where it says "Show / Hide age SDL var name", you need to put in a SDL BOOL variable. This means you need to add a SDL line to your SDL file, that looks like this:
VAR BOOL neoPants[1] DEFAULT=1Where neoPants is a name you make up.
The other thing is where it says "Female clothing name" and "Male clothing name". In those 2 boxes, you need to put the names of your clothing items. But NOT the mesh names! You must use the Material Names! (now I bet you are glad you wrote them down, right?). If you only have one item, then that is all you need to put. If you have more than one item, then you need to enter them all, but separate them with a ";" so it would look like this:
MNeoPants; MNeoShirt; MNeoLShoe; MNeoRShoeAnd that is pretty much it folks!
Extra Info
There are some extra things you will need to know. Some things you will figure out on your own, however I wanted to share these things with you right away:
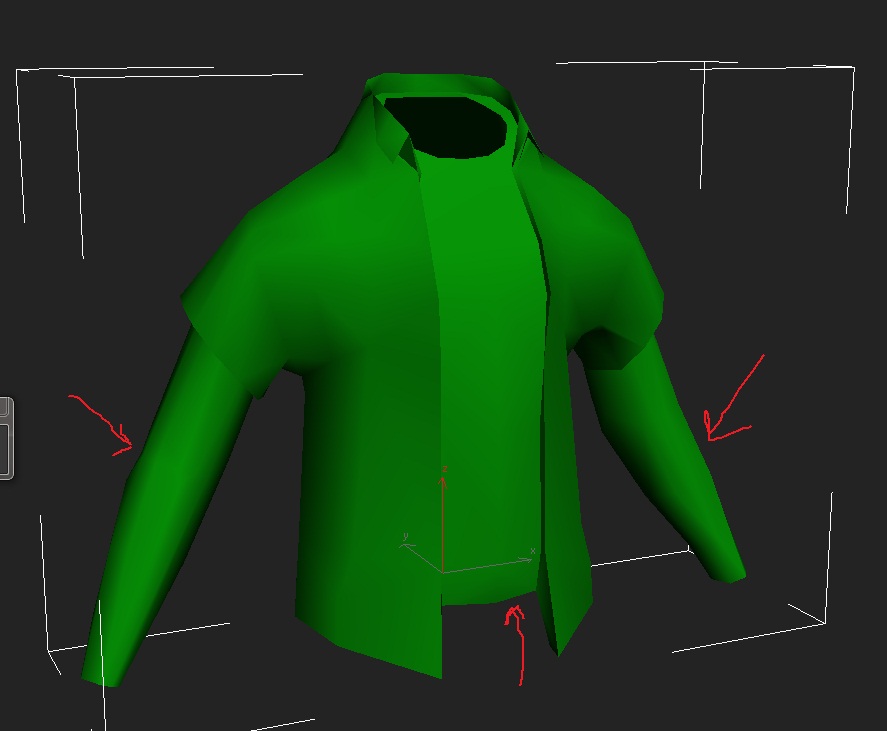
Short Sleeve Shirts:
http://assets.openuru.org/wiki/andy/MaxTutPics2/AvieCloth57.jpg
As you can see from the above picture, if you decide to make your own short sleeve shirt, you MUST provide the fore arms too! If you do not, when the player puts the shirt on, it will look like they have no fore arms! This goes for pants that are shorts too. You must provide the mesh for the leg that is expose, or it will look like they are wearing pants but have no lower legs.
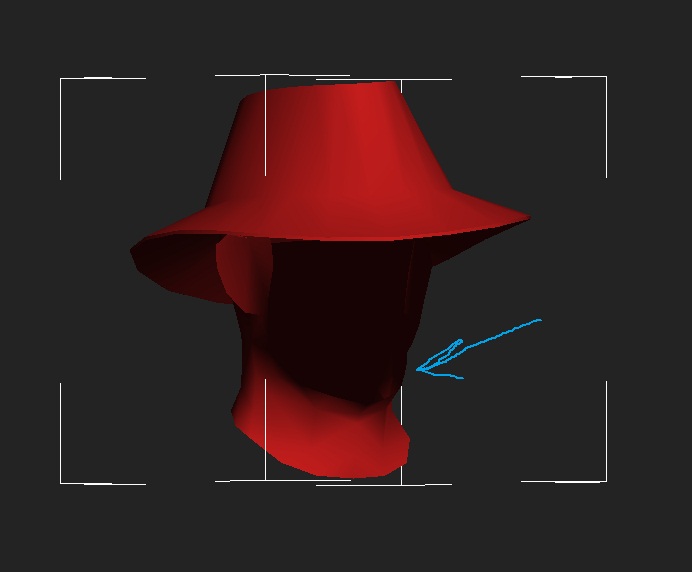
Hats and Helmets:
http://assets.openuru.org/wiki/andy/MaxTutPics2/AvieCloth58.jpg
For Hats and Helmets you must provide part of the head as you can see in the picture above. Accessories like Glasses, earrings, etc, do not require this. But hats do.
I certainly hope this tutorial helps a lot of people out there.
Questions I Have Received
Will this work with other versions of Max besides 7.0?
I do believe it should be no problem, especially since Hoikas from the GoW has made it possible for Cyan's Plugin to work with later versions of Max. Just remember, if you do some work in 7.0 and then give it to a friend, they will be able to load it in Max 8.0 or later. But if they do work, and then send it back to you, you will be in trouble as there is NO backwards conversion for Max.
Will this work for Blender and the PyPRP Plugin?
I have no idea. I imagine that someone out there can figure out a way to port the Max files over to Blender, and how to wire it with PyPRP, but that is not something I'll be getting into I'm afraid. But if someone out there needs more info from me for this I will be happy to help, but I won't be exploring if this is possible or not.
Return To: 3DS Max Plugin Tutorials
A copy of the license is included in the section entitled "GNU Free Documentation License".