In Memoriam: Tai'lahr
OpenUru.org, along with the rest of the Mystonline community, is mourning the loss of Tai'lahr on October 16th, 2019.
Rest in Peace, friend.
Snow Fall
Okay, one of the most exciting things about using Max with Cyan's plugin for me was the ability to finally be able to put particles into our Ages.
Previously with Blender and the PyPRP Plugin, there was no support for this, and if you wanted to put something like snow, rain, etc into your Age, you had to do a lot of hacking with the PRP files. Anyone that has read my tutorial over in the Blender section for this, knows what I'm talking about.
With Max and Cyan's plugin, it's all point and click.
This tutorial will show you how to put in a simple particle system that you can use for snow fall in your Age. You can also use it for leaves drifting down from trees (like we see in Delin an Kadish).
Other particle systems, for like Rain, steam, smoke, etc are done a little bit different and will be covered under other tutorials.
This tutorial assumes you've set up 3DS Max with Cyan's plugin, and have created an .age file. If you have not done this, please go back to the other tutorials and do it first.
Getting Started......
Okay, so when I decided to give this a try, I thought back to Eder Delin and when I had imported it. What I saw was that there was a "Dummy" point just above the "leaf" plane in that Age labled "SnowParty"
When I started working on this, I had read through Cyan's documentation on Particle Systems and come across this here:
http://assets.openuru.org/wiki/andy/MaxTutPics1/snowpart0.jpg
The part I've circled in red is important. Even though when I imported Delin into Blender, "SnowParty" was represented by a "Dummy" point, it merely meant that the importer imported the object wrongly. Which is okay since importing was not really supported anymore in the GoW Plugin.
However, I ran into another problem which was using "Point Source" as my particle generation (don't worry if you don't know what I'm talking about, it will become clear as you do this tutorial). When I used that, instead of snow falling flurries, I got what looked like a water hose pouring water, heh.
I realized that we have to use "Mesh" for our particle generation. The size of the mesh, along with how many segments it has is what spreads your particles out.
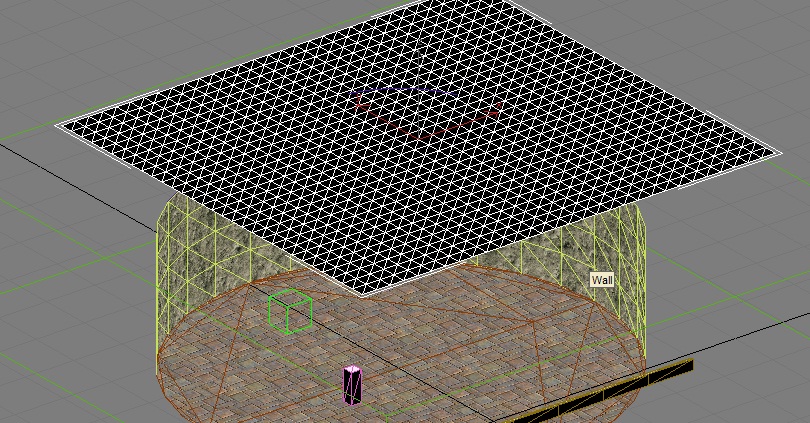
So with that in mind, You need to make a plane mesh over your Age. I made mine here, and gave it 30 width and length segments:
http://assets.openuru.org/wiki/andy/MaxTutPics1/snowpart1.jpg
I also moved it up to the roof.
NOTE: Particles will ignore collision geometry. So they will fall through things. To keep this from happening, you have to make a "Collision Volume Effect" which is not covered under this tutorial.
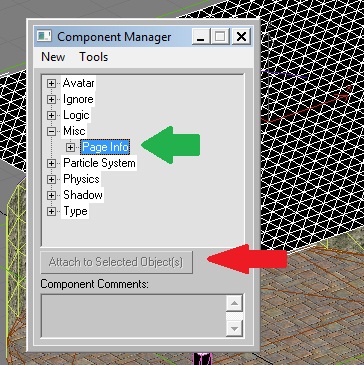
Don't forget to add this mesh to your PageInfo:
http://assets.openuru.org/wiki/andy/MaxTutPics1/snowpart2.jpg
Now, we're going to need a texture for our snow flakes (or if you're doing leaves, you'll need a leaf texture). I've got a snow flake texture here that is from Genetica. It's not the best thing in the world, and I would recommend making one that looks more like a blob than this. Just make sure you give your texture a tranceparent background:
http://assets.openuru.org/wiki/andy/MaxTutPics1/snowflake.png
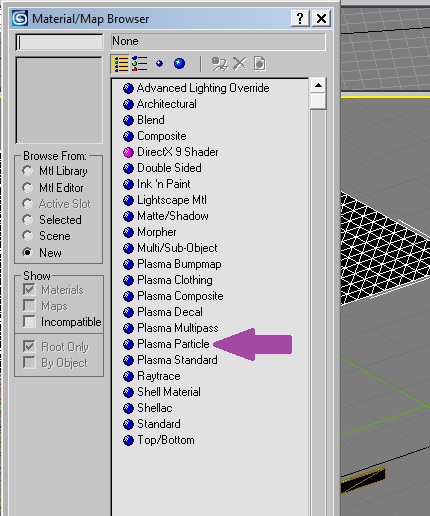
Open up the Material panel by hitting your "M" key, and then select a unused sphere. Then click on the "Standard" button:
http://assets.openuru.org/wiki/andy/MaxTutPics1/snowpart3.jpg
In the new box that pops up, look for "Plasma Particle" and double click on it:
http://assets.openuru.org/wiki/andy/MaxTutPics1/snowpart4.jpg
That should have changed the button that said "Standard" to "Plasma Particle"
Now go down and click on the blank button next to "Texture"
http://assets.openuru.org/wiki/andy/MaxTutPics1/snowpart5.jpg
This will call up a directory tree. Go and select your snowflake texture and open it.
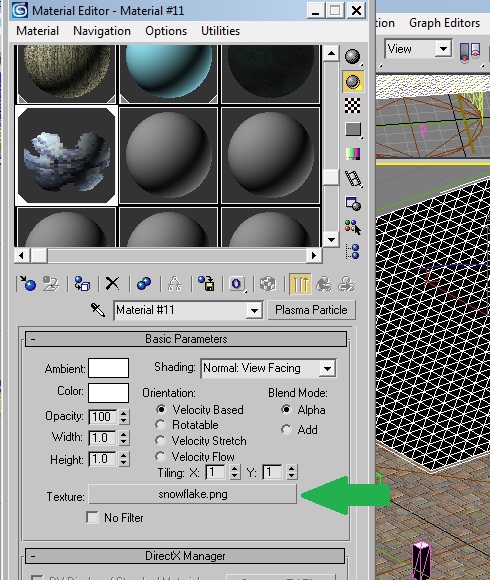
Now in this next picture, look at where I have circled things in purple.
http://assets.openuru.org/wiki/andy/MaxTutPics1/snowpart6.jpg
You'll want to make your snow's ambient color something other than black. Make sure Velocity Based is checked, and Blend Mode is Alpha.
Now you need to click on the drop down box that says "Normal: View Facing" right now:
http://assets.openuru.org/wiki/andy/MaxTutPics1/snowpart7.jpg
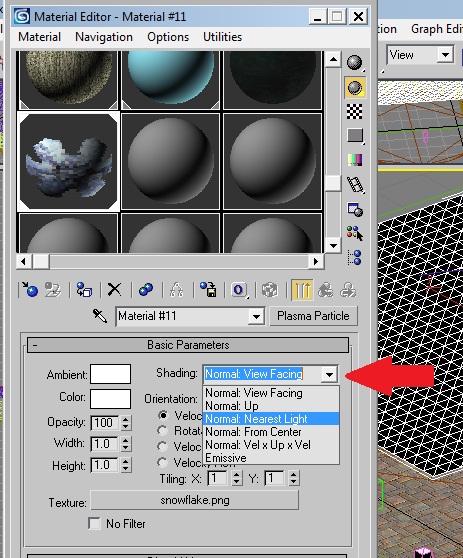
Go down and select Normal: Nearest Light.
If you don't do this....your snowflakes will look black!
Now, assign this material to your plane you made, by either click, drag and dropping it on the plane, or click the Assign Material to Selection button.
Okay, now make sure you still have the plane selected, and call up the Component Manager. Click on New > Particle System > Particle System
http://assets.openuru.org/wiki/andy/MaxTutPics1/snowpart8.jpg
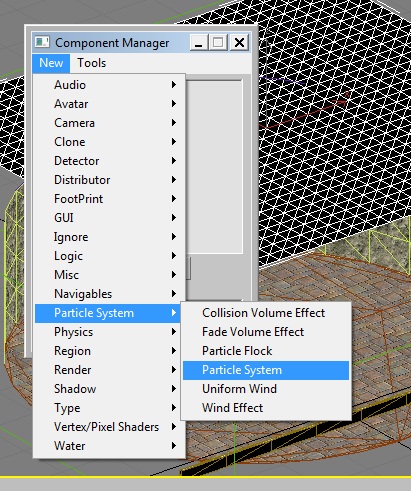
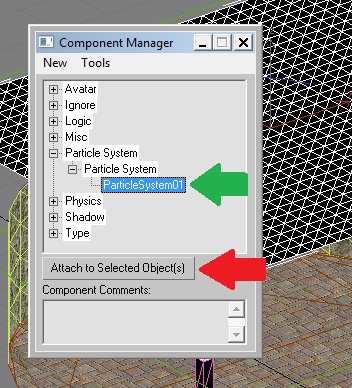
Then select it in the Component Manager and assign it to the plane:
http://assets.openuru.org/wiki/andy/MaxTutPics1/snowpart9.jpg
Now go over to your Utils tab (the little hammer) and select your Particle system. Take a look here:
http://assets.openuru.org/wiki/andy/MaxTutPics1/snowpart10.jpg
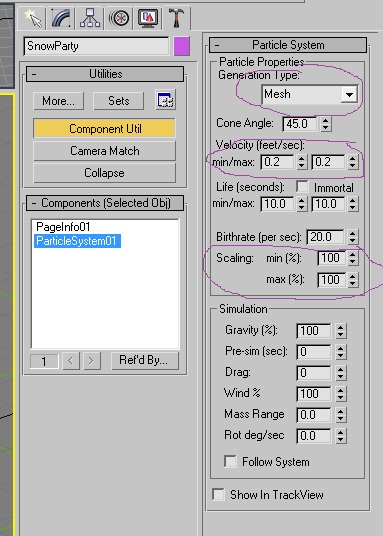
In the drop down box called "Generation Type" click on it and change it from "Point Source" to "Mesh", this is VERY important!
Where I have Velocity circled, you can play here, just keep in mind that this is FEET per second. So a setting of 0.5 would be 6 inches per second.
Where I have Scaling circled, you can play with this too, but keep in mind this: when I had set it to 10, my snow flakes were so small, I couldn't see them! ;)
You can play with the other settings if you want, but that's it, you're done. Export the Age, convert it, and link in:
http://assets.openuru.org/wiki/andy/MaxTutPics1/KIimage0069.jpg
Return To: 3DS Max Plugin Tutorials
A copy of the license is included in the section entitled "GNU Free Documentation License".