In Memoriam: Tai'lahr
OpenUru.org, along with the rest of the Mystonline community, is mourning the loss of Tai'lahr on October 16th, 2019.
Rest in Peace, friend.
Difference between revisions of "Steam and Smoke"
Andylegate (talk | contribs) (Created page with "Doing particles for Smoke, Steam and say rising Mist from a waterfall, are done a little bit different than the particles for say Snow or Rain. The two main differences are: Gra...") |
Andylegate (talk | contribs) |
||
| Line 48: | Line 48: | ||
A directory tree will pop up. You need to select your Smoke, Steam, Mist texture. Here is my "Steam" texture I used. I made a 64 x 64 sized picture with a transparent background, and sprayed it with my Air Brush in Gimp Shop: | A directory tree will pop up. You need to select your Smoke, Steam, Mist texture. Here is my "Steam" texture I used. I made a 64 x 64 sized picture with a transparent background, and sprayed it with my Air Brush in Gimp Shop: | ||
| − | http://assets.openuru.org/wiki/andy/MaxTutPics1/smokepart. | + | http://assets.openuru.org/wiki/andy/MaxTutPics1/smokepart.png Yah, Yah! I know, you don't see anything (that's because this forums background is WHITE too!). Trust me, it's there. |
ONce you've selected your texture, make sure the Alpha is selected. | ONce you've selected your texture, make sure the Alpha is selected. | ||
Revision as of 12:38, 29 July 2011
Doing particles for Smoke, Steam and say rising Mist from a waterfall, are done a little bit different than the particles for say Snow or Rain.
The two main differences are: Gravity needs to be turned off......and instead of a "mesh" as our particle generation, we need to use Point generation.
In this tutorial, I'm going to show you how to make a Steam Leak, like we see in Er'cana in the tunnel.....well, mine won't be quite as good as Cyan's, heh, because I haven't taken the time to really dial in the numbers, but how it's done is still the same.
Make sure you take the time to read through my tutorial on Snow Fall which introduces you to using particles in your Age.
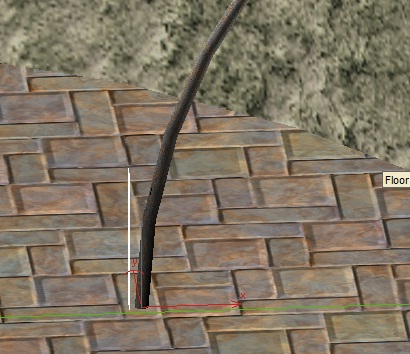
Make A Pipe....
Okay, I quickly made a pipe, bent it, gave it a material and texture, collision and made sure to put in in the PageInfo of the Component Manager:
http://assets.openuru.org/wiki/andy/MaxTutPics1/steampart1.jpg
Next, we need to make a small cube as our "Particle Emitter". Remember, Cyan's documentation says NOT to use a Dummy for a particle emitter.
http://assets.openuru.org/wiki/andy/MaxTutPics1/steampart2.jpg
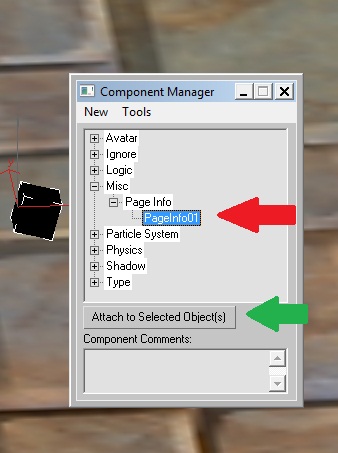
Don't forget to add the emitter you just made to your PageInfo:
http://assets.openuru.org/wiki/andy/MaxTutPics1/steampart3.jpg
Now I made my emitter quite small: 0.5 x 0.5 x 0.5 Max units (which is 6 x 6 x 6 inches). I moved it over to my pipe....but now we have to orientate it just right.
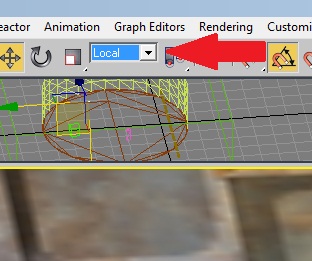
For a Point Source Particle Emitter, you want to rotate your emitter so that they "Z" axis faces AWAY from where the particles will emit. To do this, first go up to your menu and change your "view" to "Local"
http://assets.openuru.org/wiki/andy/MaxTutPics1/steampart4.jpg
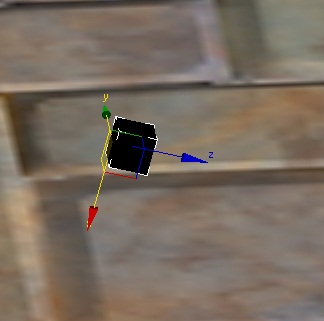
Then rotate the emitter so that the "Z" axis faces AWAY from where your steam will shoot out:
http://assets.openuru.org/wiki/andy/MaxTutPics1/steampart5.jpg
Now we have to add the material and texture to the emitter. I'm going to use the same pics as for Snowfall, as the process is exactly the same:
Call up the Material Editor by hitting you "M" key, select an unused sphere, and hit the "Standard" button:
http://assets.openuru.org/wiki/andy/MaxTutPics1/snowpart3.jpg
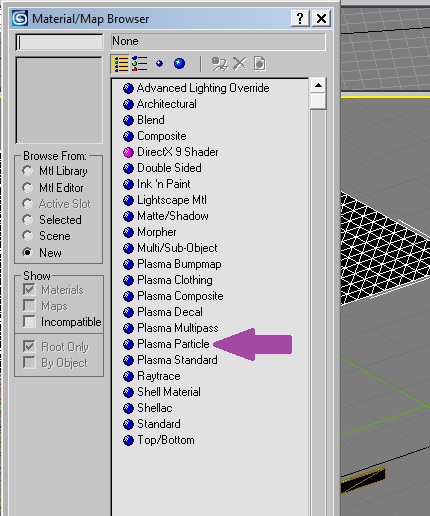
In the box that pops up, double click on "Plasma Particle":
http://assets.openuru.org/wiki/andy/MaxTutPics1/snowpart4.jpg
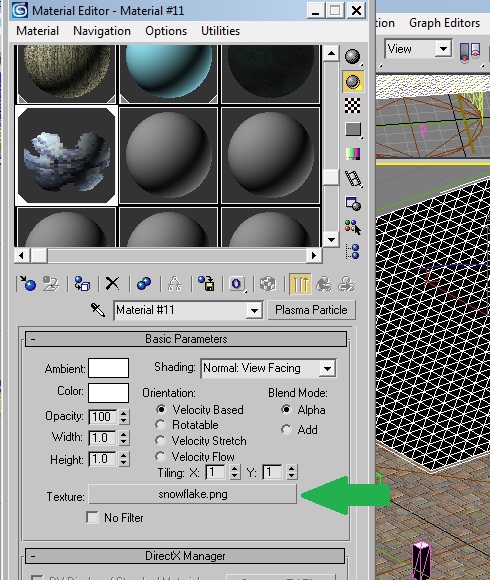
Now the "Standard" button should now say "Plasma Particle", go down and click on the blank button where it says Texture:
http://assets.openuru.org/wiki/andy/MaxTutPics1/snowpart5.jpg
A directory tree will pop up. You need to select your Smoke, Steam, Mist texture. Here is my "Steam" texture I used. I made a 64 x 64 sized picture with a transparent background, and sprayed it with my Air Brush in Gimp Shop:
http://assets.openuru.org/wiki/andy/MaxTutPics1/smokepart.png Yah, Yah! I know, you don't see anything (that's because this forums background is WHITE too!). Trust me, it's there.
ONce you've selected your texture, make sure the Alpha is selected.
http://assets.openuru.org/wiki/andy/MaxTutPics1/snowpart6.jpg
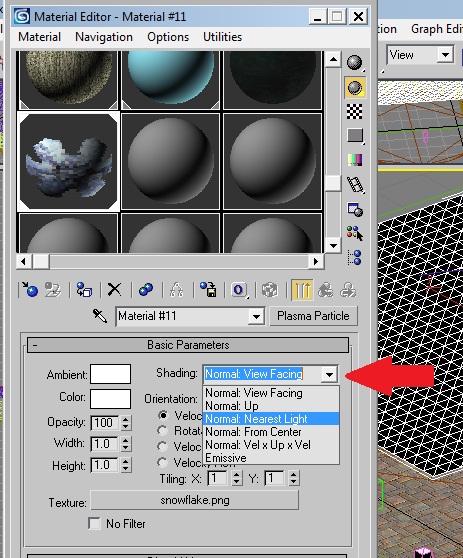
Then go up and click on the drop down box that says "Normal: View Facing" and change it to "Normal: Nearest Light" (if you don't...your steam will look black"
http://assets.openuru.org/wiki/andy/MaxTutPics1/snowpart7.jpg
Now assign the material to our emitter by either click, drag and dropping it on the emitter mesh, or by clicking on the Assign To Selection button.
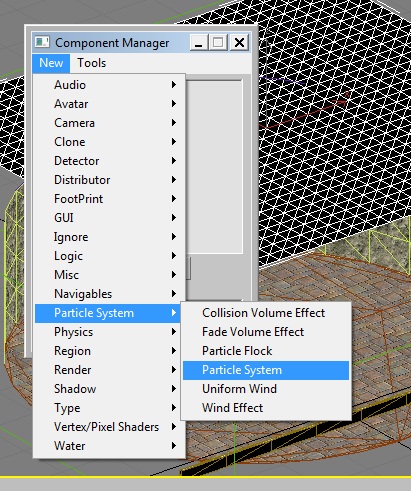
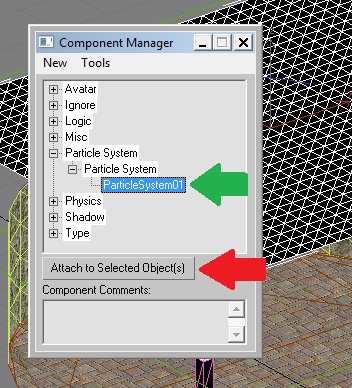
Now, with the emitter still selected, call up the Component Manager. Click on New > Particle System > Particle System:
http://assets.openuru.org/wiki/andy/MaxTutPics1/snowpart8.jpg
Make sure you attach the emitter to the Particle System:
http://assets.openuru.org/wiki/andy/MaxTutPics1/snowpart9.jpg
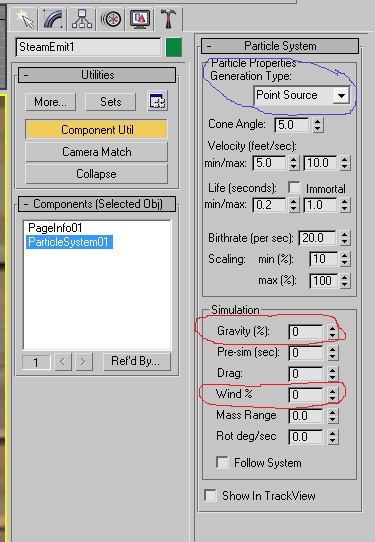
Now go over to your Utils Tab (the little hammer), and select Component Util button, and the Particle System:
http://assets.openuru.org/wiki/andy/MaxTutPics1/steampart6.jpg
Okay, a LOT to discuss here:
Where I have circled the drop down box in Blue, make sure it says "Point Source"
Where I have circled in red, (Gravity and Wind), you need to make the values 0, or very low. If you don't on the Gravity, instead of Steam shooting out, it will look like water pouring out of the hose and on to the ground. The Wind left at 100 will have the steam stream moving all around.
Now for the other number: you can set them as you see in my picture, export the Age and take a look. As you can see, it's not perfect, but it's in the ball park. I spent several hours playing with the numbers and can tell you the following:
For "Cone Angle" the default of 45 degrees most likely will work fine for smoke rising from the ground, or mist from your waterfall, but for steam shooting out of a pipe, you'll want to make it smaller. I found that 5 degrees works pretty good.
For Min/Max Velocity, I have NO idea why the default is 50 feet per second for both. That's INSANE as that's almost 35 Mph! I have mine set to 5 and 10 feet/sec....for smoke and mist rising slowly, you'll want to make those numbers even smaller.
Life(seconds) is how long the particles last in view. The longer this number, coupled with the faster the velocity, and you'll have your steam shooting 100 feet! So keep the numbers low if possible.
Birthrate: this is how often particles are emitted. Default is 20 per second, and I've left it there for steam shooting out of a pipe. You might want to change this for smoke and mist slowly rising.
Scaling %: this is how big the particles are. I was trying to make them small coming out and expanding larger. Play around with these number.
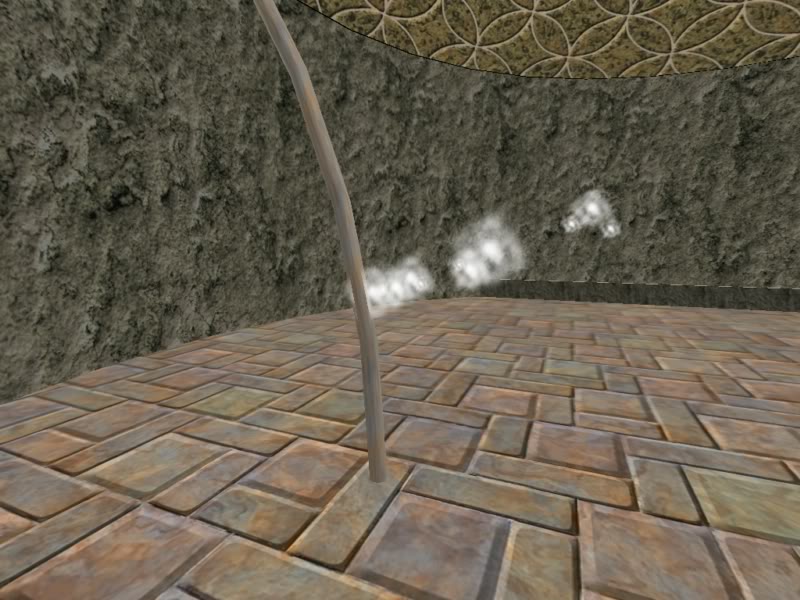
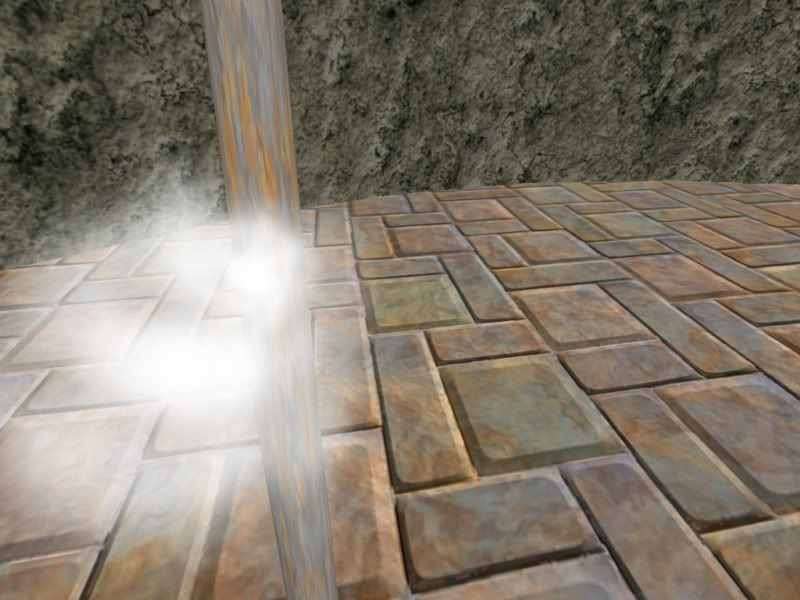
So that's it, keep refining your numbers and technique:
http://assets.openuru.org/wiki/andy/MaxTutPics1/KIimage0071.jpg
http://assets.openuru.org/wiki/andy/MaxTutPics1/KIimage0073.jpg
Return To: 3DS Max Plugin Tutorials
A copy of the license is included in the section entitled "GNU Free Documentation License".