In Memoriam: Tai'lahr
OpenUru.org, along with the rest of the Mystonline community, is mourning the loss of Tai'lahr on October 16th, 2019.
Rest in Peace, friend.
Difference between revisions of "Wavesets: Reflective, Ripply Water"
Andylegate (talk | contribs) |
m (Remove HR) |
||
| Line 137: | Line 137: | ||
http://assets.openuru.org/wiki/andy/MaxTutPics1/showinggow.jpg | http://assets.openuru.org/wiki/andy/MaxTutPics1/showinggow.jpg | ||
| − | |||
{{ALTutorials}} | {{ALTutorials}} | ||
Latest revision as of 16:14, 29 July 2011
Wave Sets are one of the most complex things in Uru to make. While Cyan's plugin allows for almost all pick and click to apply settings, it's still just as complex to make a Wave Set in Max as it was in Blender.
While I've learned a BIG chunk on how to make them in Max, this tutorial is by no means the absolute authority on this subject. There are some settings I don't understand completely, and things that still need to be figured out. However, by following this tutorial, you can make a wave set for your Age.
Some Things Never Change......
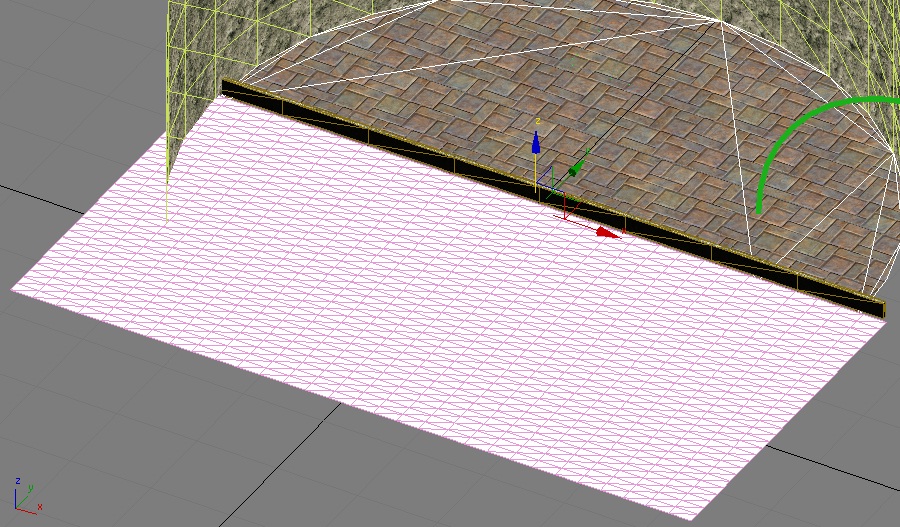
Back in Blender, to make a wave set, you had to create a plane, either by duplicating the bottom of your pond/lakebed/ocean or pool faces, or by creating a simple plane with a lot of faces on it.
Then we had to move the center of the plane up, off the plane and put it where we wanted the surface of the water to be.
This has not changed at all. You still need to do this in Max. Here I've created a simple plane (you'll more than likely want yours to fit your Age better), and gave it quite a few faces. 30 x 30 as a matter of fact. I've found the more faces you make, the more ripples in your wave set and better defined they'll be. Cyan also does this if you look at some of their more wave sets like Ahonay and Teledahn.
http://assets.openuru.org/wiki/andy/MaxTutPics1/wavemax1.jpg
As I said, just making the plane is not enough, you have to position it near the bottom of your pool/pond/lake and then move the center up to where the surface of the water actually needs to be.
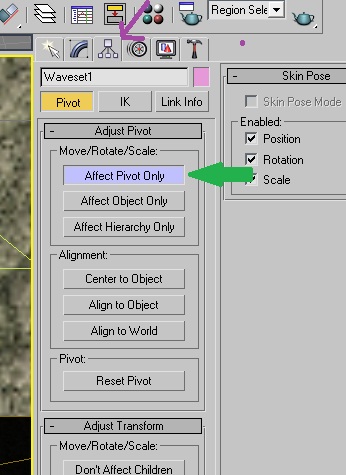
I say "Center" as that's what we call it in Blender. In Max, it's called the "Pivot Point"
Once you have the plane where you need it, go over to your tool bar and click on the "Hierarchy" tab. Look at my pic below:
http://assets.openuru.org/wiki/andy/MaxTutPics1/wavemax2.jpg
click where i have my green arrow, as we just want to move the plane's pivot point.
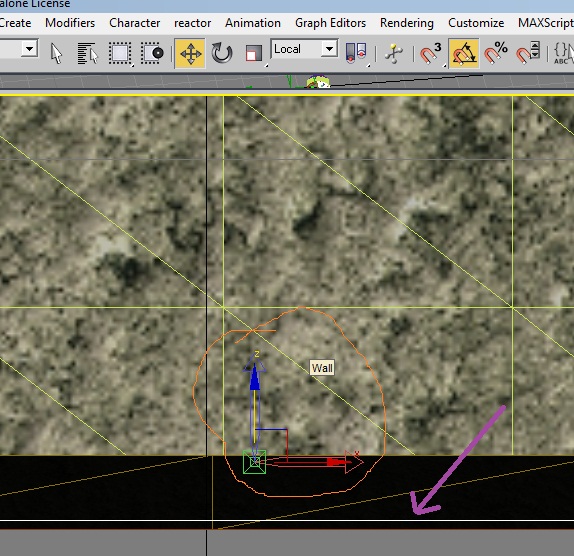
Then make sure you are in "Local" view, and use the "Move Gizmo" to place your "Pivot Point" where it needs to be:
(In the pic below, my purple arrow is showing where the wave set plane is. The orange circle is showing the Pivot Point being moved up to where the surface of the water is going to be. )
http://assets.openuru.org/wiki/andy/MaxTutPics1/wavemax3.jpg
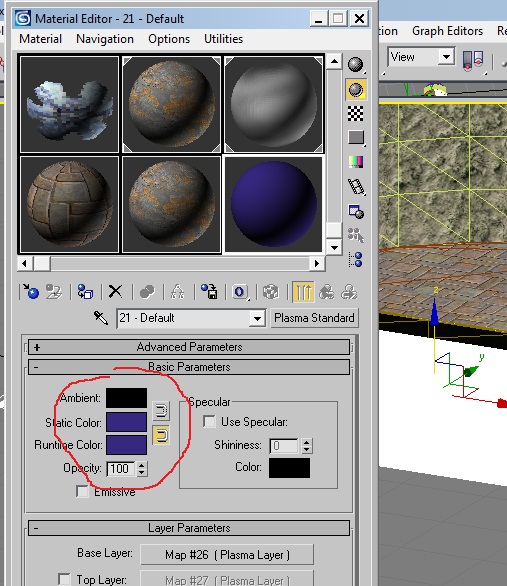
Now we need to give the Wave Set a material. Call up the Material Editor by hitting your "M" key. Select a new material by clicking on one of the empty grey spheres. Make sure you click on the Standard button and change it to Plasma Standard.
http://assets.openuru.org/wiki/andy/MaxTutPics1/wavemax4.jpg
You'll also want to change the color to what color you want your water to be, keeping in mind whatever color you pick, it will be rendered VERY lightly with that color.
Next, click on the Base Layer for your Plasma Map Layer (where we normally pick a texture). Instead of a texture, scroll down to "Coordinates"
http://assets.openuru.org/wiki/andy/MaxTutPics1/wavemax5.jpg
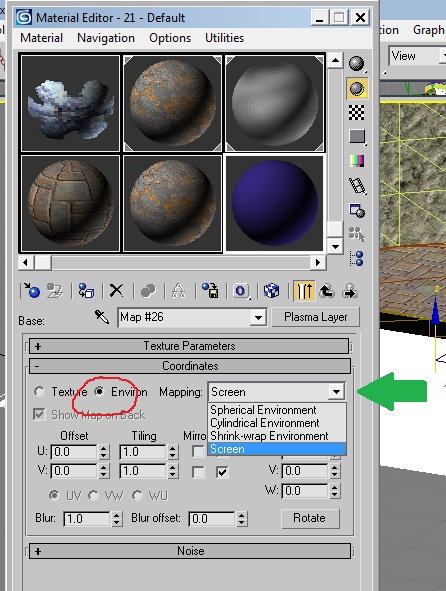
As you can see, I've selected to have a Enviorment map. In the drop down box, it defaults to "Screen" and I've had the best luck with that, but you do have other choices you can try.
Once you've done that, don't forget to assign the material to the wave set.
Also do not forget to attach the wave set to the PageInfo in the Component Manager.
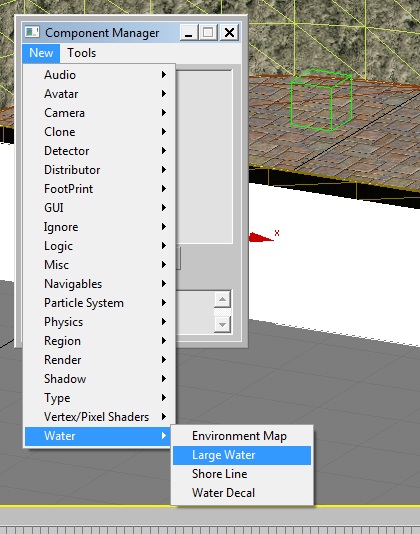
Since we have the Component Manager called up, it's time to start attaching other things to the Wave Set.
First click on New > Water > Large Water
http://assets.openuru.org/wiki/andy/MaxTutPics1/wavemax6.jpg
Now attach it to your wave set:
http://assets.openuru.org/wiki/andy/MaxTutPics1/wavemax7.jpg
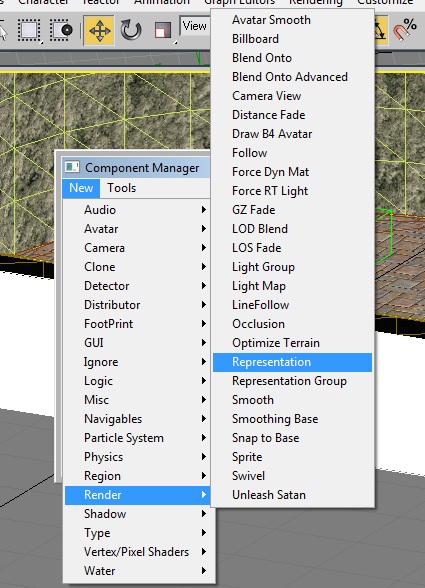
Now click on New > Render > Representation:
http://assets.openuru.org/wiki/andy/MaxTutPics1/wavemax8.jpg
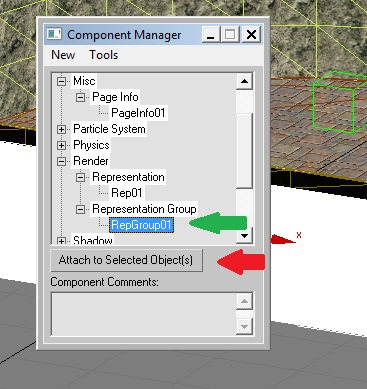
And attach it also to the wave set:
http://assets.openuru.org/wiki/andy/MaxTutPics1/wavemax9.jpg
Then click on New > Render > Representation Group:
http://assets.openuru.org/wiki/andy/MaxTutPics1/wavemax10.jpg
And attach it also to the wave set:
http://assets.openuru.org/wiki/andy/MaxTutPics1/wavemax11.jpg
Now you can close your Component Manager and go over to your Utils Tab (the little hammer). Click on the Component Util button, and select your Representation:
http://assets.openuru.org/wiki/andy/MaxTutPics1/wavemax12.jpg
The box below shows "Low" as the lowest quality. Leave it at that.
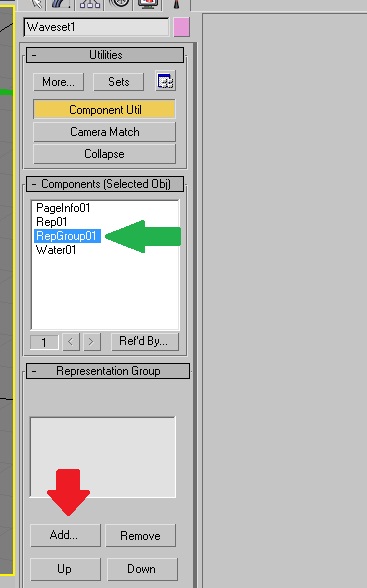
Now select your Representation Group (green arrow) and click on the "Add" button (red arrow):
http://assets.openuru.org/wiki/andy/MaxTutPics1/wavemax13.jpg
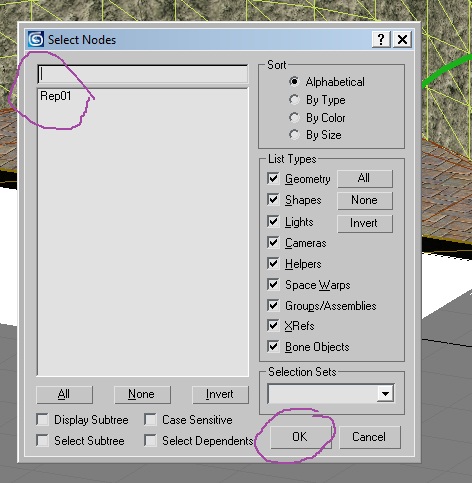
In the box that pops up, click on your Representation, and then click on the "OK" button:
http://assets.openuru.org/wiki/andy/MaxTutPics1/wavemax14.jpg
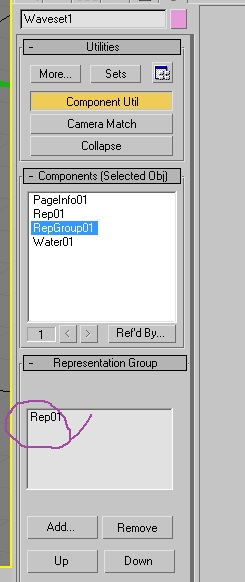
You should see it in your Representation Group now:
http://assets.openuru.org/wiki/andy/MaxTutPics1/wavemax15.jpg
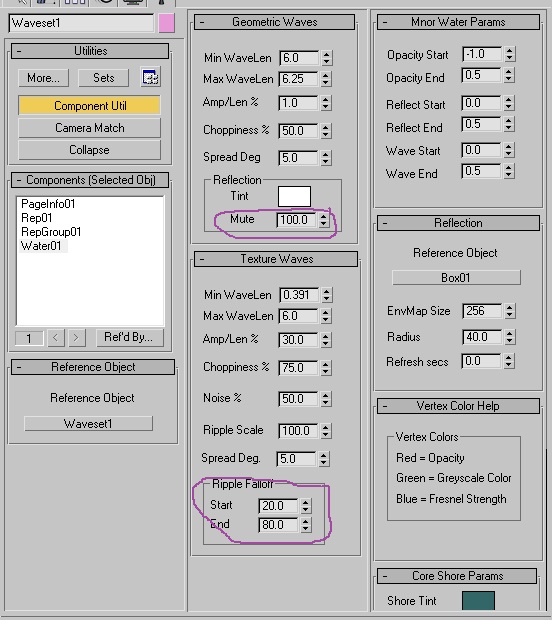
Now click on your Water:
http://assets.openuru.org/wiki/andy/MaxTutPics1/wavemax16.jpg
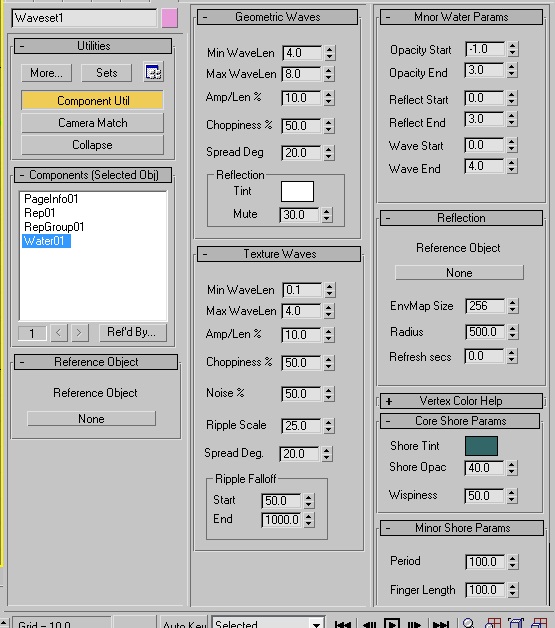
Please remain calm at this point....there are a LOT of things here that you are going to be having to mess with.
First I'd like to point out a couple of things: if you look at Amp/Len %, Noise %, etc, all those settings you see with "%" next to them.......if you used Blender before to make Wave Sets, you'll recognize the terms....but there is a important difference. Look at the pic below:
http://assets.openuru.org/wiki/andy/MaxTutPics1/wavemax17.jpg
This is what the ALCScripting in Blender looked like for making Wave Sets. Basically the same thing we're seeing in our panel here in Max. However, the numbers set in Blender, were the "DIGITAL" representations of percentages. So if you had Noise let's say set to 0.5 in Blender, that would be 50% in Max. Got it? Good.
Now let's go back to Max and our panel here:
http://assets.openuru.org/wiki/andy/MaxTutPics1/wavemax16.jpg
The values that you see in the picture above is what the default values are. You are going to want to change some of these. I'm not going to go into what each and everyone does, but I will talk about some that will have dramatic affects on your wave sets.
Under "Geometric Waves":
Geometric Waves are waves that will make the entire wave set mesh ripple. I don't mean the small ripples, but the entire mesh. If you set high values here, it will look like your Age is having an earthquake, causing your large volume of water to slosh around.
I've found that Min/Max WaveLen is good to set to 6.0(min) to 6.25(max) Amp/Len %, the default value of 10% is quite high. I'd set this to 1.0% or less.
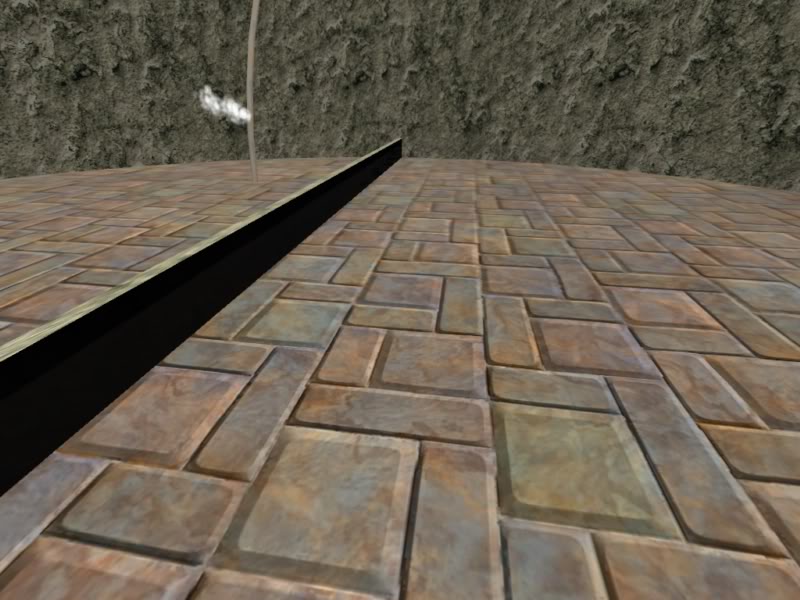
"Mute" is the most important one. Default is 30, but it will have a dramatic affect on how "dark" your water looks. 10 will make the water look almost non-existant:
http://assets.openuru.org/wiki/andy/MaxTutPics1/KIimage0077.jpg
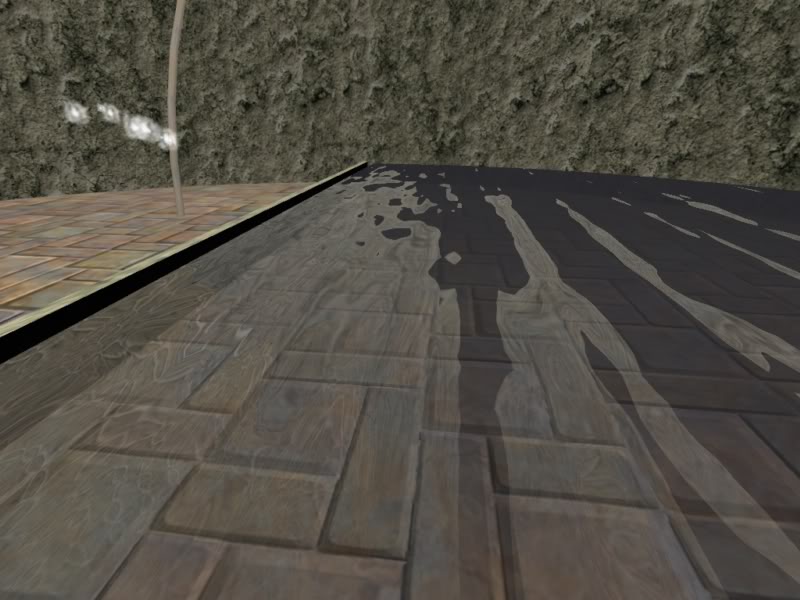
Where as setting Mute to 100 will give you this look:
http://assets.openuru.org/wiki/andy/MaxTutPics1/KIimage0078.jpg
Under "Reflection" you have a button. Click on it, and then click on the nearest object to the center of your wave set, be it a rock, the shore, a wall, whatever.
You can then play with the numbers, but I'd leave the EnvMap Size at 256. Radius should be set to the same radius as your wave set. Referesh: it's set to 0.0. This is the number of seconds that the reflections are refreshed. I would leave it set to 0.0, as anything else will cause the avatar to reflect in the wave set when in 3rd Person mode. While that sounds cool, it's buggy and your avatar will not always display correctly.
Go to the "Reference Object" box. I'm not EXACTLY sure what this does, however, I click on the button and then click on the wave set mesh. It works for me, so hopefully it will work for you too.
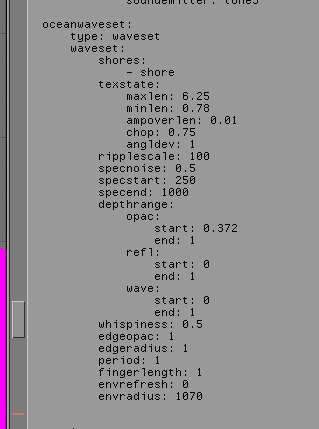
Here is a pic of the values I used in my little test Age. You'll have to play with the numbers for your own wave set to get your ripples right:
http://assets.openuru.org/wiki/andy/MaxTutPics1/showinggow.jpg
Return To: 3DS Max Plugin Tutorials
A copy of the license is included in the section entitled "GNU Free Documentation License".