In Memoriam: Tai'lahr
OpenUru.org, along with the rest of the Mystonline community, is mourning the loss of Tai'lahr on October 16th, 2019.
Rest in Peace, friend.
Difference between revisions of "Wireshark Guide for Minkata Shard"
(Created page with "{{draft}} Getting Started with Wireshark: A quick guide on how to use Wireshark to collect network packet data to help diagnose problems with the Minkata Shard. == Get the t...") |
(Added (interim) images) |
||
| Line 9: | Line 9: | ||
You should now have a desktop icon for Wireshark: | You should now have a desktop icon for Wireshark: | ||
| − | + | http://assets.openuru.org/wiki/wireshark/ws-icon.png | |
| + | |||
Double click this to run Wireshark. It'll probably take several seconds to initialise, so be patient. | Double click this to run Wireshark. It'll probably take several seconds to initialise, so be patient. | ||
| Line 18: | Line 19: | ||
Once the main window appears click on the <code>Show the Capture Options</code> button, highlighted below | Once the main window appears click on the <code>Show the Capture Options</code> button, highlighted below | ||
| − | + | http://assets.openuru.org/wiki/wireshark/cap-opt.png | |
| + | |||
| − | Now, using the image below as a guide, set the following options: | + | Now, using the image below as a guide, set the following options (note that the Capture Filter settings shown in the image below are for MOULagain - for Minkata use the setting detailed in the notes below the image): |
| − | + | http://assets.openuru.org/wiki/wireshark/setup2.png | |
| Line 33: | Line 35: | ||
'''Capture Filter:''' Don't click the button, just type the following text into the box, as shown in the image above: | '''Capture Filter:''' Don't click the button, just type the following text into the box, as shown in the image above: | ||
| − | + | ::<code>net 70.91.173.0 mask 255.255.255.0</code> | |
'''Capture File(s):''' Click on the Browse button and when the file selection window appears, type in a suitable name (using the extension <code>.pcap</code> to ensure that the file is associated with Wireshark, but that's not essential), then click on "Browse for other folders" and select a suitable folder for the log file. | '''Capture File(s):''' Click on the Browse button and when the file selection window appears, type in a suitable name (using the extension <code>.pcap</code> to ensure that the file is associated with Wireshark, but that's not essential), then click on "Browse for other folders" and select a suitable folder for the log file. | ||
| − | + | http://assets.openuru.org/wiki/wireshark/files.png | |
| + | |||
Click on <code>OK</code> to accept the file details. | Click on <code>OK</code> to accept the file details. | ||
| Line 52: | Line 55: | ||
about what it all means just now: | about what it all means just now: | ||
| − | + | http://assets.openuru.org/wiki/wireshark/sample.png | |
| + | |||
== Send off the data == | == Send off the data == | ||
Revision as of 15:50, 27 November 2012
The content of this page is a "work-in-progress" and is subject to change. Do not place undue reliance on the completeness or accuracy of the material presented here!
Getting Started with Wireshark: A quick guide on how to use Wireshark to collect network packet data to help diagnose problems with the Minkata Shard.
Get the tools
Download Wireshark from www.wireshark.org, and install. This installation includes the WinPCap packet capture service. Pay attention to the instructions, particularly if you already have an older version of WinPCap installed on your PC, in which case you may need to reboot your PC to complete the removal of the old service.
Setup the capture
You should now have a desktop icon for Wireshark:
http://assets.openuru.org/wiki/wireshark/ws-icon.png
Double click this to run Wireshark. It'll probably take several seconds to initialise, so be patient.
Note that some of the images used in this guide are from an older version of Wireshark: The screens you see may vary slightly from the ones shown, but the essential details should be similar.
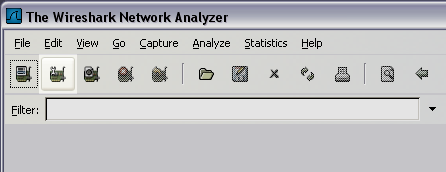
Once the main window appears click on the Show the Capture Options button, highlighted below
http://assets.openuru.org/wiki/wireshark/cap-opt.png
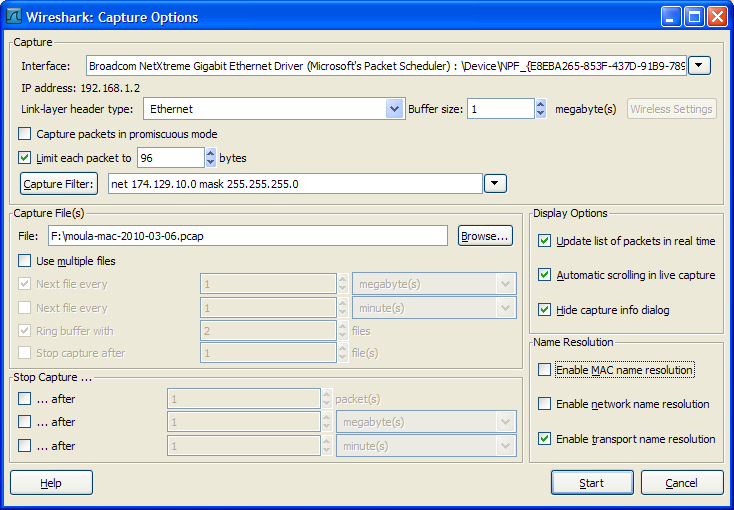
Now, using the image below as a guide, set the following options (note that the Capture Filter settings shown in the image below are for MOULagain - for Minkata use the setting detailed in the notes below the image):
http://assets.openuru.org/wiki/wireshark/setup2.png
Interface: Drop down the list a select the interface you use to connect to the internet. You may only have one entry in the list here, in which case that's fine, but if you've also got a dial-up modem or wired and wireless LAN adapter in your PC, then you'll need to select the correct
device here.
Capture packets in promiscuous mode: Untick this box, so we don't capture data from other PCs in your network - setting the filter below should prevent this anyway, but just in case.
Limit each packet to: Tick the box, and set the value to 96 (the value doesn't matter that much, it just helps to save disk space if we don't actually need to see whole data in every packet).
Capture Filter: Don't click the button, just type the following text into the box, as shown in the image above:
net 70.91.173.0 mask 255.255.255.0
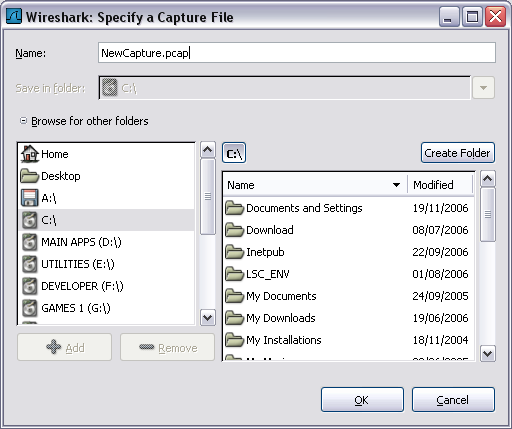
Capture File(s): Click on the Browse button and when the file selection window appears, type in a suitable name (using the extension .pcap to ensure that the file is associated with Wireshark, but that's not essential), then click on "Browse for other folders" and select a suitable folder for the log file.
http://assets.openuru.org/wiki/wireshark/files.png
Click on OK to accept the file details.
Name Resolution: We're not really interested in finding the names of the source and destination machines, so keep things simple and untick the Enable Mac name resolution and Enable network name resoultion boxes.
We're now ready to start the capture.
Start Myst Online
Run the Myst Online launcher, and go through the login procedure, and get to the point where you want to start capturing data. Use ALT+TAB to flip back to Windows/Wireshark and click on Start and you should see the screen start to fill with data, possibly quite slowly. Return to Uru and continue playing until the event you wanted to record has happened.
Stop the capture
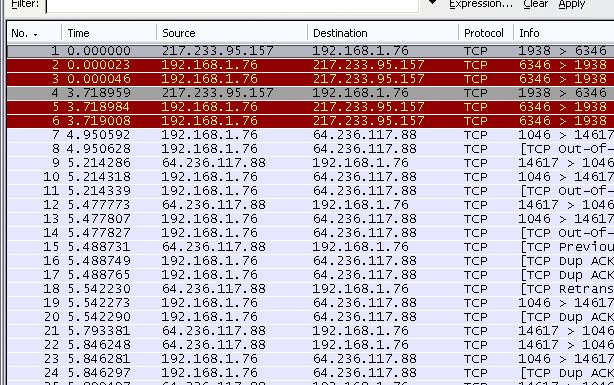
Use ALT+TAB to flip back to Windows/Wireshark and click the "Stop" button (fourth icon from left on the toolbar) or use the menu option: Capture -> Stop. You'll end up with a window filled with packet details similar to that below - Don't worry
about what it all means just now:
http://assets.openuru.org/wiki/wireshark/sample.png
Send off the data
Once you are done, close down Wireshark, locate the log file and send it off to be analysed. It's best if you can zip or rar the file first then e-mail to ian-uru@mcintoshuk.plus.com.
And that's it!